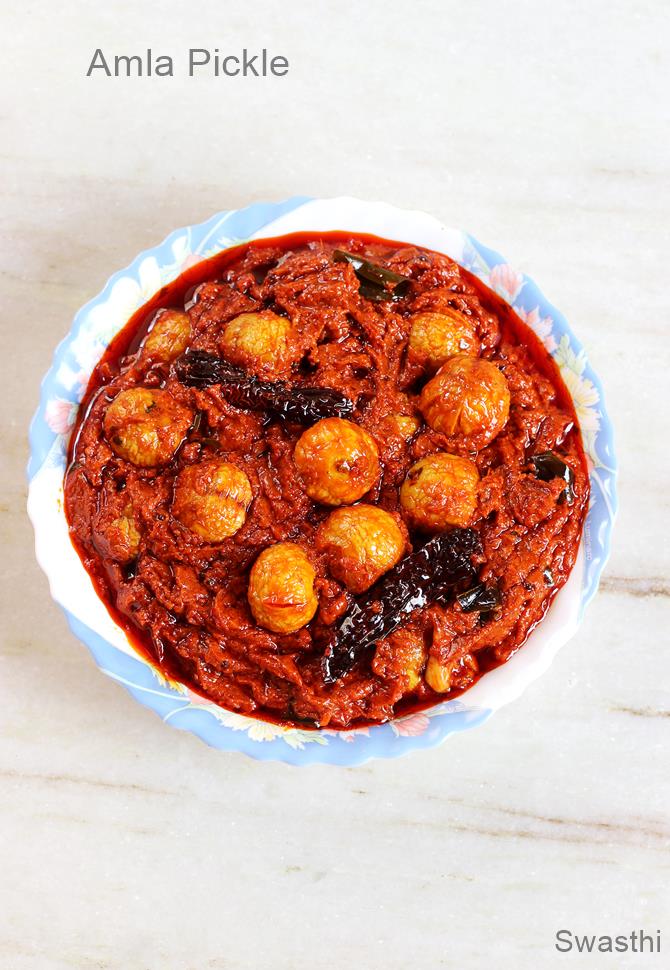
Amla Pickle (3 Ways to Make)
Updated: May 26, 2025, By Swasthi
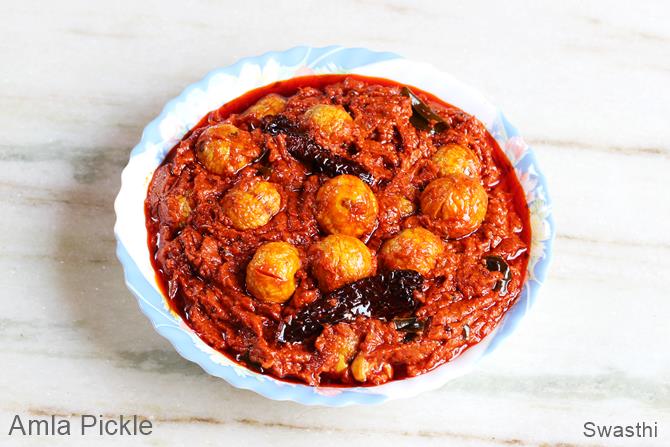
Amla Pickle Recipe – Amla is the Indian name for Gooseberry and is used in various preparations in Indian cuisine. I have shared 3 Amla pickle recipes in this post. Both the recipes are from my Mom and are made in Andhra style. The first one is a quick and easy Amla pickle recipe made in just 15 minutes. It is called as Usiri Avakaya & is usually made during the winters when Amla are in season.
The second one is a classic pickle from my Mom’s recipe collection and is known as Nilava Usirikaya Pachadi. The third one is a traditional preserve that keeps good for an year. This one is believed to be an immune booster since it involves no cooking.
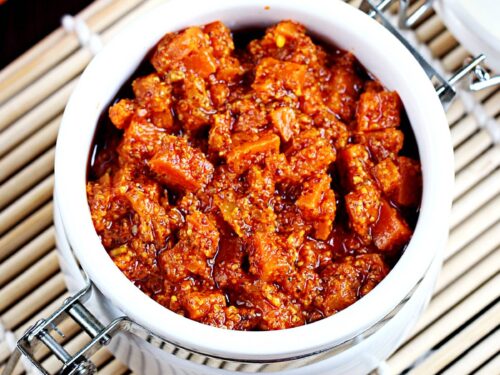
There are a few different ways an andhra style amla pickle is made, this first one is similar to the mango avakaya. It can be eaten with plain rice, dosa or paratha. I prefer to make pickles in small quantities so they taste and smell fresh. I had made this amla pickle with just 10 medium sized ones. You can easily double or triple the recipe.
Table of contents
Choose amla that are firm and fresh, this keeps the pickle good for longer time. This amla avakaya is just an instant version which doesn’t stay good for an year.
For more instant Pickle recipes, you may check
Mango pickle
Instant tomato pickle
Tomato pickle
Carrot pickle
Photo Guide
How to Make Amla Pickle 1 (Stepwise photos)
Recipe 1
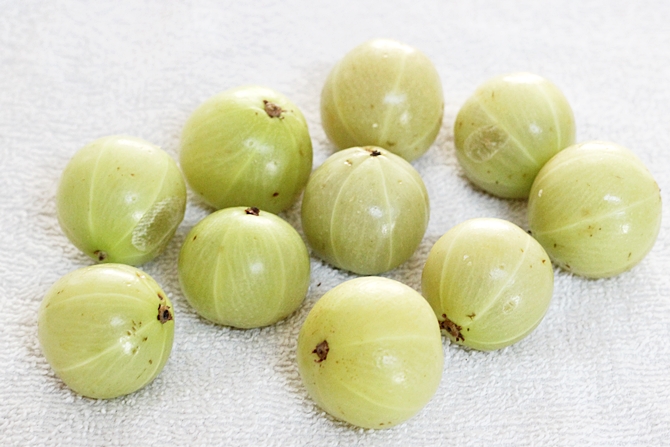
1. Wash amla, wipe them dry with a cloth or tissue. Make few incisions on each amla, else they may burst while sauteing in oil. You can also chop them to pieces. Remove any discolored portions. Wash a lemon and wipe it dry as well. Make sure all the spoons and pots used are moisture free.
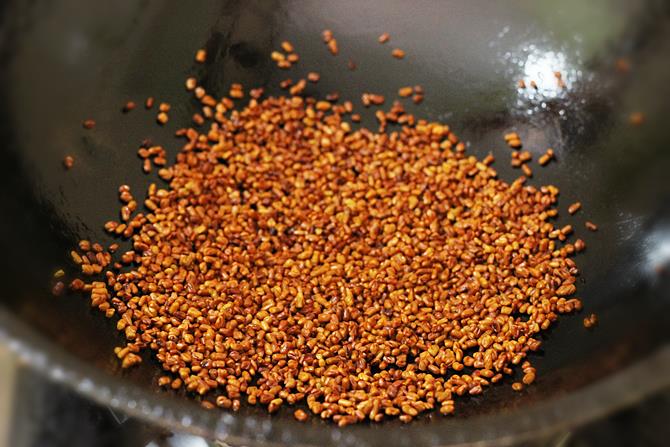
2. Powder 2 tsps of mustard and a generous pinch of methi seeds to a fine powder in a mixer jar. If your mixer/ blender cannot do little quantity, then you can also add red chilli powder and salt to the jar. Run the mixer.
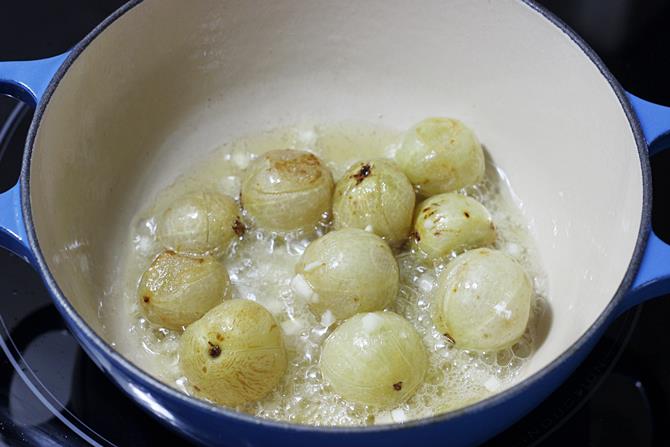
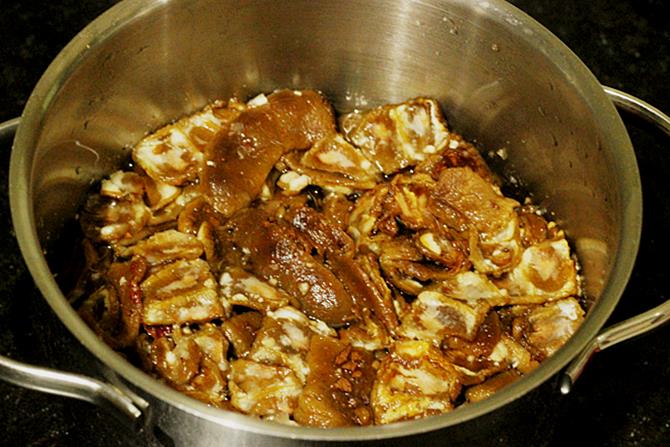
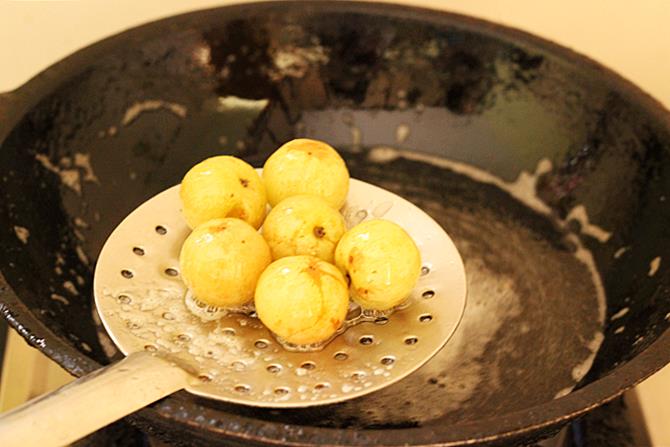
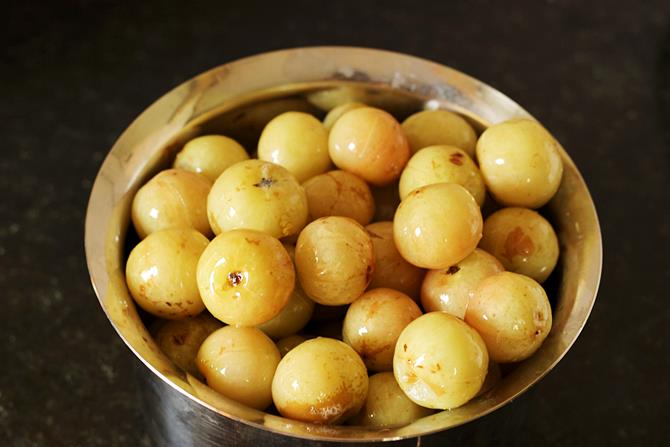
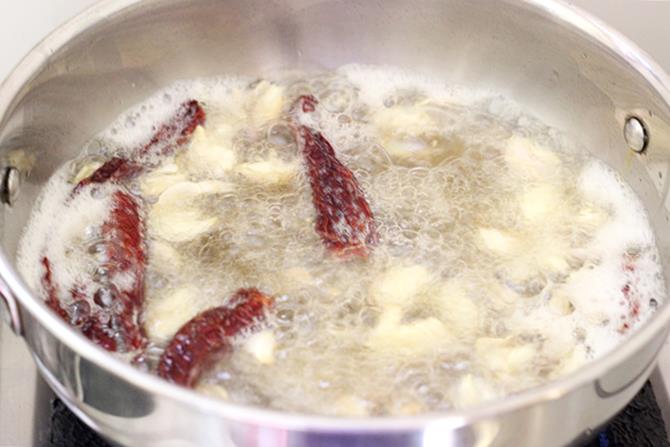
3. Heat oil in a deep pan. Fry the amla on a medium heat just until they turn lightly golden. Add garlic to this. Switch off the stove. Cool down a bit.
4. While the oil is still hot, add all the spice powders.
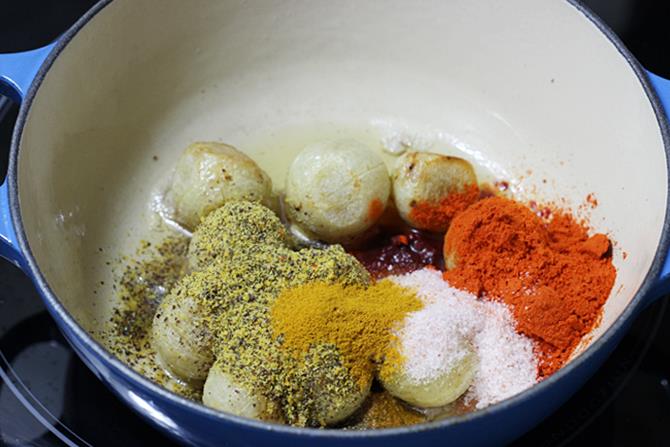
5. Mix everything well.
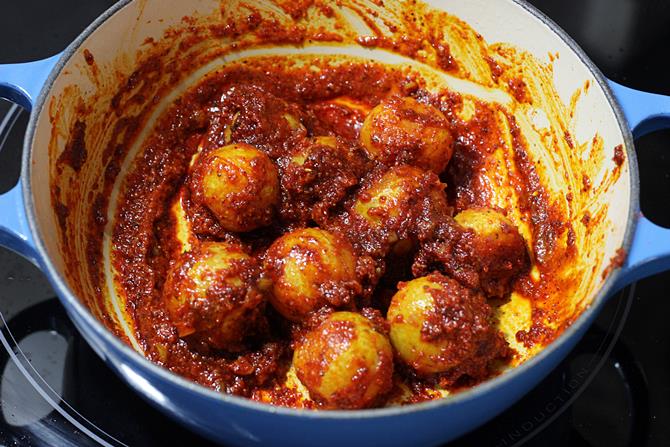
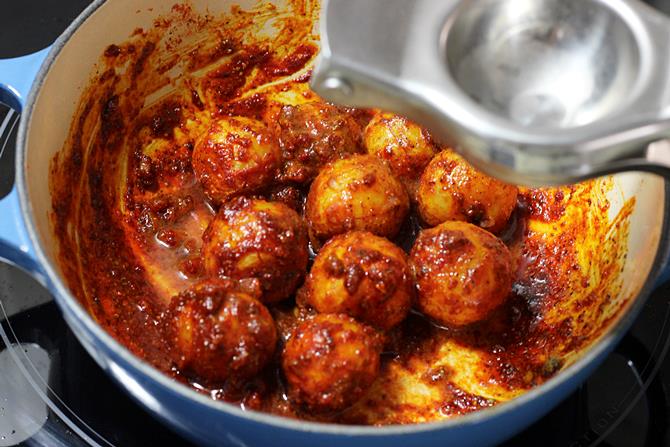
6. Cool the mixture completely, then add lemon juice. Do not skip lemon juice here, it is used to remove the pungent taste of amla. Mix well and check the salt and sourness. Store this in a glass jar.
After 2 to 3 days, You will see the amla have released some moisture. Mix well with a dry spoon. If needed add more oil, salt and lemon juice. If it looks dry, add in more oil. We prefer our pickles a bit oily since we are not on low fat diet. If you like to make it with less oil, use as needed.
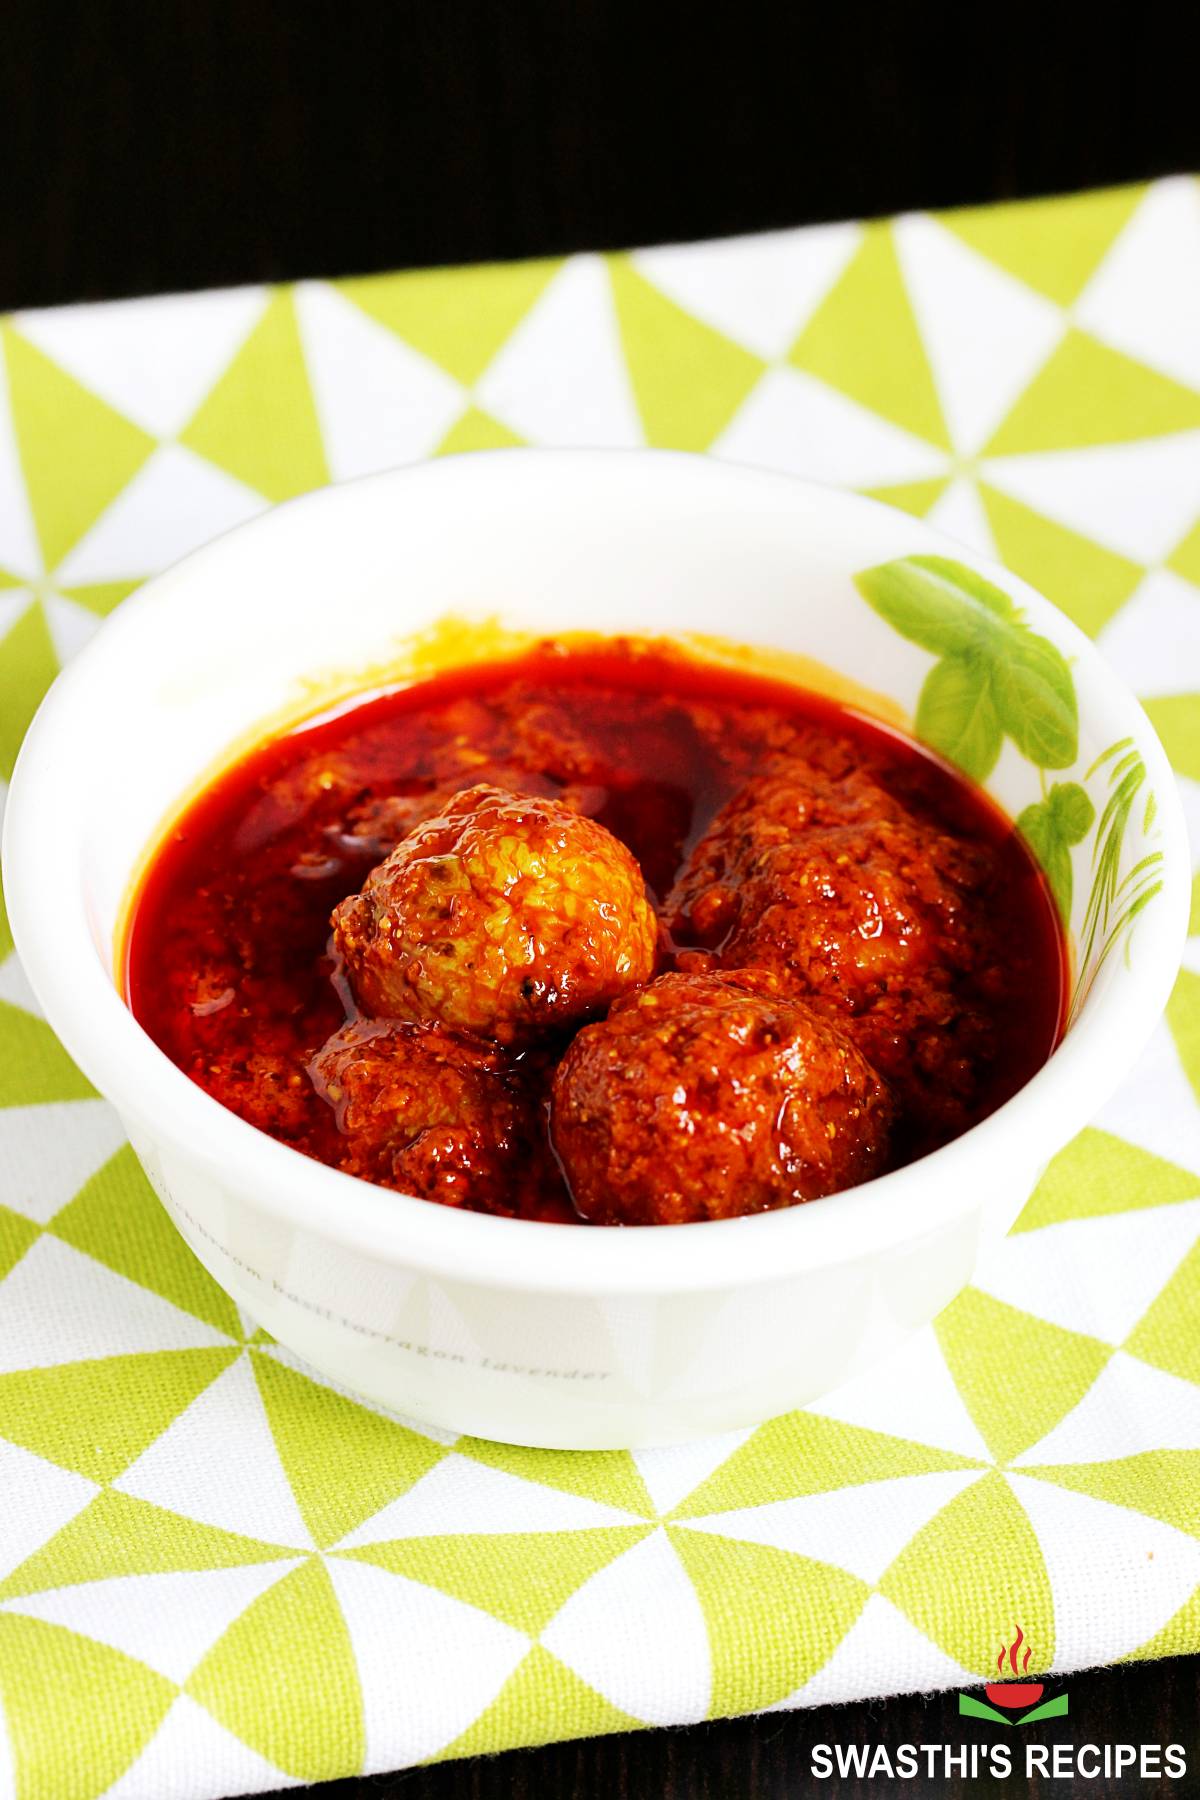
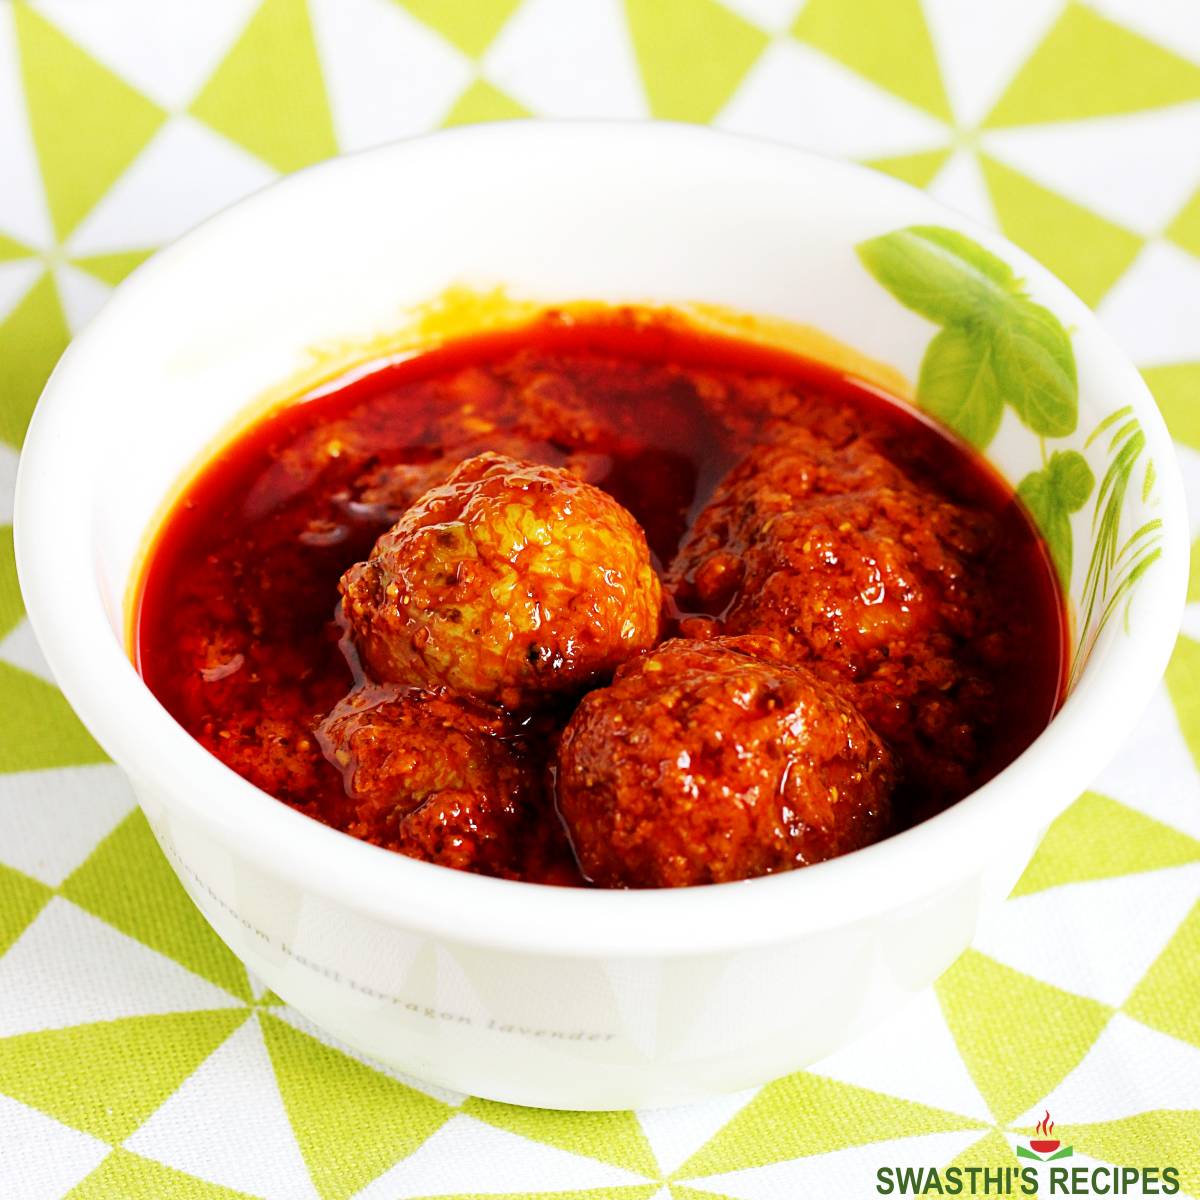
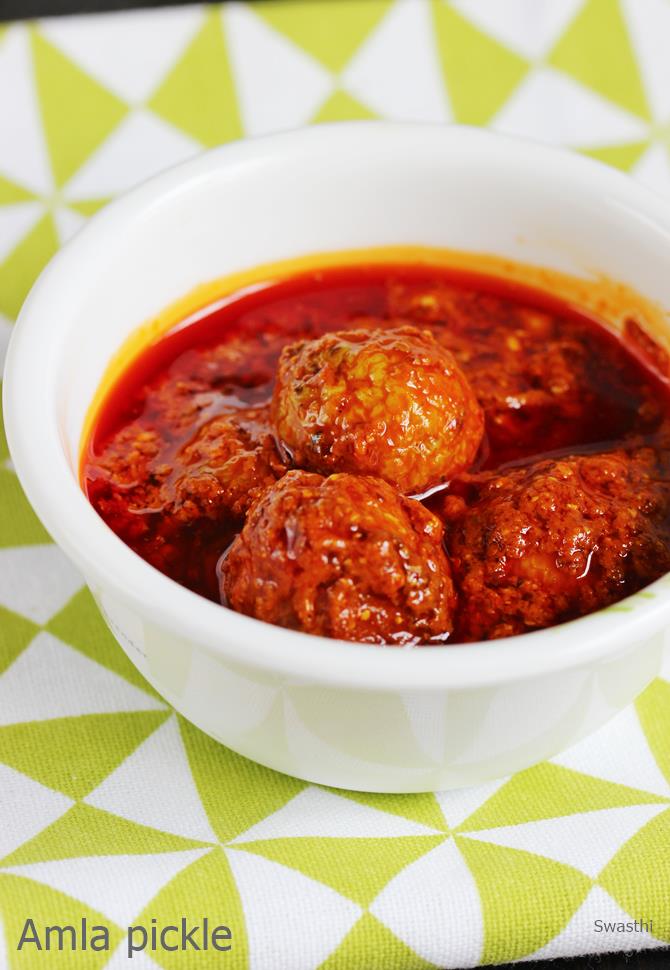
Store amla pickle in glass jar and serve with rice, dosa or paratha.
Related Recipes
Recipe Card 1 (Usiri Avakaya)

Amla Pickle Recipe
For best results follow the step-by-step photos above the recipe card
Ingredients (US cup = 240ml )
- 10 amla large, about 150 grams
- 2 teaspoons mustard
- 1 pinch methi seeds
- 1 teaspoon salt + more
- 4 tablespoons oil
- 1 lemon large , about 3 tbsps juice
- 3 to 4 teaspoons red chilli powder
- ¼ teaspoon turmeric
- 1 garlic clove large, minced (optional, but recommended)
Instructions
- Wash and dry amla well. Wipe them with a clean tissue or cloth. Make few incisions with knife randomly. You can also chop them and use.
- Powder 2 tsps mustard and generous pinch of methi seeds in a small blender jar. It has to be a fine powder.
- Fry amla in oil until partially cooked. They turn light golden in color when they are done.
- Add garlic and switch off. Allow to cool down a bit.
- When still hot, add other ingredients except lemon juice.
- Once cooled squeeze lemon juice.
- Mix well and taste it. Add more salt if needed. Store in a glass jar. Rest for at least 2 to 3 days before using. Mix well with a dry spoon. Check salt and sourness. If needed add more salt and lemon juice.
- Serve amla pickle with rice, dosa or paratha.
NUTRITION INFO (estimation only)
© Swasthi’s Recipes
Photo Guide
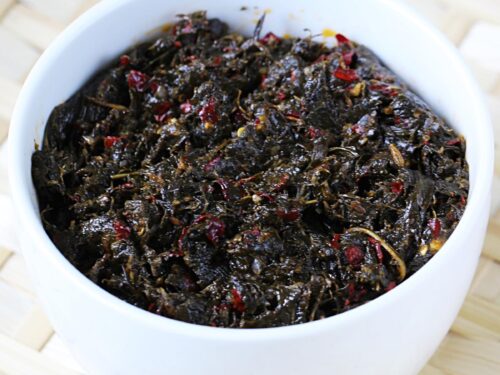
About Nilava Usirikaya Pachadi (Recipe 2)
Amla is one of the best seasonal fruits grown in India. Also known as gooseberries, these are very high in antioxidants. It is said to have a lot of health benefits when consumed in any form. Amla pickle known as nilava usirikaya pachadi is one of the popular pickle varieties from Andhra cuisine. Each family has there own way of preparing it based on the region. I am sharing my Mum’s amla pickle recipe which she usually prepares every year during Jan to feb.
I had many requests from readers for this recipe as the pickle keeps good for 1 to 2 years. I was on a 6 weeks Vacation to India and just returned back home. This time I got to see the entire process of making this so thought of sharing it with some step by step pictures that I have shot.
Amla pickle is prepared during Jan to feb but it is best to consume during the summers. As the pickle ages the cooling properties of the amla are said to be enhanced. This is best eaten with plain rice and melted ghee. But can be served in any Indian meal preferably with rice & dal.
To prepare the pickle, choosing the best quality of ingredients is very important. We make use of the freshly milled red chilli powder which imparts a bright color to the pickle. I have added more details of each ingredient in the step by step photos.
The ingredients mentioned in the recipe card will yield you one kg of amla pickle. We made the pickle with double the quantities mentioned in the recipe card. So please do not gauge the quantity of ingredients you see in the step by step pictures with the quantities mentioned in the recipe card. They will not match.
Step by step photos to make Nilava Usirikaya Pachadi
1. Sun dry the following for preparing the pickle. Make sure all of these are free from moisture.
Ingredients to sun dry
- Garlic cloves without peeling just for sometime to ensure there is no moisture.
- Crystal salt after cleaning for 1 to 2 hours
- 45 to 50 ml lemon juice for 1 hour
- Red chili powder if using ready made or packed for 30 mins just to ensure there is no moisture
Utensils to sun dry
- Glass bottles or bharani or jaadilu / ceramic pickle jars – Wash thoroughly with mild soap and dry it.
- 1 large wide stainless steel or ceramic utensil to mix the pickle.
- 1 steel pot to soak tamarind.
- 1 steel plate to transfer the amlas.
- Mixer / blender jar for 10 to 15 mins – just to ensure it is dry.
- Small dry mixer jar to powder methi seeds.
- 1 to 2 wooden or steel ladles for mixing.
- optional – If making in large traditional stone wet grinder – wash and dry that as well.
2. Wash amlas thoroughly and drain them. Spread them on a cloth. They should be moisture free before using. Make 3 to 4 incisions on each amla so that the spice and salt goes inside them and they taste good.
3. Deseed the tamarind. Discard the shells if any along with the seeds. Remove fibers on the sides if any and clean it thoroughly. Spread it in a wide plate or basket. Sun dry for few hours just to ensure that it is free from moisture. We dried it from 1 to 4 in the noon.
4. Bring 3 cups of water to a rolling boil. Turn off the heat and cool this completely. We do this simultaneously while the tamarind is sun dried.
5. Place the tamarind in a steel or ceramic bowl. Pour 1 ½ cups of boiled and cooled water over the tamarind. Discard the water completely. This is done just to rinse it with clean water. Do not do it with normal water, make sure you use only boiled and cooled water.
6. Pour more water just as needed to soak the tamarind. Do not pour the entire left over water, just use as needed. Water must be just enough to soak the tamarind. The water will be absorbed by the tamarind. If it absorbs all the water and looks very dry, you can pour some more water. Here is the picture. Cover this and set aside for 6 to 8 hours in a dry place. We did this just before going to bed the previous night. You can keep this up to 12 hours. Since it is soaked in boiled and cooled water it doesn’t go bad.
7. The next morning, Roast methi seeds in half tbsp of oil on a low to medium heat until they turn dark golden. They begin to smell good when they are done. Do not burn them otherwise the pickle will turn bitter. Cool this completely and make a fine powder. Set this aside.
8. Heat oil for frying the amlas. When the oil is hot, fry the amlas in the batches until the raw smell has gone. This takes only about 2 mins.
9. Transfer them to a wide plate and cool completely.
10. Add crystal salt and garlic to a mixer jar. Blend well.
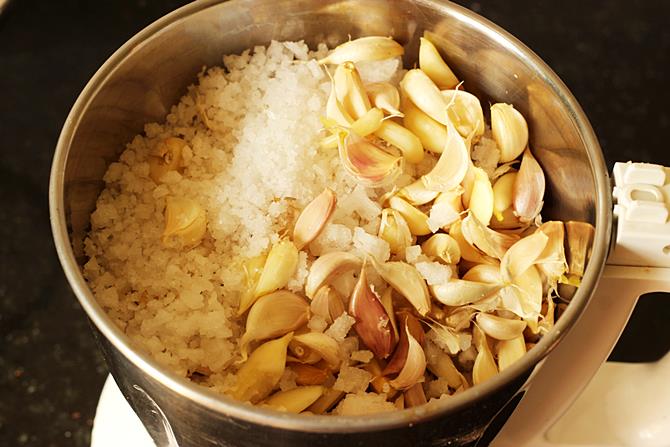
11. This must be smooth. As we made the pickle in large quantity, the garlic was then moved from the blender jar to the traditional wet grinding stone (rubbu rolu in telugu, aatu kallu in tamil). Garlic and salt mixture has to turn smooth. If making in small quantity it can be made in the blender itself. Make a smooth paste of the garlic and salt. Set this aside to a large bowl.
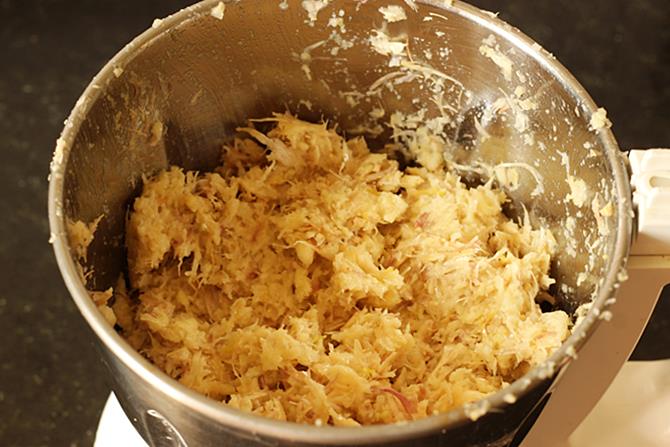
12. Wash and dry your hands well. If possible warm up the hands near the flame / fire. Squeeze the tamarind pulp well and remove any fibers if left. Add this to the blender jar and make a smooth puree. Transfer this to the garlic mixture.
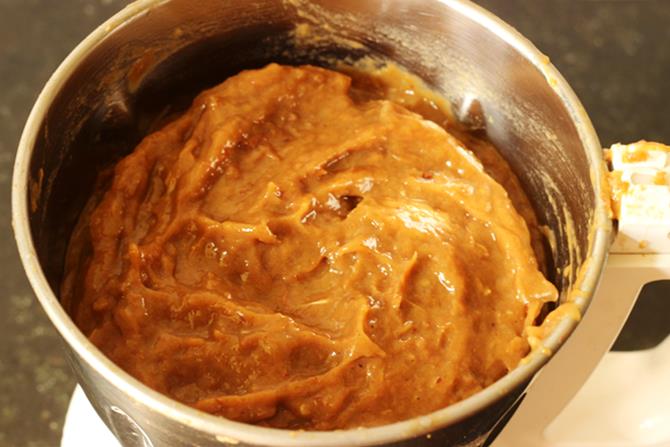
13. Mix them up well and blend them in batches until both are well combined. Since we prepared in large quantity, we used the traditional wet grinding stone. Transfer that back to the bowl. I have no pictures for this & the next step as I was away from home.
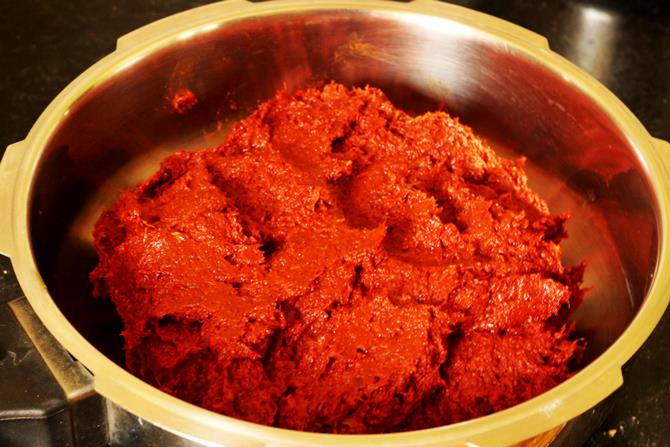
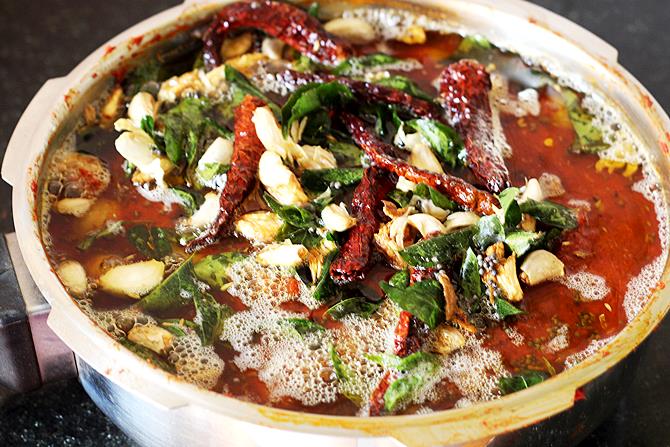
14. Add red chili powder to the blended garlic and tamarind mixture. Mix everything well.
15. Add the cooled amlas, methi powder and pour the 1 tbsps of lemon juice. keep the rest of lemon juice aside.
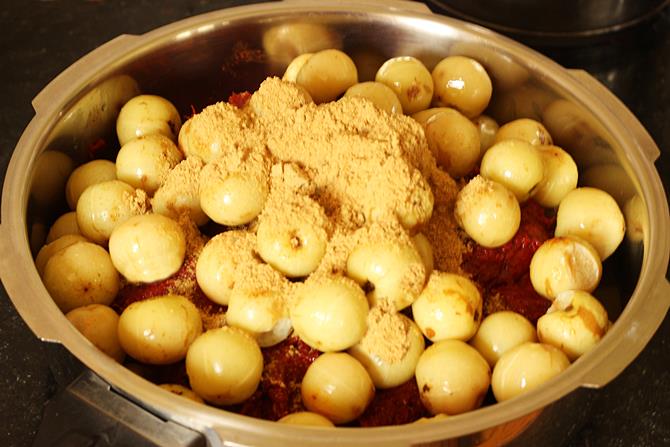
16. Mix everything well.
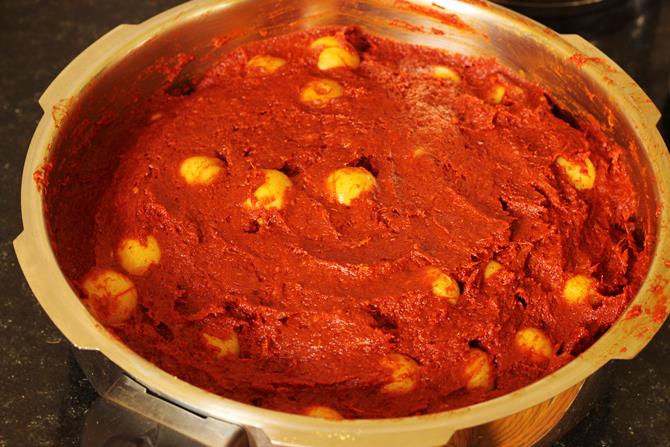
17. Taste the pickle to check if there is enough salt, tang and heat. We added the rest of the lemon juice and gave a good mix.
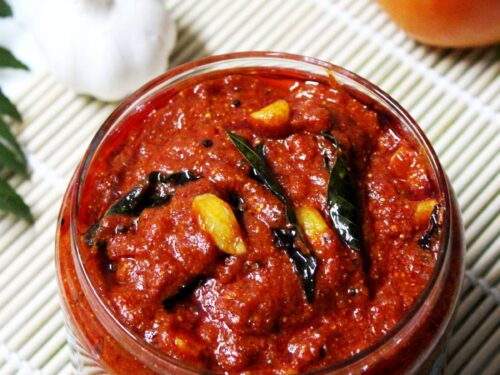
18. Heat the rest of the oil in a kadai. When the oil is hot enough, add in some mustard, crushed garlic and broken red chilies. You can also add in 1 tbsp of chana dal.
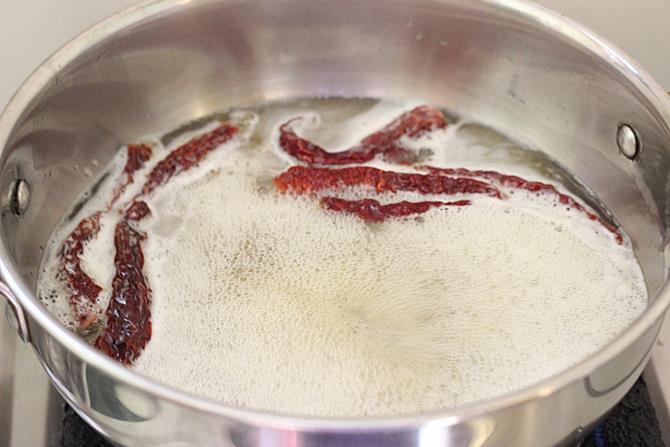
19. Keep the flame medium.
20. When the garlic turns slightly golden, add in a handful of curry leaves. When the leaves turn crisp, turn off the heat. Add hing.
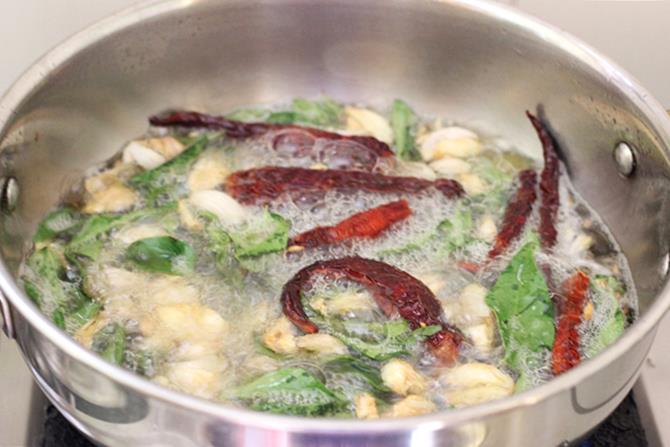
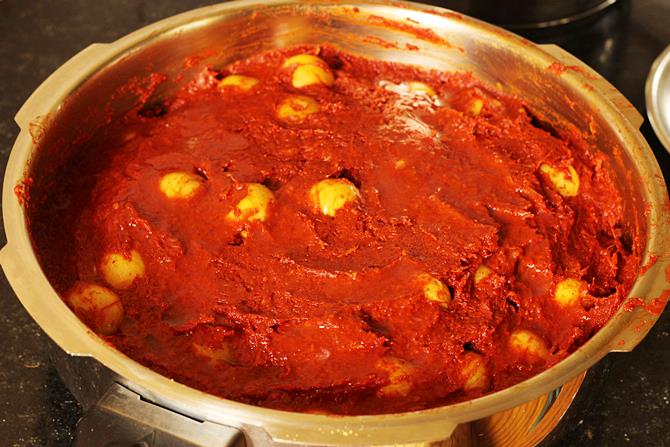
21. Pour this to the pickle. Pour the rest of the oil we used for frying amla.
22. Take a dry ladle and mix well. You can also use your dry and moisture free hand. But using your hand at this point may give you chilli and garlic burns.
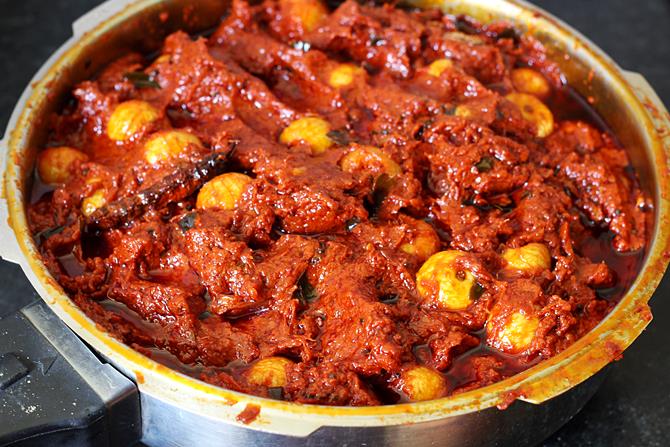
Cool this completely.
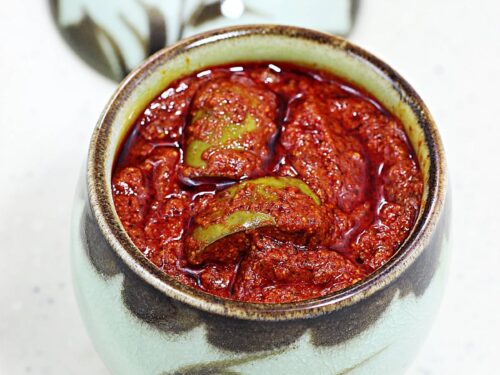
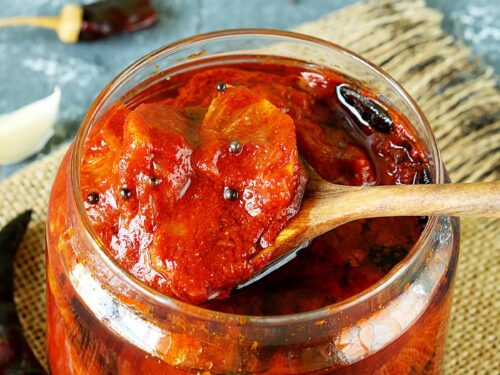
Store Andhra amla pickle in Glass or ceramic jars. Do not use plastic or steel containers to store the pickle. Usirikaya pachadi will be ready to enjoy after 5 to 6 days. But this pickle gets its real taste only after 2 months, when the amla soaks up well in the spice mixture & ages.
Though the pickle is good to keep at room temperature, I suggest refrigerating it as it helps to retain the flavors and color.
Recipe Card 2 (Nilava Usirikaya Pachadi)

Andhra Amla Pickle Recipe | Nilava Usirikaya Pachadi Recipe
For best results follow the step-by-step photos above the recipe card
Ingredients (US cup = 240ml )
- ½ kg amla / usirikayala
- 100 grams tamarind / chintapandu (weigh before deseeding)
- 100 grams garlic cloves (do not peel off the skins)
- ½ cup red chilli powder heaped
- 6 tbsps crystal salt (plus or minus 1 tbsp)
- 3 tbsps methi seeds / menthulu
- 1 cup oil
- 25 ml Lemon juice
- 3 cups water boiled and cooled
For tadka
- ¼ cup oil
- ½ tsp mustard
- ½ tsp hing
- 2 red chilies broken
- 1 Handful curry leaves
- 1 Handful garlic cloves unpeeled & crushed slightly
Instructions
Day 1 – preparation of amla pickle
- Wash amlas under running water and drain water completely.
- Dry them on a clean cloth to keep them moisture free.
- Boil 3 cups of water until it comes to a rolling boil. Turn off the heat and cool completely.
- Deseed the tamarind and remove the fibers and shells if any.
- Spread tamarind on a wide plate and sun dry for at least 2 hours just to ensure it is moisture free.
- Sun dry crystal salt along with tamarind.
- Spread red chili powder on a wide plate and sun dry for at least 30 mins. You can skip this step if using freshly milled red chilli powder.
- Keep the garlic flakes in the sun for sometime just to ensure they are moisture free.
- Ensure blender jars, mixing bowls and ladles all are free from moisture. I suggest sun drying them for a while.
- Place the tamarind in a dry bowl and pour about 1 and a half cups water. Rinse well with this water.
- Pour the rest of the water just as needed to soak the tamarind. The water must be just enough to soak it. Do not use excess water. The tamarind must turn very soft and must be moist. So if it looks dry, pour in more water.
- Soak this for 6 hours. You can keep this for up to 12 hours. This can be done the previous night.
- Roast methi seeds in half tbsp oil on a medium flame. Keep stirring fry until the seeds turn golden and light brown.
- Cool these completely and make a fine powder.
Day 2 – Making andhra amla pickle
- Make 3 to 4 incisions on the amlas with a knife.
- Heat oil for frying amlas.
- When the oil is hot, fry them for 2 to 3 mins. You can fry them in batches.
- Transfer to a plate and Cool these completely.
- Add crystal salt and garlic to a blender and make a coarse paste.
- Set this aside to a bowl.
- Use a dry and clean hand to remove any fibers from the tamarind.
- Add this tamarind to the blender jar and make a fine paste.
- Transfer this to the garlic and mix both of them.
- Blend this mixture to a smooth paste.
- Add red chili powder and methi powder. Mix everything welll.
- Add in the amla and pour the lemon juice. Taste the pickle and add in more salt or chili if needed.
- Mix everything well.
- Heat oil for seasoning.
- When the oil turns hot, add mustard, garlic and red chilies.
- When the garlic turns slightly golden, add in curry leaves.
- When the curry leaves turn crisp, turn off the heat. Add the hing.
- Pour this to the amla pickle along with the oil used for frying amla.
- Mix everything well and allow to cool down completely.
- Transfer to a glass or ceramic jar or bharani.
- Refrigerate andhra amla pickle and use upto an year.
Notes
NUTRITION INFO (estimation only)
© Swasthi’s Recipes
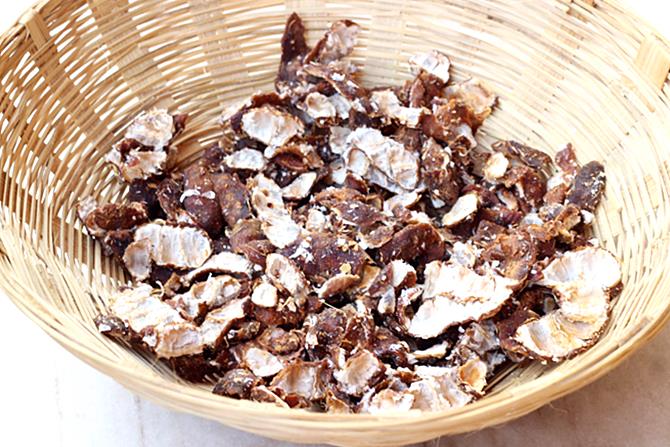
Recipe 3 Amla pickle for immunity
- Rinse 250 grams of amlas well under running water and wipe them dry. Cut them to 1 inch pieces and spread them on a plate.
- Sun dry these for 1 hour or put them in a oven or dehydrator for 5 mins at the lowest setting. This is done for shelf life.
- Add them to a ceramic or glass jar and add 1 tbsp crystal or non-iodized salt and toss them. Sprinkle 1 tsp more on top. Cover and rest them for 3 days.
- Keep this in the fridge. It keeps good for an year if handled well. The pieces will turn brown to black overtime.
- When you intend to make the pickle, fry 3 to 4 red chilies until crisp. Then add cumin and garlic. Turn off the stove.
- Blend a small portion of the amla pieces with these chilies, cumin and garlic. Usually the texture will be dry and dark brown in color. If needed sprinkle some warm water and blend. Serve this with plain rice and ghee.
About Swasthi
I’m Swasthi Shreekanth, the recipe developer, food photographer & food writer behind Swasthi’s Recipes. My aim is to help you cook great Indian food with my time-tested recipes. After 2 decades of experience in practical Indian cooking I started this blog to help people cook better & more often at home. Whether you are a novice or an experienced cook I am sure Swasthi’s Recipes will assist you to enhance your cooking skills. More about me
Follow Swasthi’s Recipes
Comments
I tried this and made a wonderful job for a first timer…All.of us love this pickle… Swathi thank you so much I love all of your recipes , u r my online cooking guru.. 😉 ur tips really help a lot, thanks again for this website and ur efforts
My pleasure Bhuma! I’m very happy to read that my recipes are helping. Thank you so much for the comment.
Thank you Swathi Garu for reposting the recipe
Hi Swathi Madam
There was one more recipe of amla where we need to sundry the dry ingredients like salt, red chilli powder etc and tamarind to be soaked in warm water one day before in your blog.
Now I cannot see that recipe.
Can you please again share the recipe
Thanks and regards
Hi Adilakshmi,
I have updated it as recipe 2 – nilava usirikaya pachadi. Please refresh the page to see.
looking great!
Amala pickle by method 1 , do we have to store in fridge.
Thanks for sharing recipes
First 2 days keep it at room temperature. Later store it in the fridge
Hi Swasthi, hope you are doing well. Question for you – here in US we do not get fresh Amla (at least not in the northern part of USA where I live. May be fresh Amla is available in tropical states like Florida or southern California). But the Indian grocery store sells “fresh frozen whole Amla” from India. I am wondering, if there is anyway that these frozen Amla can be used to make the pickle. As you may know, once the frozen Amla is thawed to room temperature, they become soft and very wet. It is practically impossible to make them dry unless I microwave them. All this process will alter the true taste of the Amla. Just wondering if you have any idea as how to make half way decent pickle using the frozen Amla. Thanks very much for your suggestions. Keep up the great work.
Hi Rom Garu,
Thanks for asking. The only way is to dehydrate the amlas a bit so the pickle does not spoil quickly. Not sure how it will taste. You should try a small batch and refrigerate it within a few hours of making. Sorry couldn’t help you.
In Amla pickle first type if it’s dry add more oil hot oil r normal.
Heat it, cool and then mix. You can wait upto 3 days and then check if it really needs. Sometimes amlas need about 3 days time to release juices so the consistency won’t be the same later.
Hi Madam , Thank you for the pickle recipes. Please clarify my doubts It is said that the instant Usiri Avakaya does not stay good for
1 year. Then how many months does it stay good ? ( For the recipe using 10 amlas ).
Which oil is used in the preparation of both the instant and the niluva pickles ?
PLEASE.
Hi Sir,
Instant pickle is just good for a few weeks. If you live in high humid places then it has to be kept in the fridge. It will keep good for 4 to 5 weeks in the fridge. Check the recipe 2 mentioned in this post.
You can check this Nilava usirikaya pickle. This one will keep good for a year and even longer if stored properly. Use any refined oil like peanut oil. Unrefined oils change the flavor of pickle if kept for longer than 6 months. Jan to feb is the right time to make amla pickle. Do not make them when it is raining. Hope this helps.
Hi Madam,
Definitely helps. Thank you for the information.
Please tell me , can I use white til oil in the preparation of the pickle ?
Also please tell me , at Bangalore where humidity is not much , is it necessary to keep in fridge and if kept in fridge ,for how many weeks pickle keep good ?
The last doubt, Madam, at high humidity places, when kept in fridge then only keep good for 4 to 5 weeks ?
Once again , Thanks.
Hi,
Yes you can use white sesame oil. Yes if living in Bangalore keep in the fridge. This pickle will keep good only for 4 to 5 weeks in the fridge. It may last longer in the fridge. But it won’t taste good. If you want to make the other recipe – nilava pachadi it will keep good in fridge for an year even in Bangalore.
Hi akka, good evening.how are you all in this pandemic time.believe you are all healthy and happy because of your healthy cookings.i recently tried this instant variety.it came out well.normally amma used to prepare the second long lasting version only.dont know this instant version at all.thanks for this recipe as I am beginner for pickles.
Hello Aruna
Good morning. We are doing good. Thank for asking. Hoping the same from you all. Glad to know it turned out well. Thank you!
Turned out great. Thank you
Lots of praises to you
Thank you
Step3 of frying removes all good medicinal values from Amla. The final product may be tastier but with zero benifits to health.
Hi this is sunny .I wached clips of amla pickle reciepie with my mom and prepared the amla reciepie .it is quite easy and enjoyable & good to serve.
Hi Sunny
Thanks for trying. Glad to know it came out good.
Namaste mam
I had been following your recipes for all of my kitchen experiments.
And they came out to be a great success.
The amla and garlic pickle came out very well. Amma and nanna loved it
Thank u so much for making my cooking experience an awesome one!!!
Welcome Tejaswini
Thanks for following the recipes. Happy to know they were useful.
🙂
Crisp and clear guidance on amla pickle recipe. Thank you Swathi.
Welcome Veena
Hi Swasthi,
I prepared this pickle today..You have mentioned to keep it for 2-3 days before using it.. should I keep it in fridge being summer and extremely hot as I fear it might get spoilt?
Hi Sneha
You have to keep it at room temperature for the first 3 days. After that you can move it to the fridge. Pickles usually don’t spoil during summer but they do during monsoon when it begins to rain. Hope this helps
Hi Swasthi, I have made many of your recipes and they always come out extremely well.
Amla pickle also came out well, but on the 3rd day, there was fungus formation on top. You said we have to keep at room temperature for 3 days na. I live in Chennai in hot climate. How to avoid fungus in such a case?
Hi Deepika,
Don’t keep it in the kitchen. Due to high humidity the pickle can go bad. If it doesn’t work out for you then you have to keep it in the fridge after making.
Hi swasthi can I add star gooseberry instead of aamla? And use the same Method
Hi Fathima,
Yes you can use.
Hi.. can we cut the amalas into pieces and carry out the recipe?
Yes Karenza. You can cut them
Hi
Apart from Chilli turmeric and salt I see one more powder. What is it? You have mentioned only mustard and fenugreek in the ingredients. Not their powders. Pls clarify.
Hi SG
Yes sorry. Somehow forgot to mention it. You will need to powder the mentioned amount of mustard and fenugreek seeds and use
Hai swasthi I prepared amla pickle but it’s not looking like u prepare. I don’t no wr I did mistake. Plz reply
Hi Shashi
What you see in the picture was after 3 days. Did the pickle turn out dry. If it is dry then you many need to add more oil and lemon juice. The consistency also depends on how much juice amla releases while resting for 2 to 3 days. Tell me exactly what happened, I can help you to fix it
Hai swasthi mouthwatering recipe. Tx for da recipe I watch in tv shows they fry amla in oil is it necessary. But u show easy pickle recipe.
Hi Shashi
Yes other than frying there is no other way to keep them good for sometime.
Since amla have lot of moisture, oil really doesn’t get smoky hot so i feel it is not unhealthy.
We are not deep frying either so i think it is just fine.