How to make Paneer (Indian Cheese)
Updated: May 24, 2024, By Swasthi Shreekanth
If you ever wondered how to make Paneer at home, look no further & try out this easy step by step guide. Paneer is a traditional Indian cheese made with just 2 ingredients – milk and an acidic ingredient. Making it at home is super easy, involves no rocket science & you to get it perfectly soft, every single time.
But why make at home? In the past store bought paneer had additives like preservatives, corn starch and even citric acid to prolong the shelf life. Much has changed in the recent years and now you get it as good as the homemade – without additives.
Table of contents
Still a lot of us want to make paneer at home for various reasons – freshness, non-availability, expensive or preference to use a particular kind of milk and acidic ingredient. Whatever be it, you will never regret for trying to make it at home. I will help you make the best quality super soft Indian cheese at home.
What is Paneer?
Paneer is a kind of fresh cheese made by curdling milk using an acidic food ingredient like lemon juice, vinegar, buttermilk, yogurt (curd) or citric acid. It is a soft yet firm, non-melting cheese that is made without using any kind of rennet. It is also not fermented or aged like other kinds of cheese so it tastes milky and somewhat similar to ricotta cheese.
To make paneer, cow or buffalo milk (or a mix of both) is boiled first and an acidic ingredient is stirred into it. The milk curdles separating the solids and the whey. It is strained to a colander, lined with a muslin or cheese cloth.
The solids are wrapped in the cloth and hung for a while to get rid of excess moisture. Lastly it is pressed with a heavy object to set. Unset cheese can be used in Paneer Recipes like Malai Kofta, Paneer Bhurji and Paneer Sandwich. Set and diced paneer can be used in many other recipes like
Palak Paneer
Paneer Butter Masala
Matar Paneer
Paneer Tikka Masala
Traditionally paneer is not seasoned but these days commercialised products do come with a little amount of salt. Enthusiastic home cooks have also been adding various kinds of seasonings like chili flakes, black pepper and cilantro so it can be eaten as is without additional seasoning or cooking.
Ingredients for Homemade Paneer
- Milk: Use full fat raw or pasteurized cow, buffalo or goat milk. Avoid low fat, skimmed milk and ultra-pasteurised milk (UHT) as they yield lesser amount of cheese.
- Acidic ingredient: Lemon juice, vinegar, citric acid, yogurt or whey from the previous batch of paneer are some options. Citric acid and vinegar are the best choices as they split the milk instantly but avoid adding a lot as it can make the cheese harder/chewy. The curdled solids need a through rinse to get rid of the citric acid or vinegar. Yogurt curdles the milk slowly but produces the softest cheese and you don’t need to rinse off. Sometimes it can be a hit or a miss unless you use raw milk (zero processed milk).
Photo Guide
How to make Paneer (Stepwise Photos)
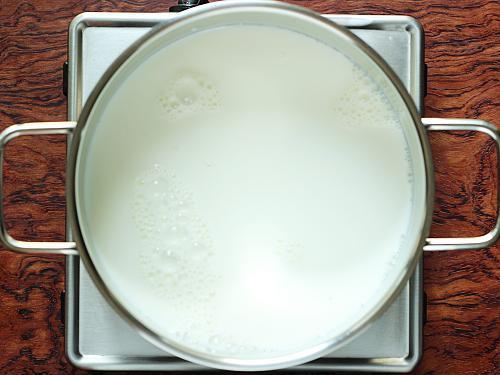
1. Pour 8 cups (2 liters) milk to a heavy bottom pot and bring it to a gentle boil on a medium flame.
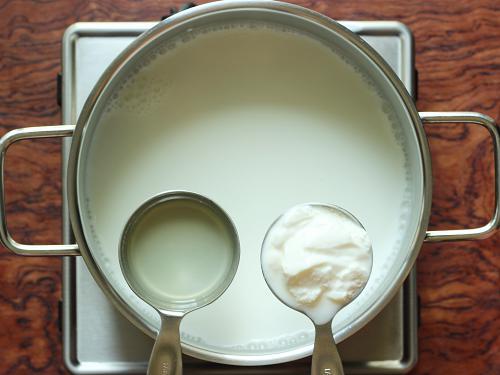
2. Keep your acidic ingredient ready such as – yogurt, lemon juice or vinegar. Please use only one. When the milk comes to a boil, turn off the stove. Add 2 tablespoons of vinegar or ½ cup of yogurt. Give a good stir for 1 minute.
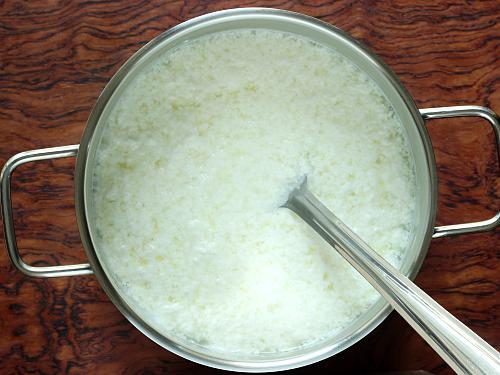
3. Milk begins to curdle immediately and solids separate from the whey. If it does not, stir in 1 tablespoon more vinegar and turn ON the stove. Boil till you see the solids separate completely. Note that non-homogenized or raw milk curdles faster. Homogenized milk takes longer to curdle as it is processed for a good shelf life.
4. Turn off the stove as soon as you see the milk has curdled completely. When the paneer is done correctly you will see the whey being clear and not milky. The color of the whey will be yellowish or green but not milky white.(check video). It is important you turn off when it is done. If you continue to cook longer, it becomes hard and grainy.
Drain and Set
5. Place a colander over a large bowl (to collect the whey). Layer it with a clean cheese cloth (or muslin cloth). A thin new handkerchief works well too. Transfer all of the curdled milk to the colander, in batches. Immediately pour cold water to get rid of the vinegar smell.
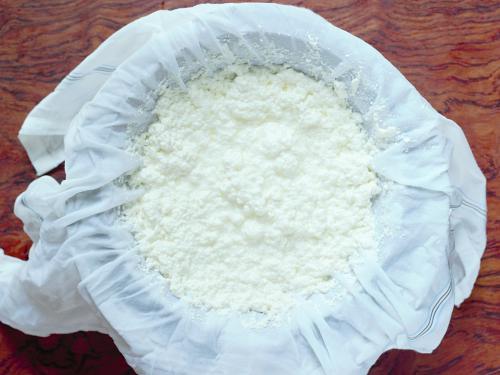
6. Later rinse the paneer well a few times under running water until it is clear of the vinegar.
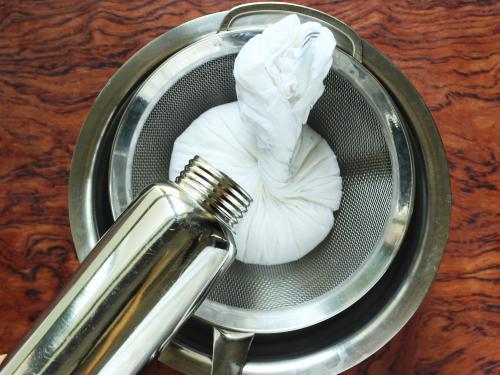
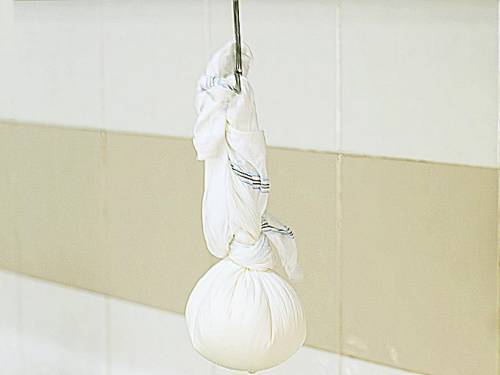
7. Squeeze off the excess water. Make a knot and hang this over your faucet for 30 mins. This helps to drain the excess whey and this step is very essential else the paneer can break in your sauce. It should still be moist after draining.
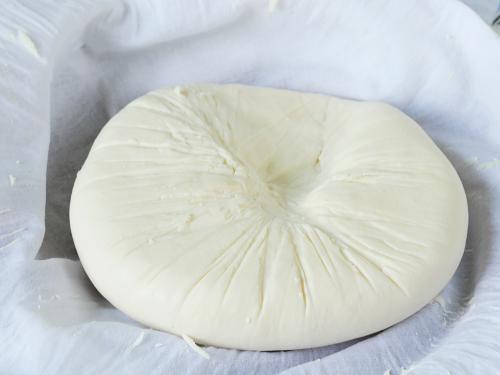
8. Keep the entire pack on a flat colander or a plate or wooden board. Form a nice round shape by bundling the paneer. (check video)
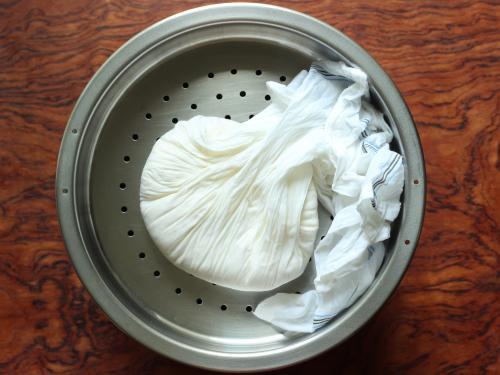
9. Place a heavy object weighing at least 2.5 to 3 kgs. I fill my pot with uncooked rice and place over it. Any heavy object will just work well to set paneer. Allow it to set for about 3 to 4 hours. If you want you may move the entire set up to the refrigerator if it is too hot. I do this at room temperature on the kitchen counter.
10. Remove the cloth and you will find a round block of paneer. You will also notice a dent on the block. It is just normal.
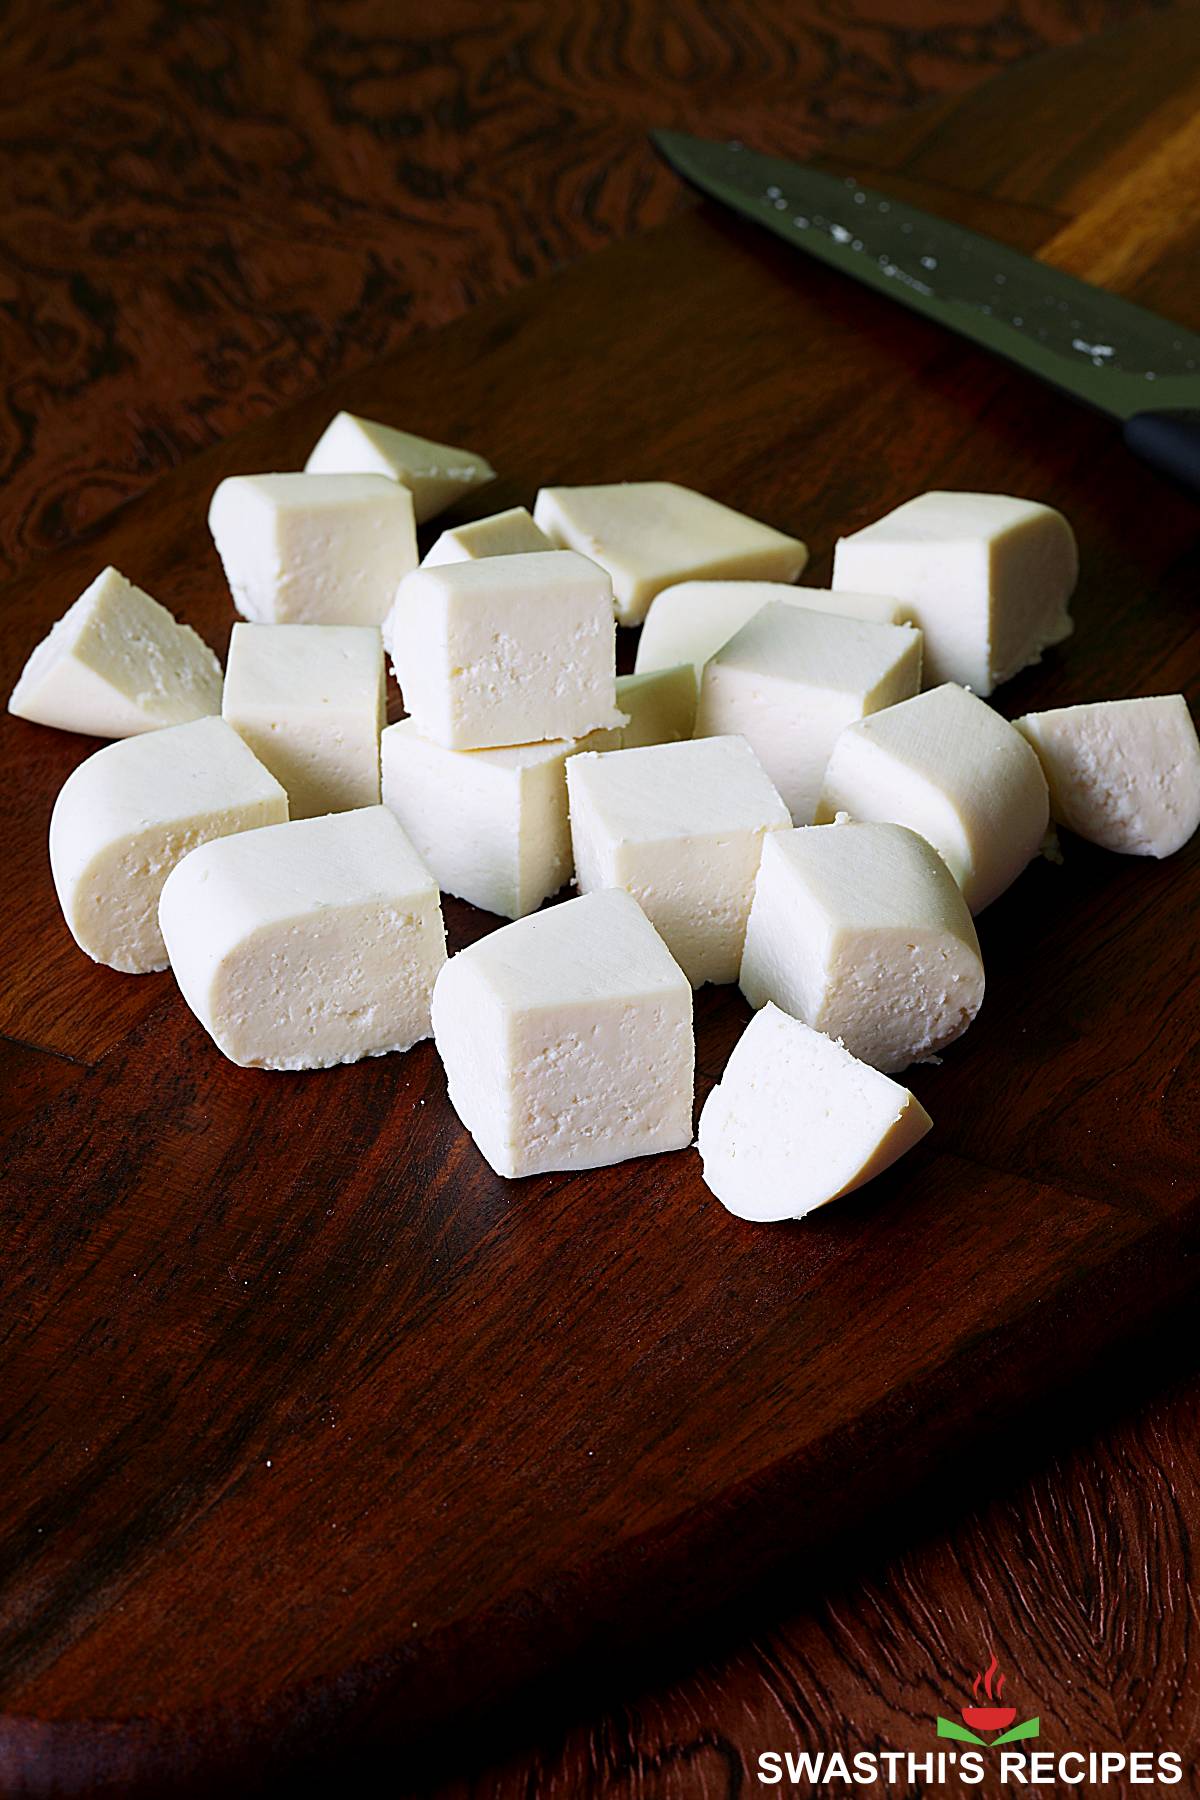
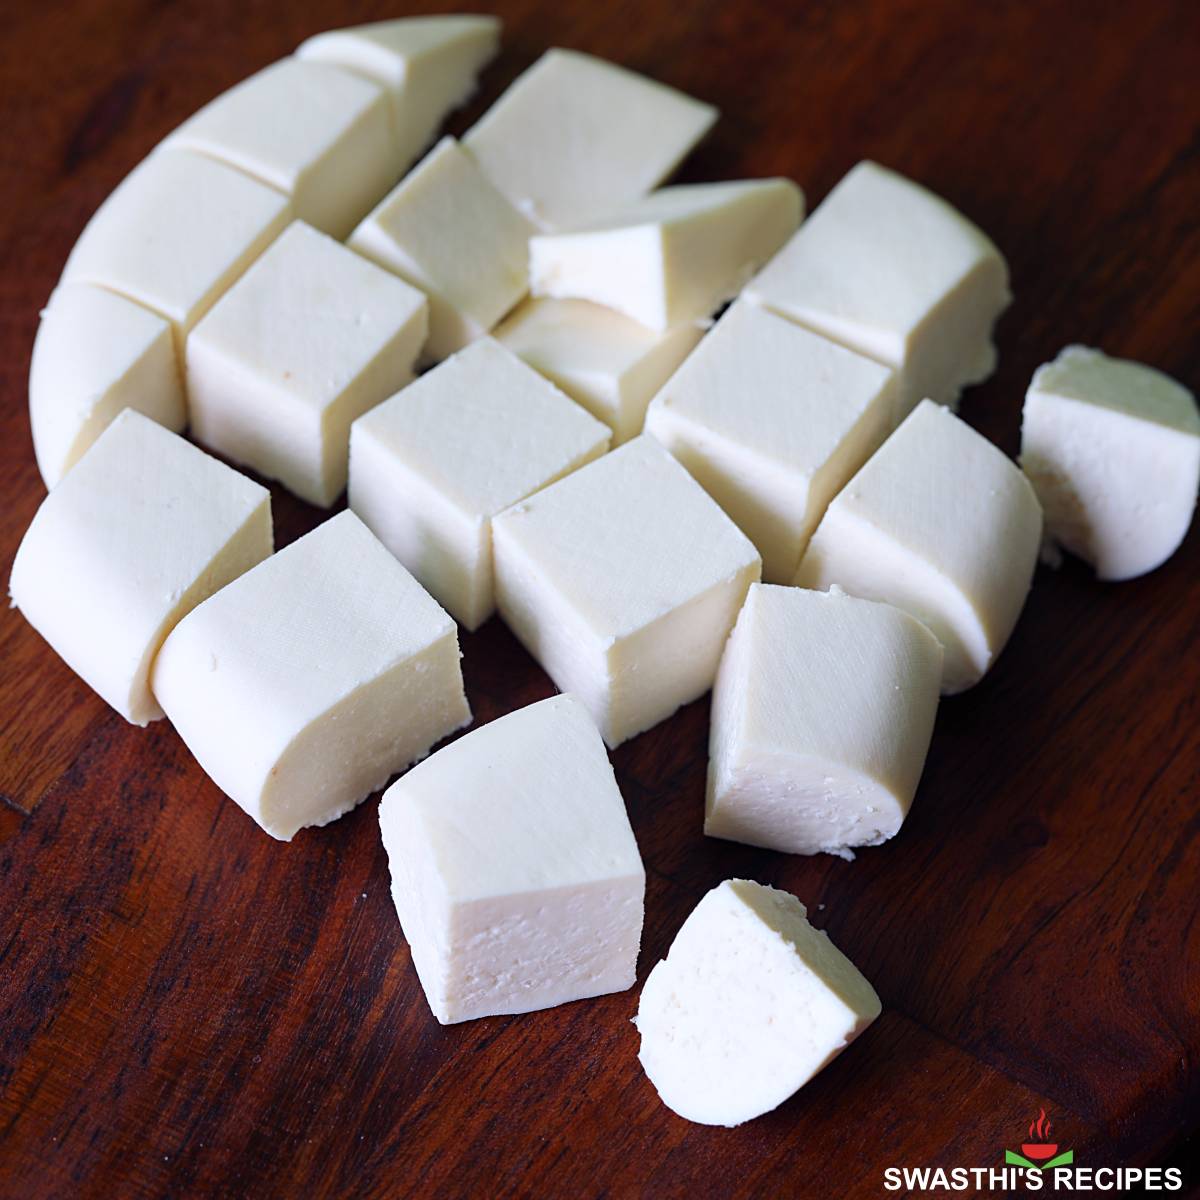
11. Cube the paneer.
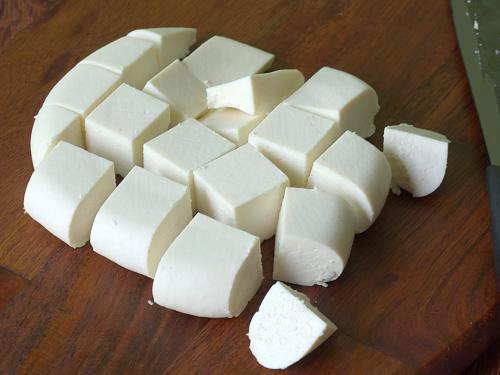
Use or Refrigerate for further use. I usually put the entire block in a steel box and refrigerate. I cut only when needed. You can also cut them and freeze for 3 months or refrigerate for 2 to 3 weeks.
Expert Tips
- Full fat milk that is minimally processed works the best. Else you will have lesser yield. UHT milk is ultra processed for longer shelf life so this kind of milk does not split faster and yields less.
- Bring milk to a boil on a low to medium heat else the fats can settle at the bottom and get scorched resulting in brown bits. Alternately, stir the milk occasionally while boiling.
- Always add the acidic ingredient only after the milk comes to a boil.
- Once the acid ingredient is added to the milk, stir and check if the milk has curdled completely. If not add more and turn off the stove. Do not continue to boil after it has curdled completely. This makes the paneer hard & grainy.
- Use just the right amount of acids (in batches) to curdle the milk. Using too much makes the paneer grainy and rubbery/chewy.
- I always prefer to pour some cold water or ice cubes immediately to the pot to stop it from cooking further. You can also omit this step and transfer the paneer quickly to a colander that is lined with muslin cloth. Immediately rinse it under cold running water.
- Ensure there is no excess whey in the milk solids before you keep it for setting. To ensure this I always hang the paneer for 30 min to drain it completely else the paneer can break in your sauce.
Related Recipes


Recipe Card
How to make Paneer
Ingredients
- 2 liters (8 cups) full fat milk
- 2 to 3 tablespoons vinegar (or lemon juice or ½ cup yogurt or 4 to 5 grams citric acid diluted in 1 cup water)
- 1 colander (strainer)
- 1 cheese cloth (muslin cloth or fresh handkerchief)
- 1 large bowl (to collect whey)
- 1 to 2 heavy objects
Method
- Heat Milk: Pour milk to a heavy bottom pot & bring it to a gentle boil on a medium heat. Stir occasionally to ensure the milk doesn't get scorched at the bottom.
- Curdle Milk: When the milk comes to a boil, turn off the stove and stir in 2 tablespoons of vinegar. You should see the milk begins to split, separating the solids and the whey. If done correctly, whey should be clear or yellowish but not milky.
- Troubleshooting: If the milk did not curdle fully or still looks milky, stir 1 tbsp more vinegar. Boil on a medium heat till it curdles fully. Turn off immediately and do not overcook else paneer can become hard.
- Strain & Rinse: Place a colander over a large bowl to collect the whey. Spread a cheese cloth over it. Transfer the paneer and the whey in 2 batches. Pour cold water all over the paneer to rinse off the vinegar really well.
- Drain the Liquid: Gather the edges of the cloth in your hand and bundle the paneer to form a round shape. Squeeze off any excess liquid. Make a knot and hang the paneer on to your faucet, for 30 mins to drain completely. (see post for pictures)
- Set the Paneer: Remove the knot and twist the edges of the cloth. Place bundle on a flat colander or a wooden board. Press down the cloth & place a heavy object (like a cast iron pot & rice bags) on it. (check the video below) Let the paneer set at room temperature or in the refrigerator (if hot) for 3 to 4 hours,
- Dice the Paneer: Unpack the cheese from the cloth. You will see a dent and it is normal. Cut the paneer to 1 inch cubes. Refrigerate in a air tight container and use within 2 to 3 weeks or freeze up to 3 months.
- Recipes to try: Use the diced cheese in curries, kebabs or rice pilafs. You may check out these 60 amazing Paneer Recipes for ideas.
Notes
- Please use only full fat fresh milk or whole milk as high fats in the milk will yield more paneer & will set well.
- Non-homogenized milk curdles faster while homogenized milk takes longer to curdle. So you will need to boil a little longer until it curdles fully.
- Do not use milk that has gone beyond the expiry date. This may affect the flavor.
- Adding sufficient amount of acidic ingredient like lemon juice, vinegar or curd (yogurt) is very essential else the milk won’t curdle. So you may need to add more than what is mentioned in the recipe card.
- Similarly adding too much of lemon juice/ vinegar/citric acid will make the paneer harder & grainier. So begin by adding only a little and add more as needed until it curdles.
- Once the milk curdles completely, turn off the stove and avoid cooking further to prevent the paneer from turning hard.
- It is also good to pour some cold water to stop the paneer from cooking immediately especially if using unprocessed milk.
- Ensure excess whey is drained from the paneer before you set. Any excess whey will cause it to break in the gravy/sauce.
Private Notes
Tried this recipe?
Mention @SwasthisRecipes or tag #swasthisrecipes!About Swasthi
I’m Swasthi Shreekanth, the recipe developer, food photographer & food writer behind Swasthi’s Recipes. My aim is to help you cook great Indian food with my time-tested recipes. After 2 decades of experience in practical Indian cooking I started this blog to help people cook better & more often at home. Whether you are a novice or an experienced cook I am sure Swasthi’s Recipes will assist you to enhance your cooking skills. More about me
Follow Swasthi’s Recipes
Comments
Haven’t tried this yet but was wondering if I used lemon juice do I have to rinse it like you do with vinegar?
Yes you will rinse it the same way
Paneer turned out excellent. I used 3 tbsp white vinegar for curdling and 2 litres of whole homegenised milk. I’ve used milk 1-2 days past expiration and it has still been excellent.
I tried you paneer cheese recipe it turned out perfectly thank you so much for sharing
Glad it turned out good. Thanks Laura
This is an excellent guide to make paneer. All the recipes I’ve followed earlier yielded me very gritty, chewy, hard and water logged paneer. I think hanging it to a faucet did the trick! Much firmer and excellent even after cooking.
Hi, this looks wonderful, but I am wondering how much paneer it produces, approximately? It would be helpful to know as input to other recipes. e.g. your Palak Paneer calls for 150 grams of paneer, so will your recipe make enough for that? Or for 2 times that, or ???
Thanks in advance!
Hi Doug,
This recipe should make about 200 grams paneer. The yield depends on the kind of milk. Homogenised milk is yields lesser than 200 gms and fresh raw milk (without pasturization) can yield up to 220 to 250 grams. Hope this helps
Hii swathiji…
I tried it
Paneer was amazing (very soft)
I’m really happy
Thank you for all receip with perfect mesurement👍
I’m gonna try your dosa batter ☺
Love this recipe! I’ve always wanted to make paneer at home and your recipe helped me a lot. Used fresh whole milk and a little white vinegar diluted with water. It worked like a charm and perfectly set. Going to make your palak paneer tonight. Thank you for always being there when I wanted to cook.
Excellent recipe. Many of my questions were answered by the author in this post. I used citric acid and it worked like a charm. I got very smooth paneer without any grainy texture and that’s what I was looking for in my paneer. Thank you
Easy and satisfying to make ! I used lemon juice and found I needed the 3 tablespoons, lots of whey left over though !.. so found out it’s possible to make ricotta from this by kinda doing the same thing over again so will try that next time , this time will use to feed my plants
Thanks for sharing back Steph. You can also use the whey in your smoothies or to make flatbread/naan dough
Hi, I want to try adding a little bit of salt. Would I add after I rinse with water?
Hi,
Yes you can add salt after rinsing
Very good description
What do you do with the whey?
If you use citric acid, it’s better to discard. But if use lemon or yogurt, you can use it to make flatbread or naan dough
Hi- what would the whey replace in your naan recipe, the 6-8 tablespoons of milk?
Very detailed recepie. Steps are clear and easy to follow. Thanks for the tips
Very detailed explanation
Your article is ‘very’ interesting. Most enjoyed and very informative.
What do you think about me using my kefir yoghurt output?
It is made from very prolific Caucasian grains.
Whey is very evident in the final sieved ferment.
My protein intake is low and paneer sure sounds a great ‘whey’ 😉 to help me out!
Hi,
Thank you. I have never tried but it should work. May be need to add a lot. Paneer has a milky flavor so I am wondering the flavor may not be the same. Try rinsing it well. Would love to know how it goes for you!
Paneer is not Whey. Paneer is Casein. Whey is the liquid portion that we throw.
What type of yogurt should I use?
Plain yogurt with plenty of whey like the homemade works. Don’t use Greek yogurt
I made your butter chicken for a party last weekend. I followed your recipe carefully, and it was a great success.
How long does it last in the fridge? The recipe says 3 weeks which seems v. long but in the comments you say 7 days and in another comment 2 weeks? Other recipes I looked at say 1 to 3 days so I am thoroughly confused!
I tried this with home set curd.. half cup first, nothing happened, added half more.. a little bit of something happened, and guess i became impatient and so I added half cup more.. paneer turned out a hard and dry.. not moist at all.. was also a little bit sticky or chewy on the teeth..
Was it the extra curd..? If i reduce the curd in my next try, would that help.. oh and also i think i hung it for around an hour, coz i forgot i did, lol ..and since it was so hard, i didn’t do the setting part with weight.. plz let me know what all i need to fix for my next try.. thank you!
Hi Jyoti,
Yes it could be too much curd! Using too much acidic ingredient or overcooking the milk can make the paneer chewy and rubbery. The problem may be with the milk you used. Usually processed milk is shelf stable and won’t curdle easily. Unprocessed fresh milk without any additives curdles immediately after adding yogurt or at least after resting for 5 to 10 minutes. You shouldn’t have gone beyond 3/4 cup. Resting a little longer would just help. Was your yogurt set the same day? Give a try with lemon juice or vinegar next time. Hope this helps
Hi Swasthi, thank you for writing back..curd was just a day older..used unprocessed milk, yes, but the impatient little devil i am, i definitely didn’t wait 5 or 10 minutes after adding the curd.. i think at most it was a minute max.. will try again tomorrow per your advice and will let u know how it turned out.. thank you once again!
It turned out great!!! I used only half cup as you mentioned..but it turned out I needed to heat the milk (again) while I mixed in the curd.. thank you so much!!
very simple recipe.thanks for sharing in simple steps.
It was very nice