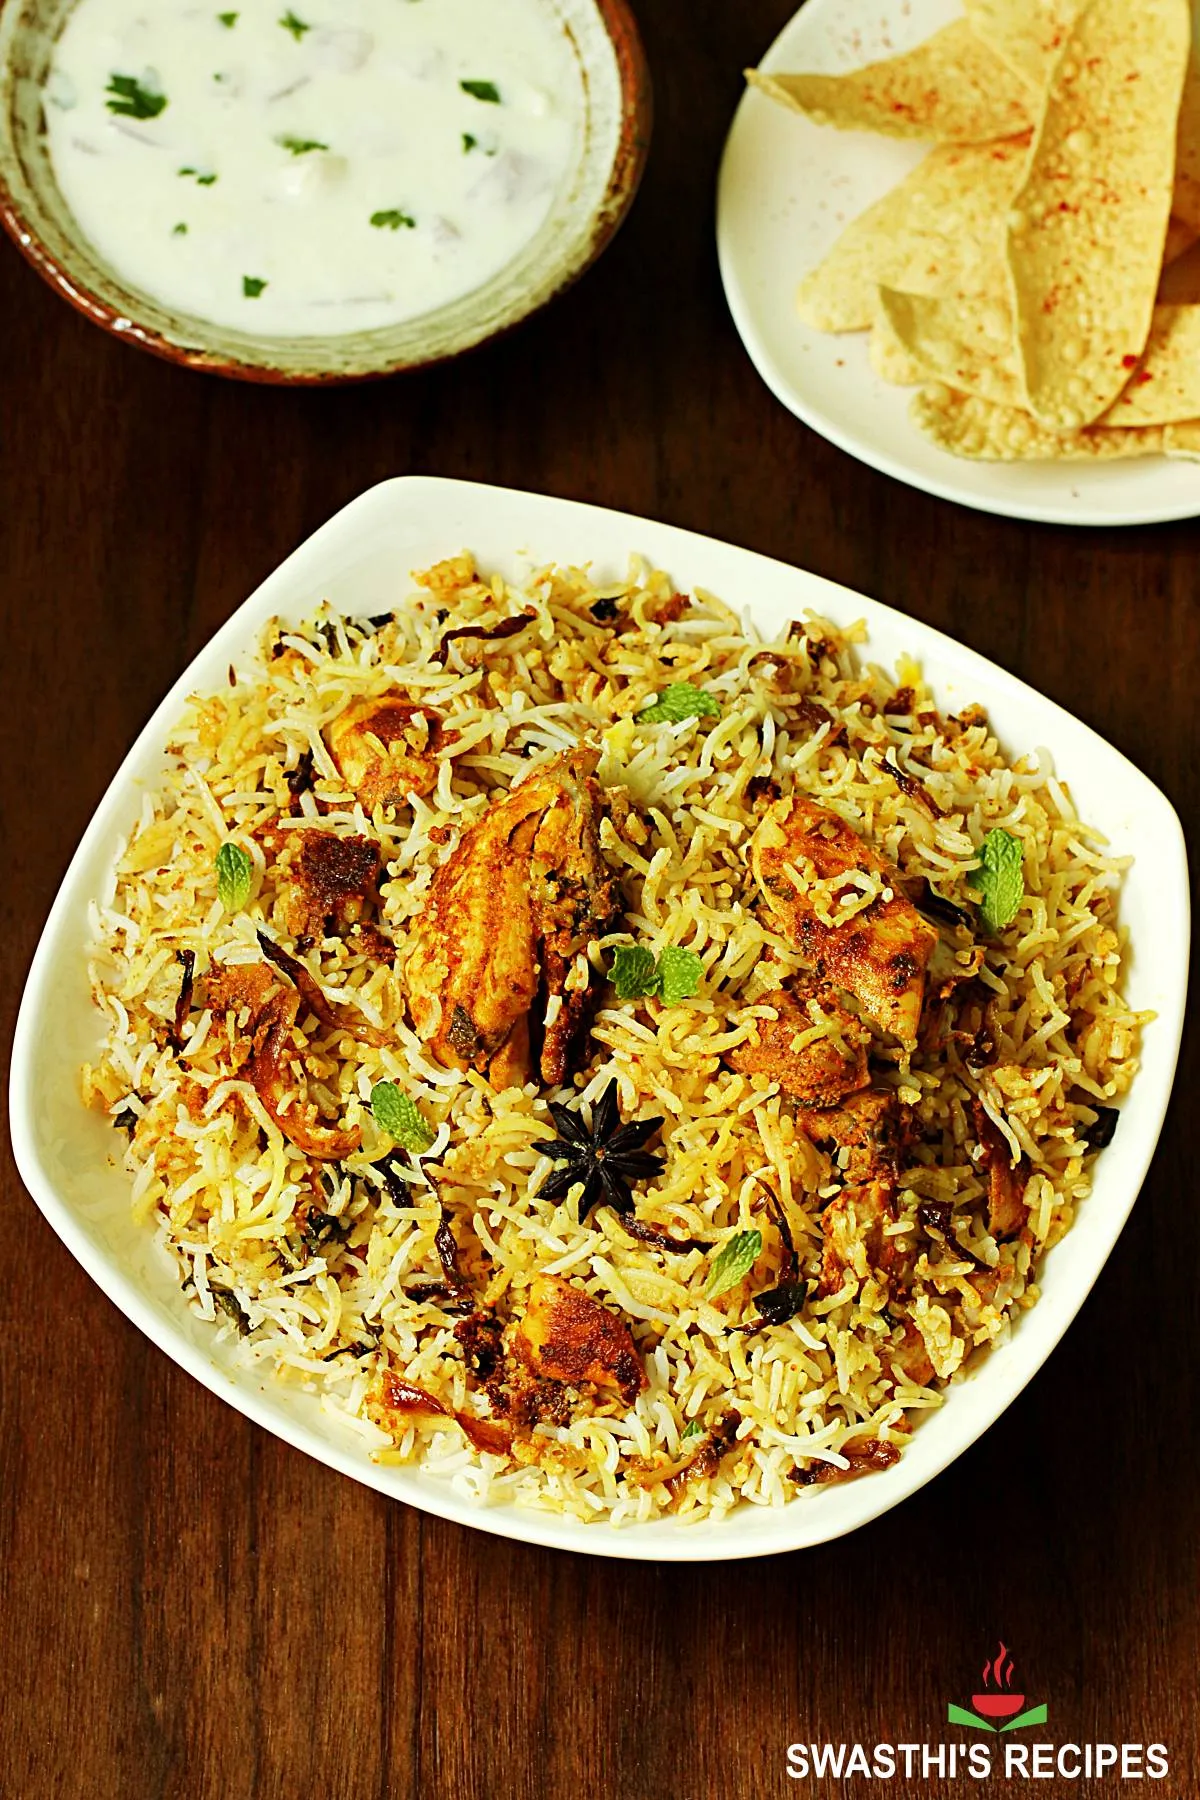
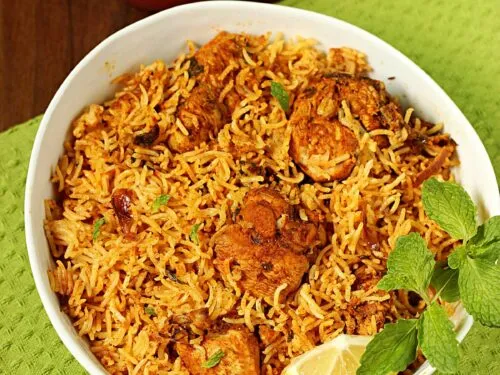
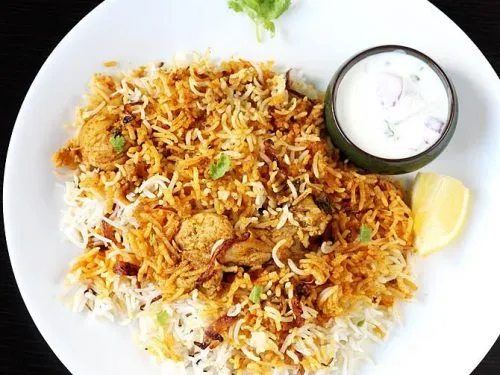
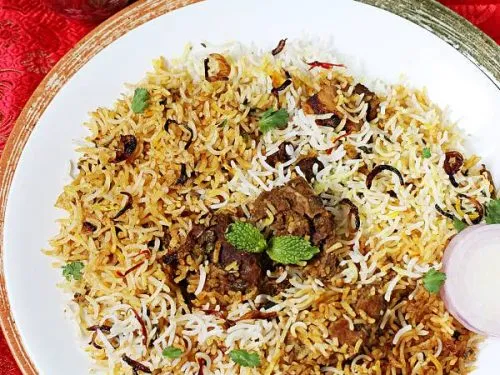
Hyderabadi Chicken Biryani
Updated: February 26, 2022, By Swasthi
Hyderabadi biryani recipe – Making a good Hyderabadi biryani is very simple and this recipe is perfect for a home preparation. This is the easiest biryani since it needs no sautéing of spices or meat. Just marinate the meat with the spices & other ingredients. Layer partially cooked basmati rice over it. Cook on a slow dum process, trapping the steam to retain the aroma.
To get an authentic flavor and taste of Biryani, do use all the mentioned ingredients and if desired you can substitute ghee for oil.
This is one of the best hyderabadi biryani recipe I have made for years and has been a favorite among the readers of this blog. It is very easy and even a beginner can try without any troubles.
This is a kacchi hyderabadi biryani, meaning partially cooked rice is layered over the marinated raw meat.
To make the best out of this recipe, chicken needs a proper marination which mainly helps to tenderize it, resulting in juicy, flavorful, soft and tender chicken.
It can be marinated the previous night and refrigerated to make the best flavorful biryani.
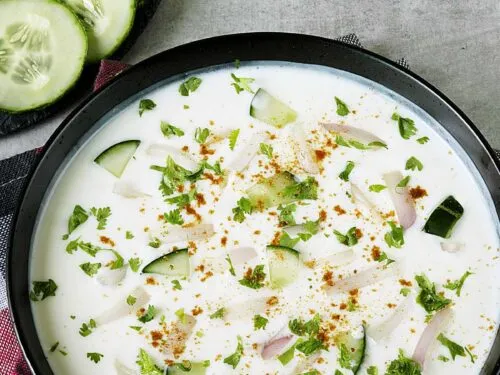
You can serve hyderabadi biryani with any of these raitas I have shared earlier. Even lassi goes well in the meal.
You can also check
Chicken biryani in cooker
Chicken dum biryani
Lamb biryani
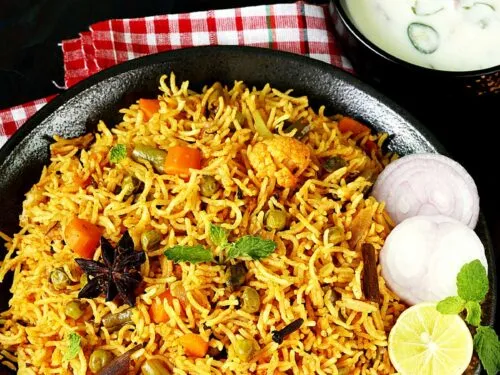
Vegetable biryani
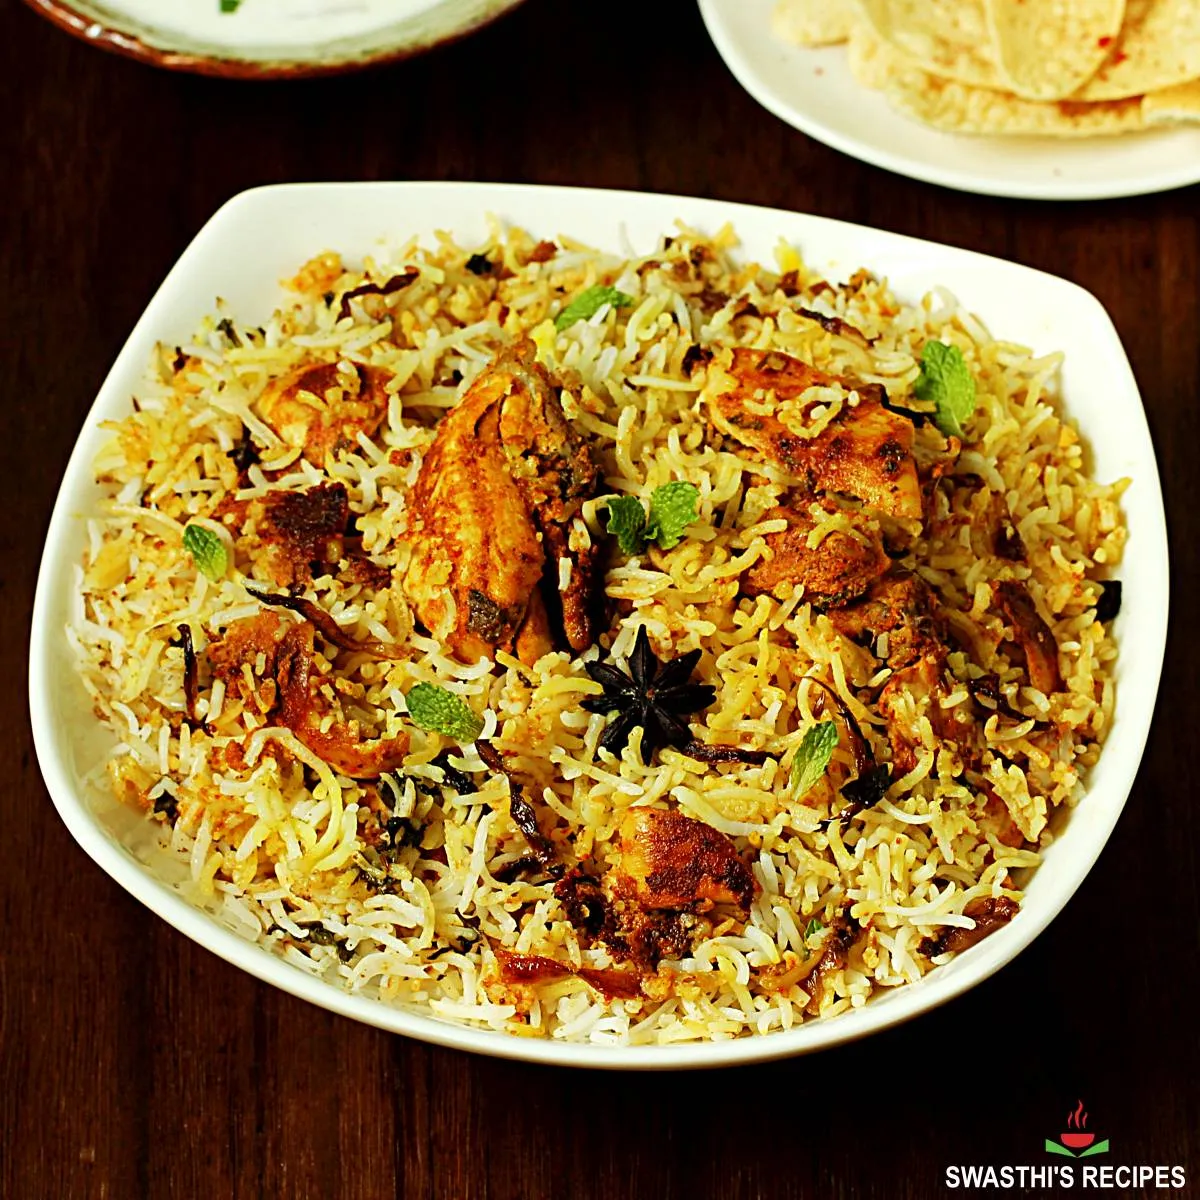
Photo Guide
How to Make Hyderabadi Biryani (Stepwise Photos)
Preparation
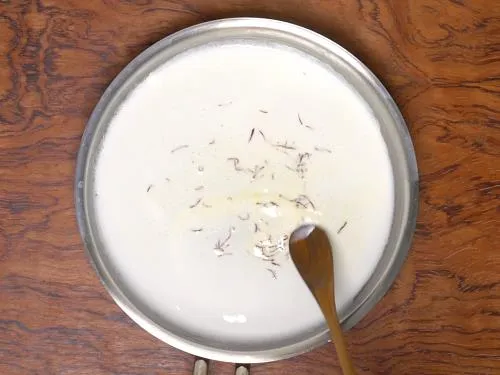
1. To a mixing bowl, add 2/3 cup (165 ml) yogurt, ¾ teaspoon salt, 1 to 1½ teaspoon red chili powder, 1 to 1½ teaspoon biryani masala, ¼ teaspoon turmeric, 2 slit green chilies, 1¼ tablespoons ginger garlic paste and ½ teaspoon cardamom powder. Do not use sour curd here.
2. Add 1 tablespoon lemon juice. If your curd is even slightly sour, then just skip lemon juice.
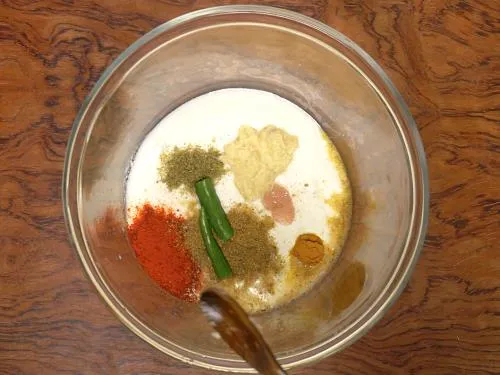
3. Mix all of them and taste the marinade. Add more salt if needed. I had to add another half tsp.
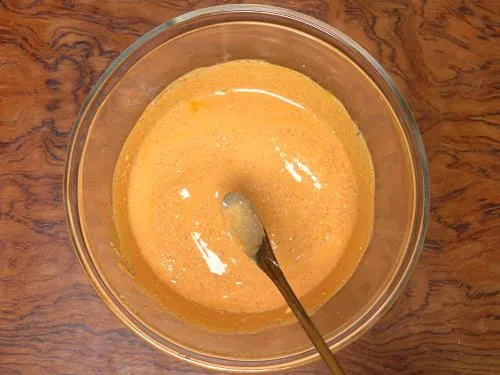
4. Add the chicken and marinate. Cover the bowl and allow it to sit overnight in the fridge or for at least 2 hours.
5. Keeping overnight makes the chicken very soft & succulent once the biriyani is cooked. If you are marinating it just for 2 hours, I suggest keeping the pieces to small to medium and not very large.

Fry Onions
6. Skip this step if using store bought fried onions. This can be done the previous night or just before you begin to make the biryani. Slice 1 large onion uniformly and thin. Separate the layers. Heat ¼ cup ghee in the same pot you intend to make the biryani.
When the ghee turns hot, add the onions and spread them well. Fry them uniformly until golden, crisp and aromatic. Keep stirring uniformly to fry them evenly without burning. When they brown, remove them and set aside. Do not over fry as they turn bitter quickly.
7. Soak a large pinch of saffron in 3 tablespoons hot milk. Do this just before you soak the rice.
8. Wash rice at least thrice. Do note that biryani turns out good only with aged premium quality basmati rice.
Cook Rice for Hyderabadi Biryani
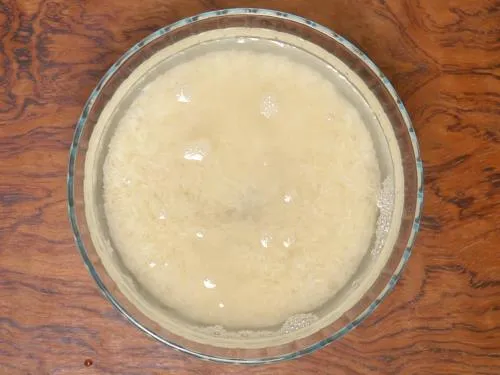
9. Pour fresh water and soak for 30 to 40 mins. Refer to the rice pack for soaking time.
10. Drain after 30 to 40 mins. Set this aside.
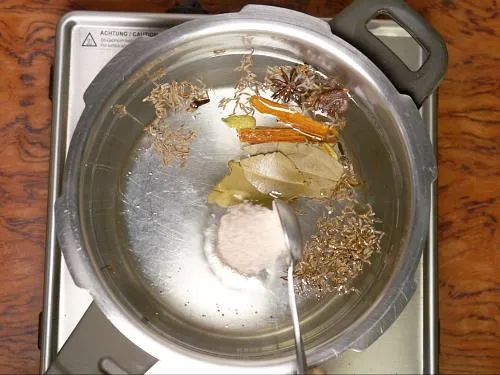
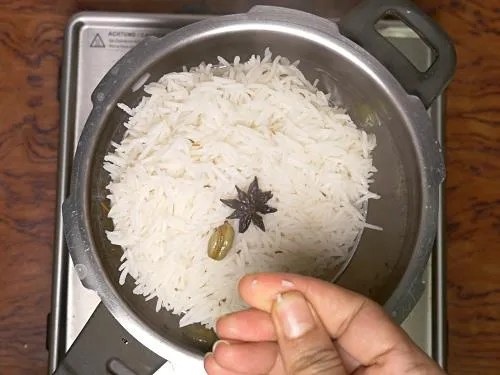
11. Add all the whole spices and 1½ teaspoon salt to a large pot of boiling water. Also pour 1 tsp oil. Stir and check the salt, the water has to taste salty. If not add more salt to your liking.
You can add the whole spices to a muslin cloth and make a knot if you don’t like to get a bite of the spices. Allow the water to simmer for 5 mins. Then bring it to a rapid boil.
12. Add soaked drained basmati rice.
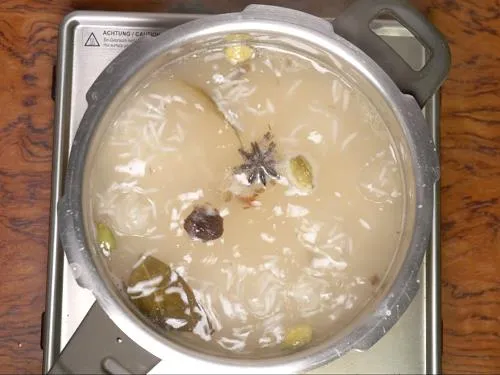
13. Cook on a medium high flame till rice is ¾ th cooked.
14. The rice must be grainy and you must get a bite into it, meaning it has to be slightly under cooked. If you are a beginner, please take a look at this detailed post on how to cook basmati rice for biryani.
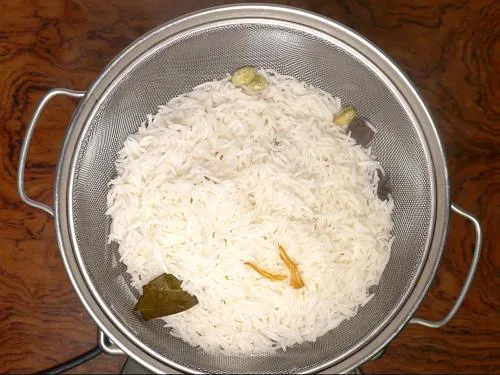
15. Drain the rice to a colander.
Make Hyderabadi Biryani
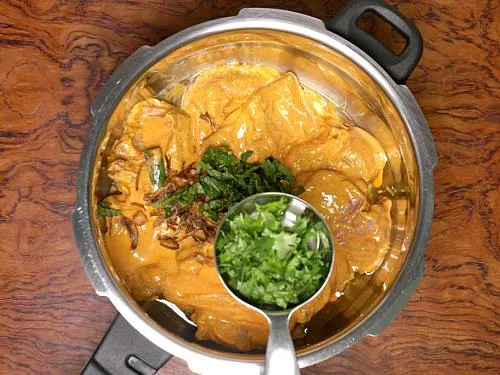
16. While the water for rice boils, add the chicken marinade to the heavy bottom pot you used to fry the onions. I used my 6½ ltrs heavy bottom pressure cooker pan. Sprinkle half of the fried onions, 2 tablespoons coriander leaves and two tablespoons mint leaves. Add the ghee or oil (4 tbsps we used for frying onions).
17. Mix all of them and level the chicken to spread to a single uniform layer.
18. Layer half of the cooked rice over the chicken. The rice must be moist and not with dripping water. It should not be dry either. Add a few more fried onions retaining some more for later. Sprinkle 1 tablespoon mint and 1 tablespoon coriander leaves retaining a few more for later. Sprinkle little more biryani masala (about 2 to 4 pinches).
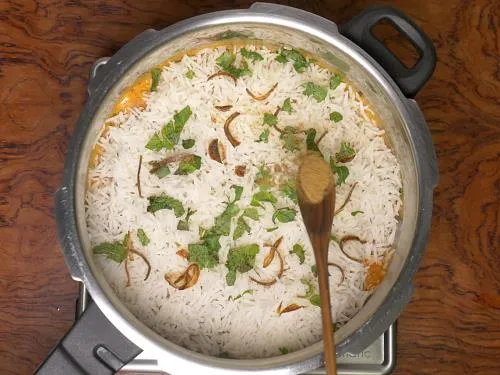
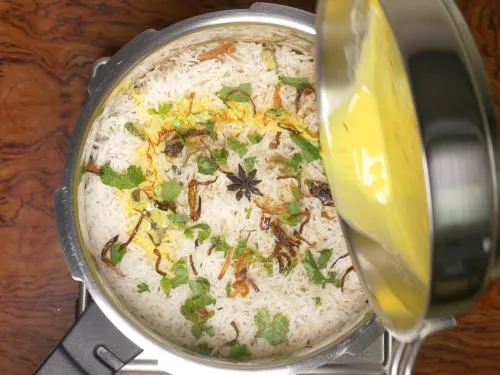
19. Layer the rest of the rice again.
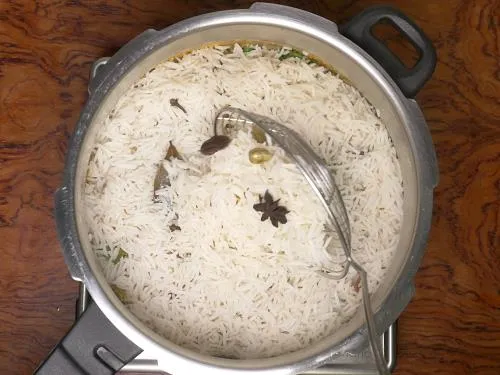
20. Sprinkle the rest of the fried onions, mint and coriander leaves and biryani masala. Pour the saffron milk.
21. To finish off, pour 2 tablespoons ghee. Please don’t use oil here, you won’t get the real flavor.
Dum Cook
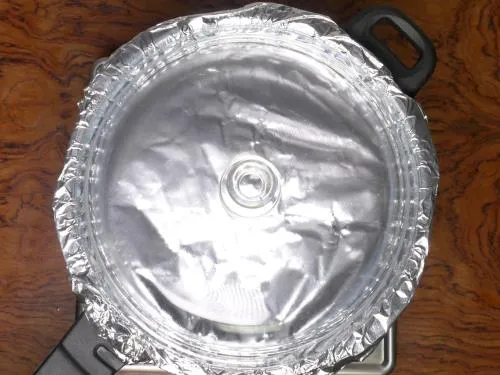
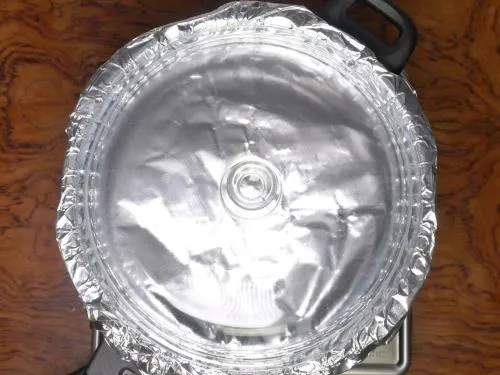
22. Method 1 – You can use either moist cloth or foil to seal the rim of the biryani pot. The cloth has to be thick and moist. Spread it over the rim. Place a heavy lid and bring the edges of the cloth to the center. (refer video for details)
23. Method 2 – Use a foil to seal the rim completely. Or make dough and stick to the rim of the pot. Place a heavy lid.
24. Place a old tawa or griddle on the stove. The flame has to be medium high. Do not use a non stick pan or a dosa tawa. I used my lodge cast iron pan which doesn’t work for making dosa. The flame has to reach across the diameter of the pan.
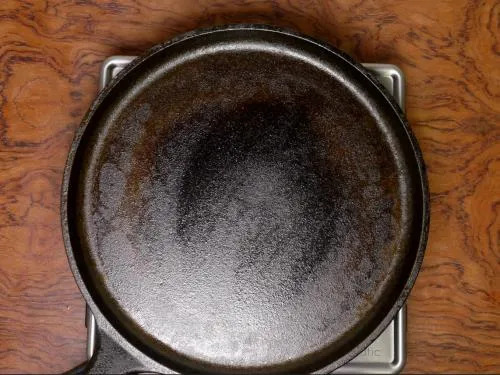
25. Place the biryani pot on the tawa. Cook on a medium high flame for 15 to 20 mins. Then Lower the flame to very low and cook for another 15 minutes. Switch off the stove and let it rest for atleast 20 mins.
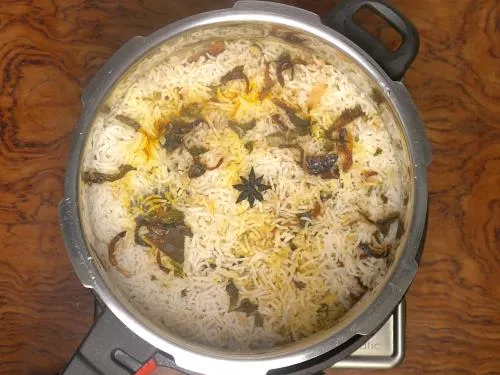
26. When done, there should be no excess moisture left in the hyderabadi biryani. If you see too much moisture, then cover back and cook until it is done. Fluff up the rice gently.
Serve hyderabadi biryani in layers with shorba or raita.
you can find raita recipes here
you can also find easy biryani gravy recipes. Hope you will like this hyderabadi biryani as much as we do.

Related Recipes

Recipe Card
Hyderabadi Biryani
For best results follow the step-by-step photos above the recipe card
Ingredients (US cup = 240ml )
- 1 ½ cups basmati rice (aged)
- ½ kg chicken (skinless, preferably bone-in thighs & drumsticks)
- ¼ to ½ teaspoon biryani masala (garam masala for layering)
- 1 large onions or ⅓ cup fried onions store bought
- 4 tablespoons coriander leaves (cilantro ,finely chopped, 2 tbsps + 1 tbsp + 1 tbsp divided)
- 4 tablespoons mint leaves (pudina, finely chopped, 2 tbsps + 1 tbsp + 1 tbsp divided)
- 4 tablespoons oil (or ghee)
- 2 tablespoons ghee (clarified butter)
- ¼ teaspoon saffron strands (kesar, soaked in 3 tbsps hot milk)
Marinade
- 1¼ tablespoons ginger garlic paste
- ¼ teaspoon turmeric
- 1 to 2 green chilies slit
- ⅔ cup yogurt (fresh curd) (or 165 ml or ½ cup + 3 tbsp)
- 1 tablespoons lemon juice
- 1 to 1 ½ teaspoon red chili powder (paprika, adjust to taste)
- 1 to 1 ½ teaspoon biryani masala powder (or garam masala)
- ¼ to ½ teaspoon green cardamom powder (or elaichi powder)
- ¾ teaspoon salt (I used 1 ¼ tsp pink salt)
Whole spices for rice
- 7 cups water
- 1 to 1¼ teaspoon salt (I used 1 ½ tsp pink salt)
- 1 teaspoon oil
- 1 bay leaf (tej patta)
- 3 inch cinnamon piece (dalchini)
- 6 cloves (laung)
- 4 green cardamom (elaichi)
- 1 star anise ( biryani flower)
- 1 black cardamom (optional)
- 2 strands mace (javitri) (optional)
- ½ tsp caraway seeds (shahi jeera) (optional)
Instructions
Make fried onions for Hyderabadi biryani
- Slice onion thinly, separate the layers and set aside.
- Heat 4 tbsps oil or ghee in a deep pan.
- Fry the onions stirring often until deep golden to brown.
- Do not burn else they turn bitter. Remove them from oil & set aside.
- Cool & pour this oil to the marinade later.
Marination
- Add yogurt, salt, turmeric, chili powder, biryani or garam masala powder, cardamom powder, green chilli, ginger garlic paste & lemon juice to a mixing bowl.
- Mix well & taste this. If needed add more salt or spice.
- Next add in chicken & marinate for 2 hours to overnight for best results.
- Overnight marination in fridge yields best soft succulent chicken.
Cooking rice
- Wash rice till the water runs clear. Soak for 30 minutes. Drain & set aside.
- Heat 6 to 7 cups water in a pot. Add 1 tsp oil, whole spices & salt.
- Taste this. The water has to be slightly salty.
- Boil water rapidly for 5 mins to release the aroma of spices.
- Add rice & cook till it is ¾ or 75% done.
- The center of the rice must be still slightly uncooked.
- Do not make the rice mushy. Drain off to a colander.
How to make Hyderabadi Chicken Biryani
- While the rice cooks, transfer marinated chicken to a heavy bottom casserole or non-stick pan.
- Add oil, ½ of the fried onions, mint & coriander leaves. Mix & spread chicken in a single even layer.
- Layer the cooked rice evenly, sprinkle fried onions, mint & coriander leaves over the chicken.
- Sprinkle ¼ tsp masala powder. Pour the saffron milk all over & then ghee.
- Cover the pot with a foil to trap the steam or dum. Then cover with a tight & heavy lid.
To bake Biryani in Oven
- Bake for 30 to 40 mins at 390F or 200C in a preheated oven. The timings will slightly vary depending on the depth of the casserole/pot used. Once done, if the chicken is too moist then bake for another 10 mins.
To dum cook on stovetop
- Place this over a thick hot griddle or tawa. Set the flame to medium high such that the flame reaches all over the diameter of the casserole. Cook this way for exactly 20 mins.
- Reduce the flame to lowest. Cook for exactly 15 mins. Off the flame. Rest for 20 to 30 mins.
- Garnish hyderabadi biryani with fresh chopped coriander leaves & serve with raita.
Notes
- If you do not like to bite in the spices, then tie up all the whole spices for rice in a muslin cloth. Add this to the rice pot.
- Do not use sour curd or flavored yogurt.
- To Brown the chicken – The last 5 mins cook the biryani on a medium high flame. This gives browned chicken. To prevent charring you can check the chicken at the bottom before you do this.
- If you do not like to use a cloth for trapping the steam or dum, you can use dough to seal the lid of the utensil. But cleaning up the mess is difficult. An aluminium foil too works.
Video
NUTRITION INFO (estimation only)
© Swasthi’s Recipes
About Swasthi
I’m Swasthi Shreekanth, the recipe developer, food photographer & food writer behind Swasthi’s Recipes. My aim is to help you cook great Indian food with my time-tested recipes. After 2 decades of experience in practical Indian cooking I started this blog to help people cook better & more often at home. Whether you are a novice or an experienced cook I am sure Swasthi’s Recipes will assist you to enhance your cooking skills. More about me
Follow Swasthi’s Recipes
Comments
Hi Swasthi. Tried your recipe last weekend. My first time cooking it. It turned out well, except for a few things which I think I might’ve been doing it wrongly. Firstly, chicken facing the bottom of the pot got burnt together with the marination. I put it on a tawa followed the timing but I think next time gotta reduce the timing on high flame.
Secondly, the top layered rice was much less saltier and less flavorful compared to the bottom layer. I made a mistake with the salt while cooking the rice. Didn’t realize it has to be really salty. Regarding the flavor, anything can be done? And also how do I make it spicier? Add green chili or add more chili powder?
Thanks in advance for the reply. The biryani was really flavorful and I received compliments from my family members. must try!!
Hello Rhuban,
Let me help you step by step
1. Yes, cutting down the high flame cook time and increasing the low flame cook time should work. Actually it could be the intensity of the flame – small, medium and large burners. A medium high flame on each of these burners is different. If your chicken burnt, I guess that’s because the intensity of heat is too much. Try shifting to a smaller burner. A economy burner size is ideal for this. Also the thickness of the pan (at the base) and even the tawa affects. With a thinner bottom, chicken can get burnt. FYI- I use a lodge cast iron tawa/ crepe pan for diffusing, which has a real thick base. Not sure, if your tawa is thick enough.
2. Yes water has to be salty.
3. Green chili paste or chopped chilies work. Adding more ground spices may result in a drier biryani.
I have an upgraded version of this coming up in the next few weeks. Please check back because I will be updating with a lot of tips. Thanks for letting me know how it turned out for you.
I did try the Recipe today.. Rice Turned out well, but the only deficit was, gravy was not enough. It almost looked like a white rice and the taste was bland and there was no masala enough for the rice.
I was wondering how to make it more gravy and masala..
Otherwise Recipe was good. Worth the try.
Hi Ammulu,
Traditional Hyderabadi biryani is different from the other masaledar biryani’s that are served in the restaurants these days. Traditional Hyderabadi biryani won’t have that excess masala because it is made with minimal amount of ground spices. If you like more masala in your biryani, I think you should try this restaurant style chicken biryani (recipe 2). Other option is to cut down the rice to 1 cup in the above recipe & see how you like that. I wouldn’t suggest tweaking this recipe because several factors affect this kind of a biryani. Just to let you know, I have an upgraded version of this recipe and hoping to post it in the next few months. Thanks for letting me know
Can I use whole biriyani spices in chicken marination instead biriyani masala powder
Yes you can
Swasthi, would you add extra ghee to this recipe if using store bought onions versus cooking your own in the 4 tablespoons of oil/ghee you note in your recipe? It seems like I’d want to add some combination of oil to make up for the 4 tablespoons not used to cook the onions and then added to the marinade.
Hi Don,
Please see my reply below. Sorry for the delay. I was on a holiday
Hi Swasthi. I made your Palak and Kadai Paneer recipes without changes and they were excellent. I decided to try the Hyderabadi Biryani (Biryani is a favorite of mine) with not the greatest results. A couple of questions for you. I used the store-bought onions and afterward felt I should have compensated for the 4 tbsp. of ghee that would have been included if I had cooked raw onions. Would you suggest adding more than the additional 2 tbsp. included in the recipe to compensate? Any advice will be appreciated.
Warm regards!
Hi Don,
Glad to know palak and kadai paneer worked well. If you think just adding more ghee would solve the problem, yes you may try it that way. You didn’t mention what actually went wrong with the dish? I could help you if you were eloborate. Are you trying to replicate a particular type of biryani with this recipe? Do let me know. I can help you better
how much of gram is 1½ cup basmati rice , in this recipe
Use 275 grams rice in this recipe
Very nice recipe 🥰🥰🥰🥰🥰☺️☺️☺️☺️☺️😍🥰😋
Thanks Manpreet
5 start
Hi Swasthi, love this recipe, it’s my favorite. I make with 1kg chicken, how do you recommend adjusting the recipe? Also I use bone in thighs and drumsticks. Do you suggest removing all the skin? It does seem to have lots of water releasing.
Thanks Paddy. Yes remove the skin. Select 2x from the recipe card and follow the same as written, except to use a wider pot. Your chicken should fit in a single layer to match the same cook time. Hope this helps
Excellent recipe
Thank you
Very well explained, thank you! Unfortunately, my biryani burned at the bottom. It was my first time trying dum process with a wet towel. The lid of my pot didn’t seal completely, I could see some steam escaping. Is that the reason why ot got burned? Too much steam evaporating and that’s why there was not enough moisture left in the pot? I will sure try again.
Hi Lena,
There can be many reasons for burning. Yes the steam should not escape. It could be Greek yogurt also. I haven’t tried this recipe with Greek yogurt. The thick consistency compared to the regular homemade yogurt may cause the burn. The other reason could be not using a heavy bottom pot/pan and a thick heat diffusor (tawa). I think you should try to troubleshoot step by step
Is it good to add oil in marinated chicken before dum, I have seen in many YouTube videos…..
And should I use sunrise biriyani masala powder for this recipe
My recipe also uses oil/ghee (but onion fried ghee) in the marinade. I have no idea about sunrise biryani masala. I use this homemade biryani masala
Ohh…Can I add cooked rice water in the Marinated chicken before dum, does it will taste good? …i have seen in many youtube videos,
And can I also added grated khoya and kesar milk to the Marinated chicken before dum
Please follow one recipe without changes. Trying to cook using multiple recipes (for a single dish) can easily affect the flavor profile.
Can I add Essence like kewra water, rose water, mitha ittar and also can I add cooked Rice water to the Marinated chicken before dum
Yes you can add the kewra/mitha attar or rose water while layering. But note that all these have preservatives and additives. So use them only if required
Can I use sunrise biriyani masala powder for this biriyani
Delicious Chart😊
Swathi! I want to say a BIG thank you! Your recipes are a savior. I am a newbie to cooking and today when I thought of making briyani I knew exactly where I needed to go to learn how to cook. All your recipes have turned out delicious.
Thank you!
You are most welcome Pinky. Very happy to read this comment. Thank you so much for the trust!
How do I make sure that the chicken is cooked completely since it is at the bottom of the pan?
Also, if I don’t have a wide pot, would it be a bad idea to not have the chicken in a single layer?
Hi Dileep,
Yes it is advised to use a wide pot, good enough to spread in a single layer. However if you are cooking it in a oven, this is not essential, but still recommended. Marinating longer ensures the chicken is cooked through. I have been making this recipe for more than 14 years and never had a problem with undercooked chicken. This recipe may not work if you are using a portable stove of any kind (gas/induction/electric). If you are a beginner (cooking with chicken), I won’t suggest this recipe. Please use my other chicken biryani recipe (recipe no 2 – restaurant style). That recipe has been created for beginners. Hope you get to try!
This is my go to recpie
Thank you
Thanks chef
Best cooking
Hi
If you have to gram wise
How much is 1 1/2 cups of rice in grams?
Hi,
It comes around 275 grams
Hi! Just want to confirm – are the cups of rice for a regular US standard cup or rice measuring cup? How many cups of rice would you suggest for 16 people?
Hi Jiya,
It is a US measuring cup. About 6 cups rice for 16 people. But if you have a lot of other dishes like naan, appetizers etc, 5 cups would be enough
Thank you. I scaled up for 7 lbs of chicken and 9 cups and rice and used your recipe for biryani masala. Dish was excellent, chicken moist and flavorful. Dish was excellent and well received.