How to Make Ghee (Ghee Recipe)
Updated: September 15, 2023, By Swasthi Shreekanth
Learn how to make Ghee at home. Ghee is a type of clarified butter that dates back to thousands of years. Well known as a pure cooking fat with high smoke point, it is nothing but a clear golden liquid that is traditional in Indian cuisine & is associated to Vedic cooking and Ayurvedic practices. In this post I share how to make ghee at home with a simple step by step photo guide. You will also learn everything interesting about Traditional Ghee!

But why homemade? Homemade ghee is much superior in taste & flavor. It is pure and unadulterated. If you have never tried making your own at home, then you got to try it! I am sure you will never go back to the store bought one.
As aroma of fresh spices sauteed in ghee wafts through the kitchen & it brings backs childhood memories for a lot of Indians. I remember granny and mom preparing my favourite comfort food – Delicious dal tempered with spices in a generous amount of ghee!!
For Indians, and South Asians for that matter, their love affair with this nutty flavoured cooking fat goes back not just into childhood but millennia. Ghee may have originated in Vedic India, but its roots have spread across the globe from North Africa to Fiji and Malaysia.
While Paleo and keto diet aficionados have made it popular in America and European modern times, ghee’s history is both fascinating and legendary.
According to food historians, this cooking fat started its journey over 5000 years ago as an innovative and shelf stable solution to a pressing problem in tropical India – butter spoilage. But soon found its way into cooking, medicinal systems and spiritual traditions. If you are new to Indian cuisine and wondering
What Is Ghee
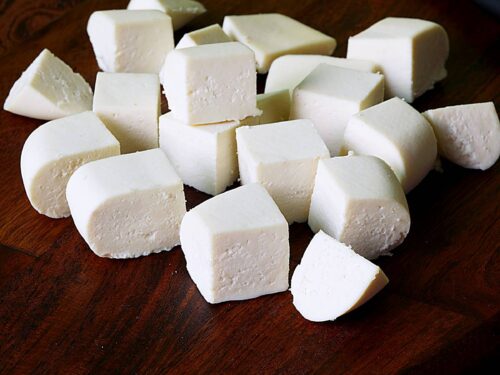
Ghee is a type of clarified butter made by simmering butter until the milk solids separate from the fats and caramelize, infusing a nutty aroma. It is then strained off to remove all caramelized milk solids. The filtered clear pure fat is known as ghee.
Ghee finds mention in ancient literature and recipes, Ayurvedic practices and Hindu mythology. According to one of the stories of creation, Prajapati, a Vedic deity churned the first ghee out of nothing by rubbing his hands together. He then poured it into the fire to create his offspring, leading to a practice that Hindus consider auspicious and continue to this day.
Ghee from the sacred cow is offered into fires (homa/ havan) during marriages and other religious ceremonies as it symbolizes auspiciousness, nourishment, creation and positivity.
Ayurveda, the traditional medicine system, extolls the virtues of this pure butterfat. Ghee is seen as beneficial to the immune system (ojas) and a nourisher of body tissues (seven dhatus).
It serves as a base for many herbal formulations and a carriers of herb nutrients to body cells. Ghee is used as a digestive aid (an appetiser), cooling agent, salve for burns, moisturiser and lubricant, and a general health booster.
Ghee became an important dietary staple and a key ingredient of a balanced diet. Vedic cooking even proclaimed food cooked in ghee to be superior to other types of cooked food.
Indians no longer cook this way, but you’ll still find traces of this system. Festive, temple offerings and ceremonial foods are usually made with ghee.
What Makes Ghee a Great Cooking Fat
Ghee is delicious on its own. When you cook foods in it, you imbibe the resulting dish with a distinct and enticing flavour. But taste isn’t the only reason you should use ghee for cooking or baking.
Ghee is lactose and casein free as milk solids are removed during the process. If you’re are lactose intolerant, and experience discomfort after consuming butter, switch to ghee.
What sets it apart from healthy cooking oils and butter is the high smoke point. Most oils including coconut have a much lower smoking point. Even butter breaks down when heated beyond 175°C (350°F).
Why does smoking point matter so much?
According to food scientists, cooking fats are safe only to use when they are heated to 180°C or lower temperatures. Past this point, they release acrylamides – a toxic cancer causing compound. This makes ghee a safer cooking agent.
The benefits of ghee don’t end there. Unlike refined seed and vegetable oils, ghee has a good ratio of omega-3 to omega-6 fats. Any imbalance of these fats causes inflammation and leads to chronic illness like obesity, heart disease and hypertension.
This cooking fat can reduce bad cholesterol (LDL) levels in your body. Eat small amounts of ghee every day to improve your overall health.
Why Cultured Butter
Traditional Vedic Indian ghee has always been made with cultured cow butter, the butter that is got by churning curd / Indian yogurt. The taste and flavor of cultured ghee is so much superior to regular ghee. It is easier to digest and can also be given to babies.
So most traditional Indian households make ghee from scratch without any shortcuts.
Importance of butter from grass fed cows
Though ghee can be made from both buffalo & cow milk, buffalo ghee doesn’t share that special status accorded to cow ghee.
In India, only ghee made with cultured butter from grass-fed desi cows is considered pure & said to be beneficial for health.
But is this just a cultural belief or is there more to A2 Ghee?
Cow ghee is rich in fat-soluble vitamins A, C, E and K and is loaded with antioxidants and essential minerals like calcium, iron, magnesium, zinc, folate, iodine and phosphorous.
Grass-fed cow ghee is said to contain more of conjugated linoleic acid (CLA), a double-bond fatty acid that boosts immunity by producing more T-cells or warrior cells.
With so many health benefits, why not use butter from grass fed cows, if possible cultured the Indian way.
Photo Guide
How To Make Ghee (Stepwise Photos)
Making ghee at home really doesn’t take much of your time. I usually add butter to the pot and leave it on a very low flame while we eat our dinner. It does on its’s own with minimum monitoring. The ladle does the magic by preventing any overflow & I do not stir it at all.
1. Add unsalted butter to a heavy bottom deep pot and begin to heat it on a medium flame. Using a deep & heavy bottom pot is essential to avoid overflowing.
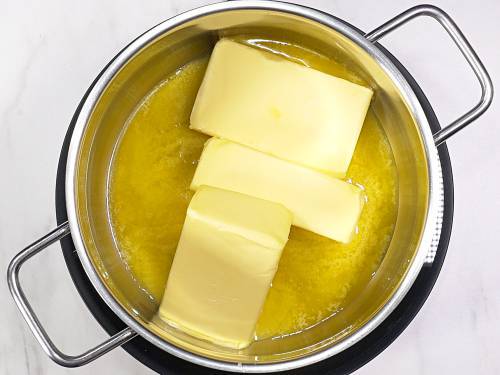
2. I always leave a ladle in the pot as it prevents overflowing.
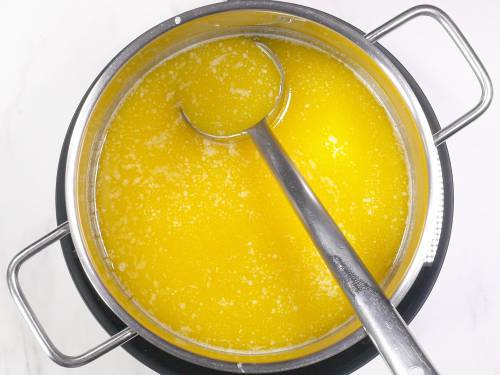
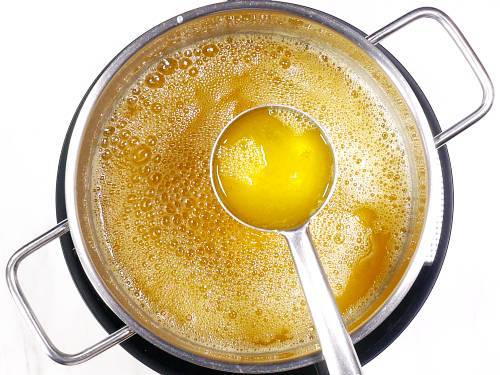
3.As the butter begin to turn hotter, it will froth up a lot. Give a good stir and reduce the flame.
4. Soon the froth evaporates and butter begins to bubble rapidly.
5. Within few minutes, the color of the butter begins to change from yellow to light golden.
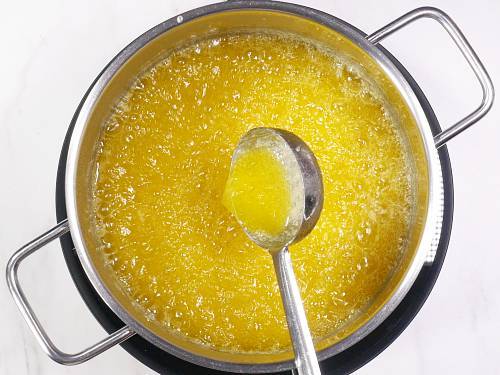
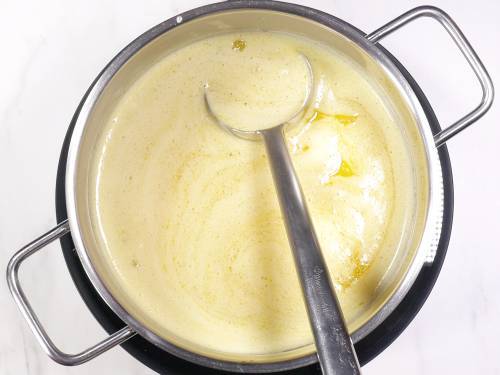
6. At this stage, the milk solids begin to settle at the bottom & the bubbles will reduce significantly. You can see them in the picture. I have shown little milk solids in the ladle. When they just begin to turn light brown, remove the pot from the stove.
7. Ghee will continue to cook in the hot pot and brown the milk solids. Let the temperature cool down a bit.

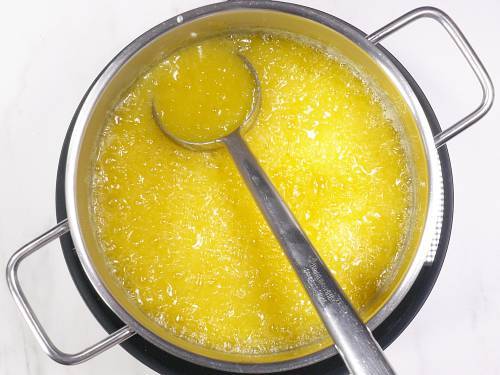
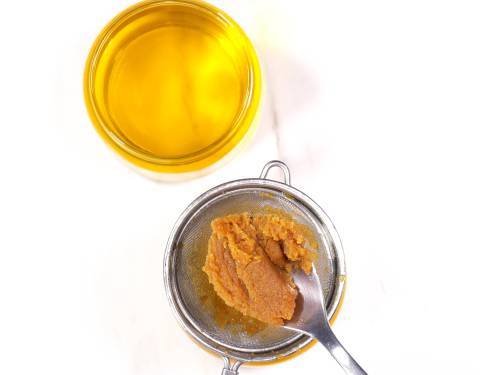
8. Place a clean and dry strainer/filter over a clean jar. Pour the ghee through the strainer/ filter. Press down the milk solids. I usually strain the ghee to several small jars. This helps the ghee to remain fresh for longer.
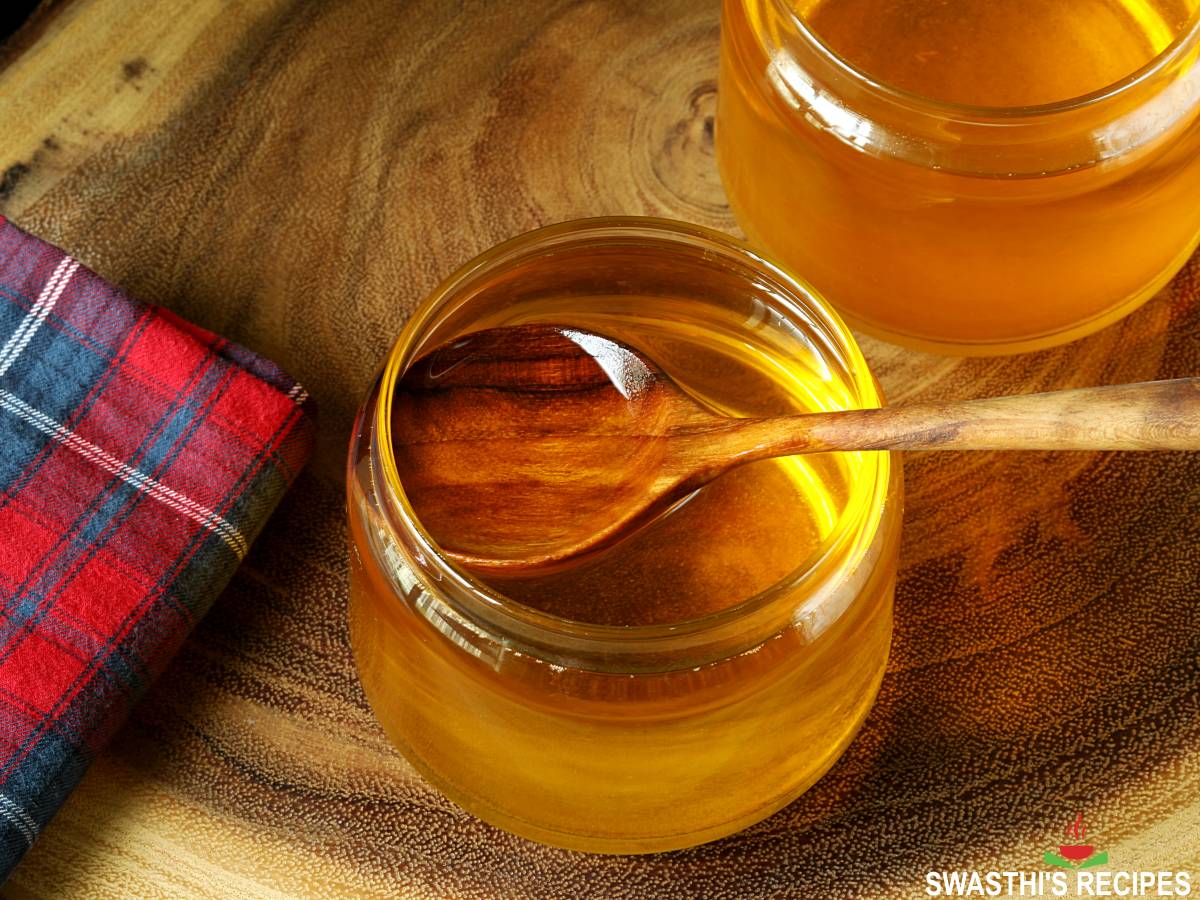
Cool down the ghee completely and cover with a air tight lid. Store in a cool and dry place, in your pantry. Use them to make various Indian dishes likes
Parathas
Dal tadka
Khichdi
Biryani
Carrot halwa
Besan ladoo
Traditional Method of Making Ghee – Bilona
The traditional method of making ghee starts with fresh milking of the desi cows. The milk is boiled to remove bacteria and other impurities and cooled down to warm temperature.
It’s then transformed into curd/ Indian yogurt with a bit of starter yoghurt. This is traditionally set overnight in clay pots. Later the curd is scooped into a bigger wooden or earthen pot and a bilona, a wooden churner is placed in the pot.
The bilona has a rope wrapped around it. You churn the contents of the pot by continuously pulling the rope ends with both hands, creating a clock-wise and anticlock-wise motions which slowly separates the white butter from the whey.
The white butter is transferred to another earthen pot and heated over a slow wooden fire. The liquid continues to cook well after the milk solids separate and deposit to the bottom & caramelize slightly.
Sometimes cooking and medicinal herbs are added during the boiling process to develop more flavour and enhance the medicinal value of the ghee.
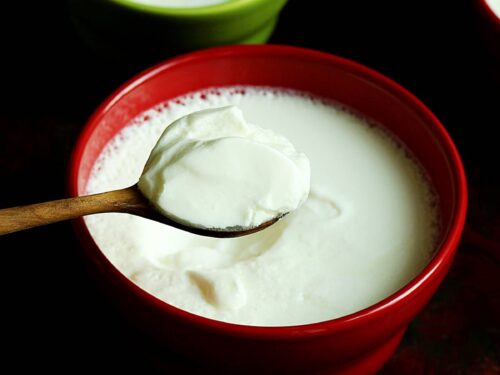
How To Culture Cream To Make Cultured Ghee
Here I am sharing the way my mom makes ghee from scratch (Method B & C). The steps to make traditional ghee – culture the cream, churn the cultured cream to get cultured butter and then simmer the butter to make ghee.
Step 1. Culture the cream : Follow either method (A) or (B) or (C) based on your convenience. Methods B and C are traditionally followed.
Method A – Heat up 2 cups of heavy cream until warm enough. Stir in 2 tablespoons of yogurt (at room temperature). Cover and keep it in a warm place for 8 to 16 hours as you would keep to make yogurt. When your cultured cream is ready, it smells like yogurt. Chill it for few hours and then proceed to step 2 to make your own cultured butter.
Method B – Boil non-homogenized full fat milk. When the temperature comes down you will see a layer of cream over it. Make yogurt using both the cream and milk, following this post on homemade yogurt or curd.
When the yogurt is set remove the top portion of the cultured cream and store in a separate jar. Refrigerate and keep adding the cream to it every time you make yogurt. You will need at least a cup of this cultured cream to go ahead and make your butter, followed by ghee.
Method C – Boil milk and let it cool down for a few hours. Remove the milk cream that forms on top & store in a separate jar. Refrigerate this and keep adding more cream every time you boil the milk.
When you have a cup of this cream, heat it to warm temperature and then add a tbsp of yogurt/curd culture to this and mix well. Allow this to set in a warm place like regular yogurt for 5 to 8 hours depending on the temperature.
Churn Butter To Make Ghee
Step 2.Churning butter from cultured cream: Add the cultured cream from step 1 to a blender jar and pour 3/4 to 1.5 cup chilled water depending on the size of your blender. Run the blender in intervals of 40 to 80 seconds. After a few minutes of blending you will see all the cultured butter floats on top.
Rest for a while until it comes together. To quicken the process you may pour some chilled water to the jar.
Remove the butter and add it to a separate bowl. The rest of the liquid in the blender is the traditional or old fashioned buttermilk. You can drink it or use in recipes calling for buttermilk.
Rinse the butter well with plenty of clean water at least thrice. This step is very important and will prevent the butter from splattering while making ghee.
Next comes the actual process of simmering this butter to ghee which I have shared in the recipe card. You can also follow the step by step photo guide.
FAQS
Cook or bake with ghee instead of vegetable oils or butter. Use it in spreads and dressings. Sauté, roast or deep fry your favourite foods in ghee instead of oil or other animal fats to develop a richer and deeper flavour. Add it to coffee, tea, soup, soups, stews and smoothies. How you use this golden liquid will depend on your intended purpose.
Ghee is shelf stable and can be kept without refrigeration for 2 to 3 months. Store it in air tight glass jars, away in your pantry. However, care should be taken to use clean dry spoons to dip into the jar during every use.
Ghee made from cultured desi cow butter keeps good for 6 months, beyond that the flavour becomes more intense as it ages. Ghee made with regular butter can last only a couple of months at room temperature so it is good to refrigerate if you want it to last longer.
Yes! Ghee is lactose and casein free as milk solids are removed during the process of making ghee
Is Ghee The Same as Clarified Butter?
Not exactly, as the answer lies somewhere in between. Both are derived from butter and don’t spoil at room temperature. Both have water and milk solids removed. You can make clarified butter and ghee with the same heating process. But the similarity ends there.
Clarified butter is strained once the water and milk solids have separated from butter. Ghee is what you get when you cook this liquid a bit longer, until it turns golden brown and acquires a nutty aroma. Strain this liquid and you have the food fit for gods.
If you’re wondering, clarifying unsalted butter isn’t the only way to make ghee. You can make ghee by heating whole milk cream. But best and traditional method is to churn curds or Indian yoghurt.
The taste and flavor of ghee made from cultured butter is much superior than the one made with regular butter churned from cream. So most traditional Indian households make ghee from scratch without any shortcuts.
Ghee made from cultured butter is believed to be easily digestible & is a better choice especially for babies & kids.
How To Make Flavored Ghee?
Here are some ways to flavor up your ghee. My mom would always make a variety of flavored ghee. I suggest trying these in smaller quantities.
Curry leaves or moringa leaves: I have shared the curry leaf flavored ghee in recipe notes. Follow the same to make the moringa flavored ghee. You can add the moringa leaves to your chutney.
Dried Red chilies: Add a few broken dried red chilies to the hot ghee just before turning off the stove. The chilies turn crisp under 30 to 40 seconds, remove them immediately.
This infuses a spicy and hot flavor to the ghee. You can smear this over your rotis, parathas, dosas or top it over plain rice. You can use the chilies in your chutney. Please do not try it with fresh chilies.
Related Recipes


Recipe Card
How to make Ghee (Ghee Recipe)
Ingredients
- 227 grams unsalted butter (8 OZ or ½ pound, cultured grass fed cow butter)
- 5 sprigs fresh curry leaves (refer notes)
Method
- Add butter to a heavy bottom deep pot and begin to melt on a medium flame.
- Butter melts and turns frothy. Then lower the flame & simmer until all of the froth evaporates. I usually leave a ladle/spoon in the pot as this prevents overflowing.
- Next butter will begin to bubble a lot. Stir it occasionally & continue to cook on a low heat.
- Soon the butter changes its color from yellow to clear golden. At this stage milk solids will settle at the bottom & begin to turn slightly light golden/brown. Also bubbles will reduce significantly indicating it is done.
- Turn off the stove and set the pot aside to cool down. This step is important to avoid overcooking or burning it.
- Ghee will continue to cook on its own for another 1 to 2 mins since the pot is hot. By then the ghee is perfectly done – clear, golden in color and all the milk solids browned but not burnt.
- When the temperature comes down, place a strainer over a clean jar and filter it. Press down the brown solids with a spoon.
- Cool the ghee completely and cover it with a tight lid. Store at room temperature in a dry cabinet for upto 3 months or refrigerate for an year. Ghee will solidify in a few hours or days depending on the temperature.
- Press SAUTE button (normal) on the Instant pot and add the butter to the inner steel pot.
- Butter will melt and turn frothy. Press the saute button twice again to adjust from normal to less.
- After a few minutes, the butter changes its color from yellow to clear golden. The milk solids settle down at the bottom.
- Press the CANCEL button. If the milk solids turn to light brown then remove the steel insert from the Instant pot. If the solids are still white in color you may leave the pot in. Ghee will continue to cook there and brown the milk solids.
- Let it cool down a bit. Clean and prepare air tight jars to transfer your ghee.
- Strain/ filter the ghee to a clean air tight jar. I strain it to several small jars so they remain fresh longer. Seal the jars well and store in a cool and dry place in your pantry.
Notes
- Nutritional values are per serving – 1 serving size is 1 teaspoon.
- It is important to cook the butter until the ghee turns to golden and the milk solids to light brown. This is essential for a good shelf life & flavor.
- Ghee will continue to cook in the pot for 1 to 2 mins even after the heat is turned off. Be cautious & avoid overcooking as it only takes 30 seconds for the perfect well done ghee to burn off & alter the flavor.
- To flavor the ghee: 5 to 10 sprigs of fresh clean curry leaves can be added to the ghee just before turning off the stove. The leaves fry in the hot ghee and turn crisp. This flavors the ghee. (Avoid adding wet leaves as the ghee will splatter.)
- Remove the crisp fried curry leaves and keep them in a small glass jar. Refrigerate them. Add a few leaves to curries, sambar or any other recipes when you are not accessible to fresh leaves.
- Making ghee in Instant pot: There is no benefit of making ghee in an instant pot unless you want to use the deep pot (steel insert). It is very important to remove the steel insert from the Instant pot once the ghee is done. Otherwise the ghee may burn off. Use kitchen cloth or mittens & be extremely cautious while you remove it.
Private Notes
Tried this recipe?
Mention @SwasthisRecipes or tag #swasthisrecipes!Ghee recipe first published in March 2020. Updated and republished in May 2021.
About Swasthi
I’m Swasthi Shreekanth, the recipe developer, food photographer & food writer behind Swasthi’s Recipes. My aim is to help you cook great Indian food with my time-tested recipes. After 2 decades of experience in practical Indian cooking I started this blog to help people cook better & more often at home. Whether you are a novice or an experienced cook I am sure Swasthi’s Recipes will assist you to enhance your cooking skills. More about me
Follow Swasthi’s Recipes
Comments
Thank you for the guidance. I’ve made ghee using your recipe and it was easy. How much ghee does 8 oz butter make? Do you have a preffered brand of butter to make ghee. Thanks for your reply.
Beautiful and simple recipe. Thank you
thank you. I made my first homemade ghee and it was a great experience.
Another perfect instructional guide! I love that you included cultured ghee
Well done, Swasthi! Thank you
This is a simple and easy way to make ghee 😊
Perfect.
Good
Swasthi, Thank you for the recipes. This is my first time making homemade ghee from butter and it smells amazing. I made a large batch of ghee 2 weeks ago and stored them in glass jars away from moisture. I see the ghee has started to form round white balls. Is it normal and safe? What did I do wrong?
Ur recipes clarifies every doubt in cooking
So easy to make Ghee! I was told that it is time consuming. What do you do with the solids that are left in the strainer? I hate waste .
Yes it is very easy & fast to make. You can spread it on toast, cutlets or add it to soups, mix with hot rice and add little salt & dried ginger. You can also add it to roti/paratha dough.
Making ghee looks so simple but wouldn’t be possible for me to get the perfect flavor without a written recipe. I made a large batch last night for sunnundalu. They turned out delicious, so fragrant and mouth-melting. Going to try the curry leaves hack next time. Thank you Swasthi.
So glad to read this Varshini. Thank you
Wow! Never knew it’s so easy to make ghee at home. Followed exactly as written and it came out perfectly. Smells and tastes so good in your biryani. Sending it to my 80 year old mom. Next I am going to roast the chicken with ghee.
That’s nice to know Kelly. Happy to read this! I am sure mom will like it on dal or curry. Thank you for sharing back
I made my first batch of ghee and it smells divine. So different from what I have eaten from the stores. I am learning to cook Indian and glad I found your website
Thanks for trying Karen. Glad you like it.
Thank you for the amazing recipes and ideas. I made this ghee many times in the past year and have also experimented flavoring it. Love the fresh curry leaves flavor in ghee. I stored the crisp leaves in the refrigerator and have been using them in my tadka. What a great aroma!
Happy to read that Nancy! I agree curry leaves are so good!
Thank you for this recipe. I can’t wait to try it!
You are welcome Jodi
Thanks for sharing this information in such a detailed manner. I have preapred ghee from bilona method which is adds a lot of taste in my daliy food.
You are welcome!
Hi Swasthi,
I saved malai for a month. But now the old container has pink and green later on top of the malai. Is it safe for making ghee?
Hi Mamoni,
It is not good to use. It should be mold. I assume it is milk cream and not cultured cream (cream on top of the yogurt). One month seems to be long for milk cream. Cultured cream keeps good for several months. I have mine in the freezer longer than 6 months and it smells fresh.
I’m so happy I found your instructions! When I was taught in a restaurant kitchen you stood there & skimmed the foam & solids. As I’m sure you know that doesn’t work well! You still have solids & its a pain to do so I stopped making it. This way is so simple! It did take longer ~ 1/2 hour. When done solids were pale yellow/light tan so I think I could have gone another minute but I took your comments to heart about how it only takes 30 seconds to ruin it & that it keeps cooking for a minute or two after pulling off heat. Next time I’ll be better, less nervous about ruining 2 lbs of butter! Thank you!
Happy to read this Christine. Thank you for sharing back how you made it. Actually after making it a few times, you will able to make the ghee faster, because you know how to play with the heat better (Ex. increase the heat in between so the butter melts faster). Glad the post helped!
I have some questions – Would I be correct in saying that simply melting and clarifying butter will never have the same flavour that proper desi ghee achieves? Two, can you use greek yoghurt or other natural yoghurt to do short form Method B/C or are commercially available yoghurts not viable for this purpose due to the processing and actually a different yoghurt culture from Indian curd? And finally, when in India, can we use dahi (not the commercial one) to short cut method B/C? Thanks in advance!
Hi Job,
1. Yes it won’t have the same flavor. 2. Yes the store bought yogurt does not gives the same flavor unless it has the same cultures used in India. But if you have never tasted the traditional curd made from Indian cultures you won’t know the difference. 3. yes you can.
FYI – the store bought curd in India is not always the same as the traditional curd (I feel it is mostly made from different cultures).
I’m wondering if you’ve ever water bath canned this and if so, how long of cook time in the canner? Thank you
I have no idea about canning this.
I’m so glad to come across your recipe for Gher. I have a Guernsey milk cow, have been making my own yogurt and butter for years, but I’ve always pulled the cream to make butter and made yogurt with milk. I also make whole milk yogurt, never thought to make cultured cream this way. And was completely ignorant of cultured butter, the light has finally come on! lol. Thank you. Will have to look at your other recipes as I love Indian food ?
That’s really nice to know Carol.
Thank you