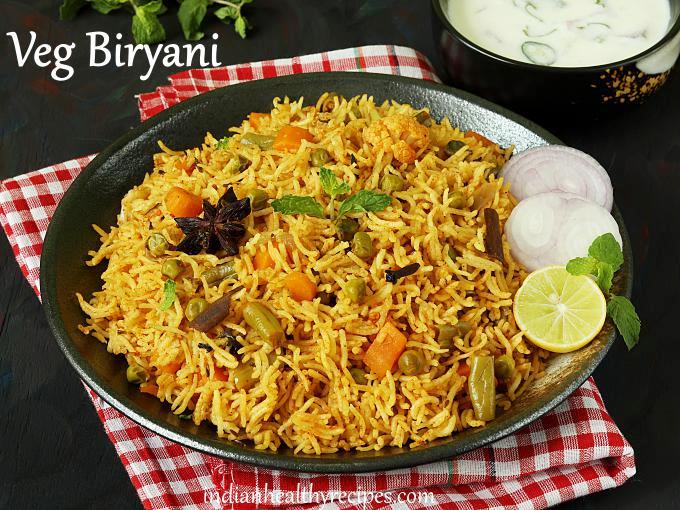
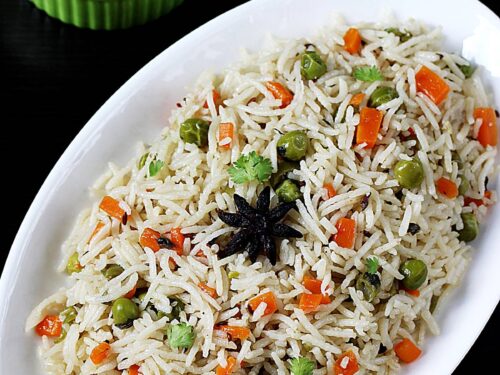
Veg Biryani (Vegetable Biryani Recipe)
Updated: April 29, 2023, By Swasthi Shreekanth
Veg Biryani recipe with pot, pressure cooker & Instant pot options. Vegetable Biryani is an aromatic rice dish made with basmati rice, mixed veggies, herbs & biryani spices. This easy Veg Biryani is a total crowd pleaser! You will love this for everything from busy night meals to holiday family dinners. In this post I share 2 ways to make – one pot fast biryani and the other restaurant style Dum Vegetable Biryani.
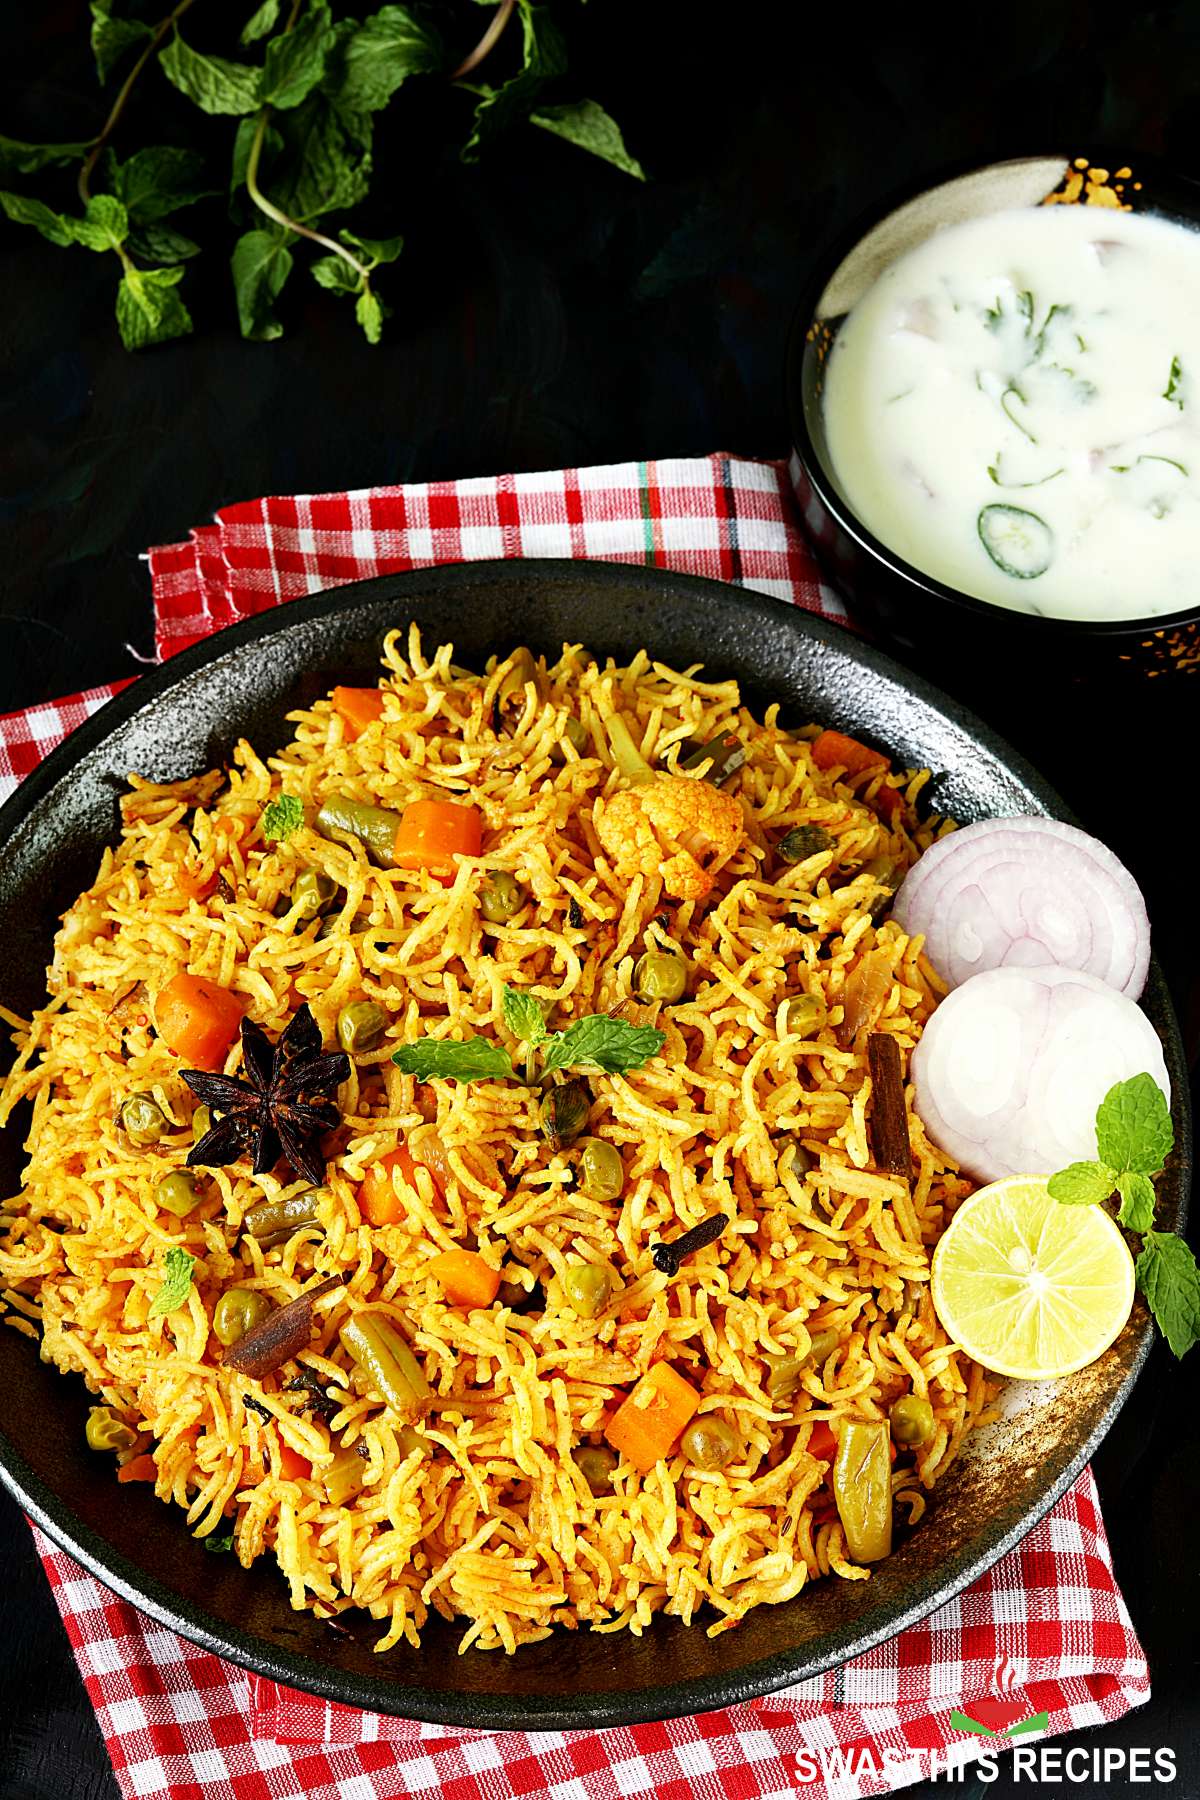
Biryani is a celebration of exotic flavors, vibrant colors and pleasing aromas infused into a pot of goodness. So this vegetarian dish is a perfect & hearty dinner packed with fragrant rice, vegetables, crunchy nuts, aromatic spices and herbs. It’s a dish you will often turn to time and again!
Biryani is a celebratory dish popular in many countries. A traditional biryani has layers of marinated meat and fragrant rice, dum cooked with caramelized onions, spices, herbs and saffron-infused milk. Making a good biryani, especially the traditional method requires time and patience since it involves a series of steps like marination, cooking biryani gravy, parcooking rice, layering and lastly dum cooking.
But the end results are worth the effort as every bite of it tastes super delicious with bursting flavors. Biryani is so much popular that vegetarians have embraced it and adapted it to a vegetarian dish.
In India, veg biryani is a very common dish which is made time and again in many households. In restaurants too there are different kinds of vegetable biryanis served.
Table of contents
About Veg Biryani Recipe
This easy recipe is a one stop solution to your biryani cravings as it shows you how to make super delicious vegetable biryani easily in 2 different methods – one pot method and dum phukt method.
One pot method is great for those busy weeknights where you temper the spices, saute the veggies, dump the rice and water. In one go, a delicious and quick veg biryani is ready! You can make this in a pot, stovetop pressure cooker or an instant pot.
Dum cooked veg biryani is a special dish which I make mostly on the weekends or for celebrations as it takes time. Both these methods require the same amount of preparation time. But the cook time changes considerably for the dum biryani, as we make the fried onions and slow cook the dish to infuse the flavors.
Both the biryanis turn out good in their own way but time is the key factor for most of us. So the choice is yours! Go ahead with the method you are comfortable with. But I don’t make the dum biryani on a weekday when we have busy work and kids’ school schedules. So reserve it for leisure days.
There are various notions that a biryani should always have meat in it and it has to be dum cooked. A lot of people like me prefer to make a veg biryani in one pot method because the entire process of dum makes sense to slow cook meats so the flavors are infused into the rice.
But still a vegetable dum biryani is classic! The king of all vegetarian biryanis in terms of flavors and taste.
Biryani is a meal in itself so it can be eaten on its own but for a complete meal serve it with shorba, bagara baingan or mirchi ka salan and raita. Finish off with some chaas or lassi.
More similar biryani recipes
Hyderabadi veg dum biryani
Aloo dum biryani
Paneer Biryani
Chicken biryani
Egg biryani
Kuska or plain biryani
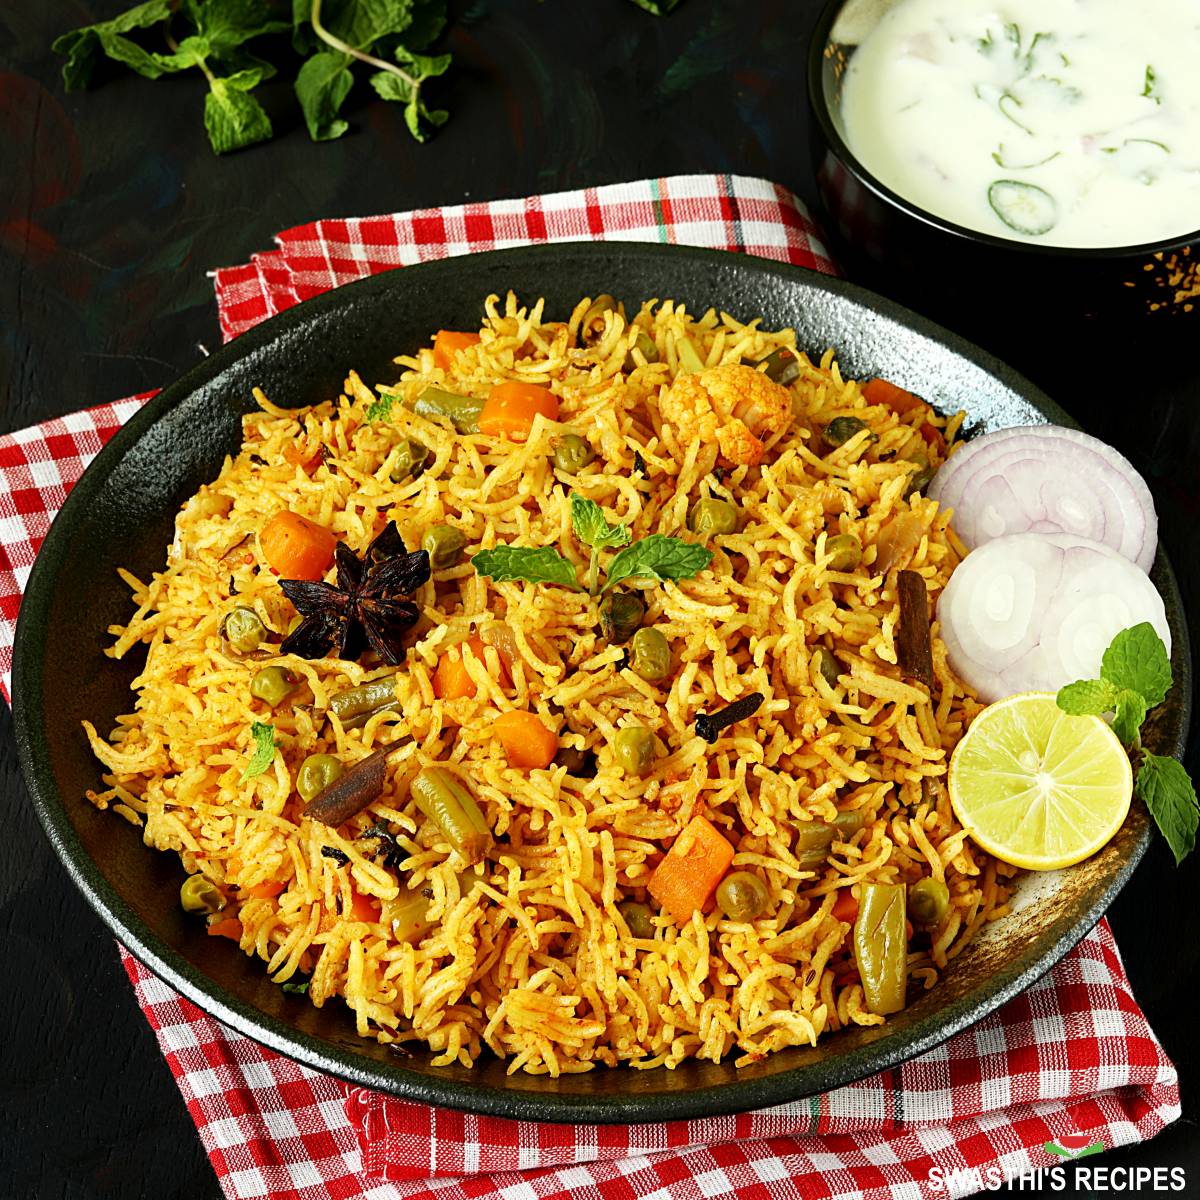
Photo Guide
How to make Veg Biryani (Recipe 1 stepwise photos – one pot)
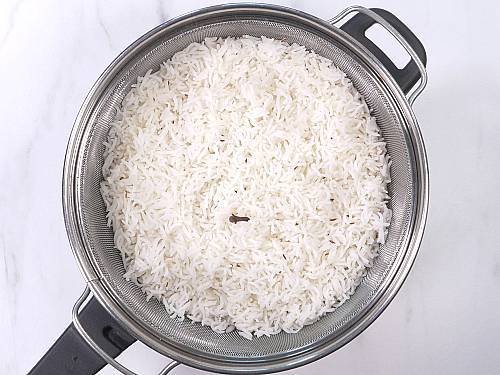
1. Add 1 cup aged basmati rice to a bowl and rinse well a few times until the water runs clear. Soak it for 20 to 30 minutes. Meanwhile rinse and chop vegetables & herbs. After 20 to 30 mins, drain the water from the basmati rice completely & keep aside.
You will see double the quantity of all ingredients in the pictures as I made 2x recipe.
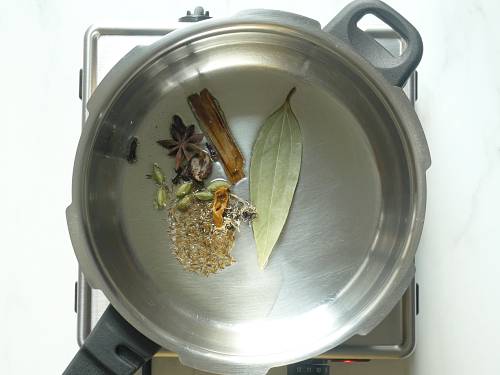
2. Heat a pressure cooker with 1½ to 2 tablespoons oil or ghee. Add whole spices
- 1 bay leaf
- 1 inch cinnamon
- 3 green cardamom
- 3 cloves
- ½ teaspoon shahi jeera (or cumin seeds)
- 1 star anise (optional, but recommended)
- 1 strand mace (optional)
- little stone flower (optional)
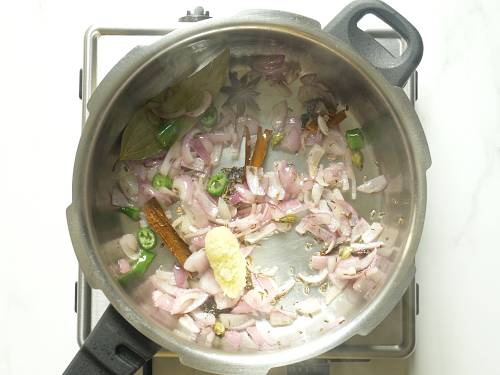
3. When the spices begin to crackle, add 1 sliced onion (½ cup) and 1 chopped green chili. On a medium heat, saute until the onions turn deep golden. Keep stirring often to fry evenly.
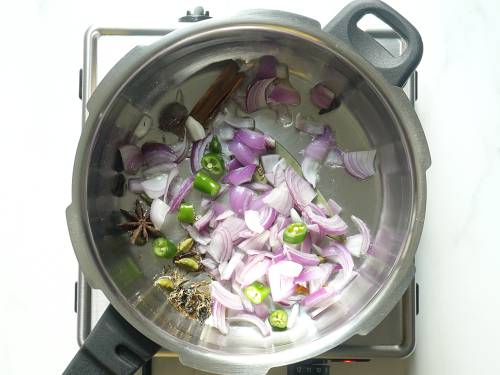
4. Next add 1 teaspoon ginger garlic paste. Saute this for 1 to 2 minutes or until the raw smell goes off.
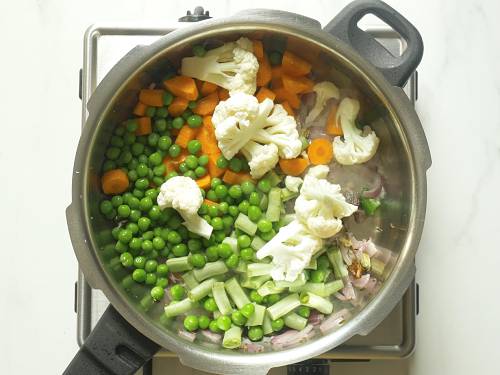
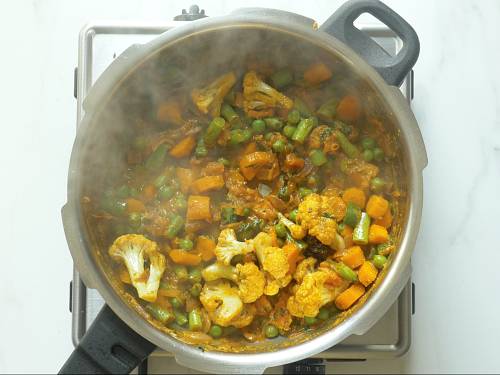
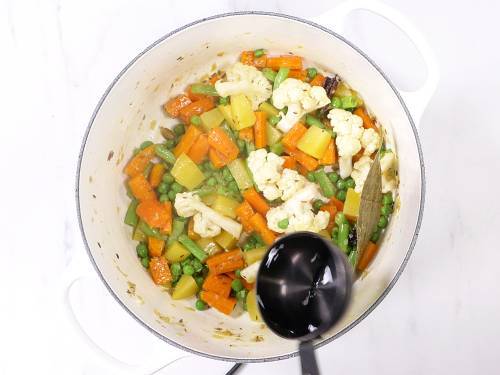
5. Transfer 1 cup chopped mix veggies. Saute on a medium to high flame for 2 to 3 minutes. I have used potato, peas, onions, carrots, cauliflower and french beans.
You can also add soya chunks if you like. To add soya chunks, soak them in hot water until soft. Squeeze up the water. Rinse a few times and squeeze them completely. Then add here.
Add Spices
6. Next add the following
- 2 tablespoons mint leaves (pudina)
- 2 tablespoons coriander leaves
- ½ teaspoon red chilli powder
- 1/8 teaspoon turmeric
- 1/8 teaspoon salt
- ¾ to 1 teaspoon garam masala (or biryani masala powder)
- 1 small finely chopped tomato (optional)
- 3 tablespoons yogurt (curd or dahi).
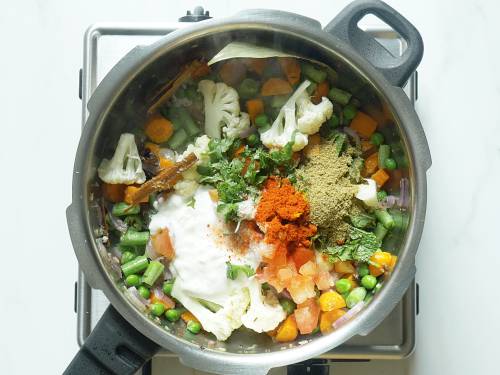
7. Mix and fry again for another 2 to 3 minutes on a slightly high flame until the tomatoes break down. Do not burn it. The mixture turns aromatic after frying. Regulate the flame to low and spread the veggies to a single even layer.
Cooking Vegetable Biryani
8. Add the drained rice. Spread it evenly to another layer.
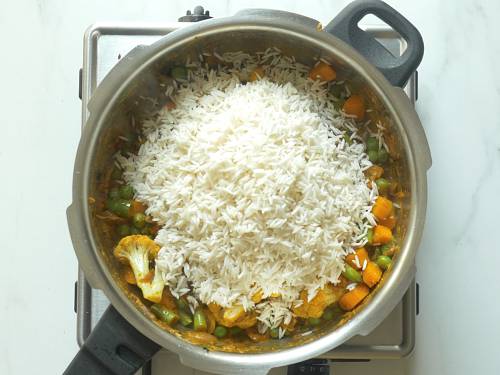
Please note the amount of water mentioned here is for aged basmati rice. If you are using newly harvested basmati rice, you will require lesser water. For any kind of newly harvested rice, you will use the same amount of water as you use to cook the plain steamed rice.
9. Pour water to a separate bowl and add ¼ teaspoon salt. Mix and taste test the water. It has to be slightly salty. If needed add more salt. Bring the water to a boil. Pour the salted water around the edges of the pot or cooker. Level the rice. This method gives you layered vegetable biryani. (check video to understand). OR you can also just pour the water and mix everything and cook.
You will need 1¾ cups water for cooker, 2 cups for regular pot. Optional : You can also add a tbsp of ghee, sprinkle some fried onions and then 1 pinch of saffron soaked in 2 tbsps milk.

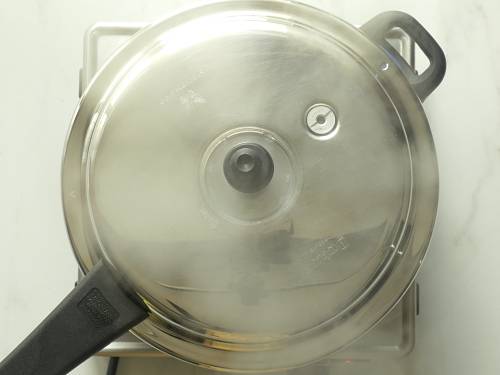
10. Cover the pot or pressure cooker with the lid.
Pressure cooker – Cook on a medium high flame for one whistle.
To cook in pot – Bring it to a rolling boil. Cover and cook on a low heat until all of the water is absorbed and the rice if cooked fully. Once done turn off and rest for 15 minutes.
11. When made in pressure cooker, I manually release the pressure with the help of a wooden spoon after 1 to 2 mins.When the pressure releases, open the lid. Lastly gently fluff up the vegetable biryani with a fork. Let it cool down a bit and then squeeze lemon juice if desired. Do not stir it vigorously otherwise biryani will turn mushy.
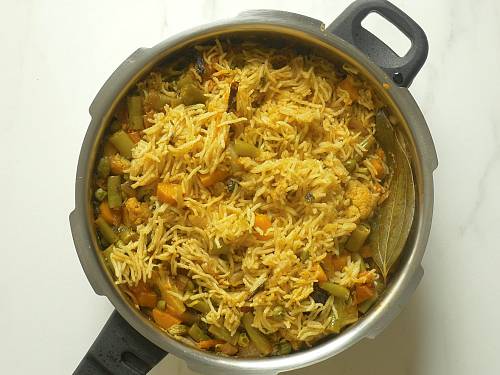
Serve veg biryani with raita or biryani gravy.
Related Recipes


Recipe Card 1 – One Pot Biryani
Veg Biryani | Vegetable Biryani Recipe
Ingredients
- 1 cup aged basmati rice (read notes)
- ½ cup (1 medium) onion (thinly sliced)
- 1 green chili (slit or chopped) (skip for kids)
- 1 teaspoon ginger garlic paste
- 2 tablespoons mint leaves chopped (pudina)
- 2 tablespoons coriander leaves chopped (cilantro)
- ½ teaspoon red chilli powder (or paprika, adjust to taste)
- ¼ teaspoon turmeric
- ¾ to 1 teaspoon garam masala (adjust to taste) or Biryani Masala Powder
- 1 small tomato (optional) chopped
- 1¾ cups water or thin coconut milk (1¼ cups water for IP, 2 cups for regular pot, refer notes)
- 1½ to 2 tablespoons Oil (or ghee)
- 3 tablespoon curd or yogurt
- ⅛ teaspoon salt for veggies + ¼ tsp for water
- ⅓ cup (1 small) potato or beans cubed
- ⅓ cup (1 medium) carrot chopped (gajar)
- ⅓ cup green peas (matar)
- 1 bay leaf (tej patta)
- 1 inch cinnamon (dalchini)
- 3 cloves ( laung)
- 3 green cardamoms (elaichi)
- ½ teaspoon shahi jeera (or cumin seeds)
- 1 star anise (optional, but recommended)
- 10 fried cashews for garnish (optional)
- 1 tablespoon lemon juice (optional)
Method
- Soak rice for at least 20 minutes. Drain the water and set aside.
- Chop all the veggies, coriander and mint leaves. Keep these aside as well.
- If using cauliflower keep them slightly larger.
- Add oil to a hot pressure cooker or a heavy bottom pot.
- Next add bay leaf, star anise, shahi jeera, cloves, cardamoms & cinnamon. Saute for 1 to 2 mins.
- Add sliced onions and slit green chilies. Fry them stirring often until the onions turn evenly golden or light brown.
- Next add ginger garlic paste and saute for about a minute or until the raw smell has gone off.
- Add all the chopped vegetables and fry for about 2 minutes.
- Next add tomatoes, ⅛ teaspoon salt, yogurt, coriander leaves, mint leaves,red chilli powder, turmeric and garam masala.
- Mix all of these and fry on a high flame for 2 to 3 mins. The tomatoes should break down completely and the raw smell disappear.
- Reduce the flame to low. Drain the water from the rice completely and spread it in a layer evenly over the veggies.
- Measure the water or coconut milk to a separate bowl & add ¼ tsp salt. Mix well and taste the water. It has to be slightly salty. Bring the water to a boil.
- Pour the salted water across the sides or edges of the pot.
- If you do not mix up everything then the veg biryani will cook in layers. (However you can also mix up everything and cook just like it is done normally.)
- Optional – Sprinkle 1 tsp ghee, 2 tbsps chopped mint leaves, handful of fried onions & saffron soaked milk. (refer notes)
- For pressure cooking: Cover the cooker and pressure cook for 1 whistle on a medium high flame.Turn off the stove. For al dente non mushy veg biryani, I release the pressure manually after 1 to 2 mins using a wooden spatula. When the pressure releases, open the lid and fluff up veg biryani with a fork.
- If cooking in a pot, bring it to a rolling boil. Cook covered on a low to medium flame until the water is absorbed and the veg biryani is cooked fully. Turn off the stove & rest for 15 mins. Serve veg biryani with raita or salan.
- Optionally squeeze lemon juice while serving.
- Press the SAUTE button on your IP and pour oil or ghee to the steel insert.
- Add thinly sliced onions. Spread them to a single layer and saute occasionally until uniformly deep golden. Remove half of these and set aside for later.
- Then add the whole spices and green chili. Then add the ginger garlic paste and saute until a nice smell comes out.
- Add tomatoes, chopped veggies, mint, coriander leaves and sprinkle ⅛ teaspoon salt. Saute until the tomatoes breakdown. This takes about 1 to 2 mins.
- Stir in the garam masala and red chilli powder.
- Press CANCEL button & add yogurt. Deglaze by scraping the bottom of the pot with a spatula. This releases any bits of food stuck there.
- Spread the veggies to a single layer. Next layer the drained rice and level it.
- In another bowl, stir in ¼ teaspoon salt & 1¼ cup water and taste it. It has to be slightly salty. If needed add more.
- Pour the water starting from the sides and then in the center. Do not mix. Ensure all of the rice is under the water.
- Secure the IP with the lid. Position the steam release valve to sealing position.
- Press pressure cook/ manual (set to high pressure) & set the timer for 5 mins. If you double or triple the recipe then set to low pressure with the same cook time. (Alternately you can pressure cook for 4 mins on high pressure setting and wait for 8 mins. Then release the rest manually.)
- When the IP finishes, for aldente cooked vegetable biryani quick release the pressure manually. For softer rice, wait for 5 to 7 mins (natural pressure release) and then release the rest manually with the help of a spoon. Garnish with fried onions. Serve with Raita.
Notes
- Rice & Water: Prefer aged basmati rice for biryani. Newly harvested rice makes mushy biryani. If you do not know what kind of basmati you have, simply use the same amount of water as you use to cook it plain.
- 2x of this recipe has been tested & retested countless number of times in a 6 QT Instant pot. It can throw a burn sign if you use lots of potatoes. Measure the veggies in cups for accurate results.
- To double the recipe, use 1 bay leaf, 1 star anise, 6 cardamoms, 6 cloves, 2 inch cinnamon & 3/4 tsp shahi jeera or cumin seeds.
- You can pour 1 tbsp ghee, 1 pinch of saffron (7 to 8 threads) soaked in 2 tbsps milk and 2 tbsps of fried onions after pouring water to the cooker or pot.
- If you wish to garnish with fried cashews, fry them first in the same oil or ghee before you begin making the biryani. Keep them aside and garnish later.
- Troubleshooting tip: If rice is not cooked fully, just sprinkle some water and cover with a loose lid and cook for few more mins.
- If it becomes mushy, reduce the qty of water the next time you cook.
- You can use store bought biryani masala powder. Using too much of masala powder can make your veg biryani bitter. So adjust the powder according to your taste.
- You can also use frozen mixed veggies like carrots, beans, peas & corn. Or any of these. It is good to rinse them and then drain completely or let them come to room temperature before using. Using cold veggies directly may let out excess moisture and make the biryani mushy.
- For 2x recipe, use 3 tbsps oil. For 3x recipe, use 4 tbsps oil. Once done, if your rice turns out too dry, sprinkle some ghee on top and mix gently.
Private Notes
Tried this recipe?
Mention @SwasthisRecipes or tag #swasthisrecipes!How to make Restaurant Veg Biryani (Recipe 2 stepwise photos)
If it is a single course meal, this veg biryani serves 4. For youngsters with large appetite this makes only 3 servings.
Ingredients
2 cups aged basmati rice (400 grams)
1 teaspoon salt (for cooking rice)
1 tablespoon oil (for cooking rice)
6 green cardamoms (divided 2 + 4)
6 cloves (divided 2 + 4)
1 large bay leaf (torn to 2)
2 – 1 inch cinnamon sticks (divided 1 + 1)
1 teaspoon shahi jeera (divided ½ + ½ )
¼ cup mint leaves (pudina)
¼ cup coriander leaves
4 tablespoons ghee (or oil)
For gravy / curry
1 cup onions sliced thinly (120 grams, 1 large)
1 green chilli slit (optional)
¾ cup carrots 1 inch pieces (120 grams, 1 large)
¾ cup green peas (100 grams)
1/3 cup beans (50 grams – 5 to 6)
½ cup potatoes (85 grams – 1 medium)
8 cauliflower florets (100 grams)
1½ tablespoon ginger garlic paste
1 cup yogurt (fresh, not sour)
¼ cup water (more if needed)
1 teaspoon Kashmiri chilli powder
1½ to 2 teaspoons biryani masala
¼ teaspoon turmeric
½ teaspoon salt
For garnish
22 cashews (35 grams)
3 tablespoons raisins (35 grams)
For saffron milk
¼ cup milk
2 pinches saffron
½ tbsp. kewra water or rose water (mixed with saffron milk)
Preparation
1. Rinse 2 cups basmati rice well and soak it in water for at least 30 minutes. You can soak up to 50 minutes but not more than that. Rinse all the vegetables under running water. Slice the onions thin and evenly so they fry evenly. Squeeze them gently to separate the layers completely. Slice 1 green chilli and make a paste of ginger garlic. Peel and chop potato to 1 by ½ inch and keep them immersed in a bowl of water so they don’t discolour.
2. Chop beans to 1 inch pieces. Peel and chop carrots to 1 inch pieces. Also rinse peas and keep them aside. Chop cauliflower to slightly large florets. Rinse them well under running water and set aside. We need 8 florets.
3. Rinse and chop ¼ cup each of mint leaves and coriander leaves. Whisk yogurt well with a whisk or fork and set aside. Ensure it is not too sour.
4. Heat ¼ cup milk in cup or sauce pan and add 1 large pinch of saffron strands. Also add ½ tbsp. of kewra or rose water to it and keep aside.
5. Pour ghee to a heavy bottom pan. When it melts, add cashews and fry them until light golden. Then add raisins and fry until they swell up. Remove them to a plate.

Make Fried Onions
6. Add the sliced onions and spread them well. Begin to fry on a medium heat. Keep stirring often. Continue to fry for a few minutes, then reduce the flame as needed to low.

7. While the onions fry, on another burner bring 7 to 8 cups of water to a rapid boil along with 1¼ teaspoon salt, 1 teaspoon oil, 1 tablespoon lemon juice, 2 green cardamoms, 2 cloves, ½ teaspoon shahi jeera, 1 inch cinnamon and 1 bay leaf.
8. When the water comes to a rapid boil, drain the water from the rice and add it to the pot of boiling water. Cook on a high heat ensuring the water does not over flow. Cook until the rice is just 90% cooked. Rice has to be slightly undercooked and have a bite to it. For more tips check the pro tips below. Mine took only 3 minutes to cook as I soaked for an hour. When it is done drain it to a colander. Remember the rice needs to be hot when we layer it.
9. After about 7 to 8 minutes, onions begin to caramelize. At this stage turn down the heat to lowest so they don’t burn. If using dutch oven, turn off the heat. Saute until the onions caramelize and turn evenly deep golden. Be very attentive at this stage as they can burn in few seconds. Burnt onions taste bitter. It took me 10 minutes for this entire task. 5 mins on a medium heat, 3 mins on a low heat and 2 mins with the stove turned off. Remove these to a plate and set aside.

Make Veg Biryani Gravy
10. Add whole spices
1 bay leaf
1 star anise
4 cloves
4 cardamoms
1 inch cinnamon
½ teaspoon shahi jeera

11. Turn on the heat to low and quickly saute ginger garlic until slightly aromatic. Be cautious as this can burn in a flash.

12. Then remove the potatoes from water and add them to the pan. Also add carrots, peas, green chilli and cauliflower. Saute on a medium heat for 3 minutes.

13. Pour ¼ cup water and mix. Cover and cook on a medium heat until the potatoes are fork tender but not mushy. Ensure they are cooked before proceeding to next step, as sometimes yogurt hinders the potatoes from cooking well. At the end of this step you won’t be left with any water in the pot.
14. Then add 1 teaspoon red chilli powder, 1½ to 2 teaspoons garam masala, ½ teaspoon salt and turmeric powder. Saute for 2 minutes until fragrant.

15. Reduce the heat completely and then pour 2 tablespoons water. Next add 1 cup whisked yogurt.

How To Make Dum Vegetable Biryani
16. Mix well and cook covered on a low heat for 4 minutes. Then add ¾ of the fried onions and 2 tablespoons each of mint & coriander leaves. Turn off the heat. Taste test your gravy and add more salt if needed. On another burner, begin to heat a griddle or a pan on a medium heat for dum process. Avoid using nonstick.

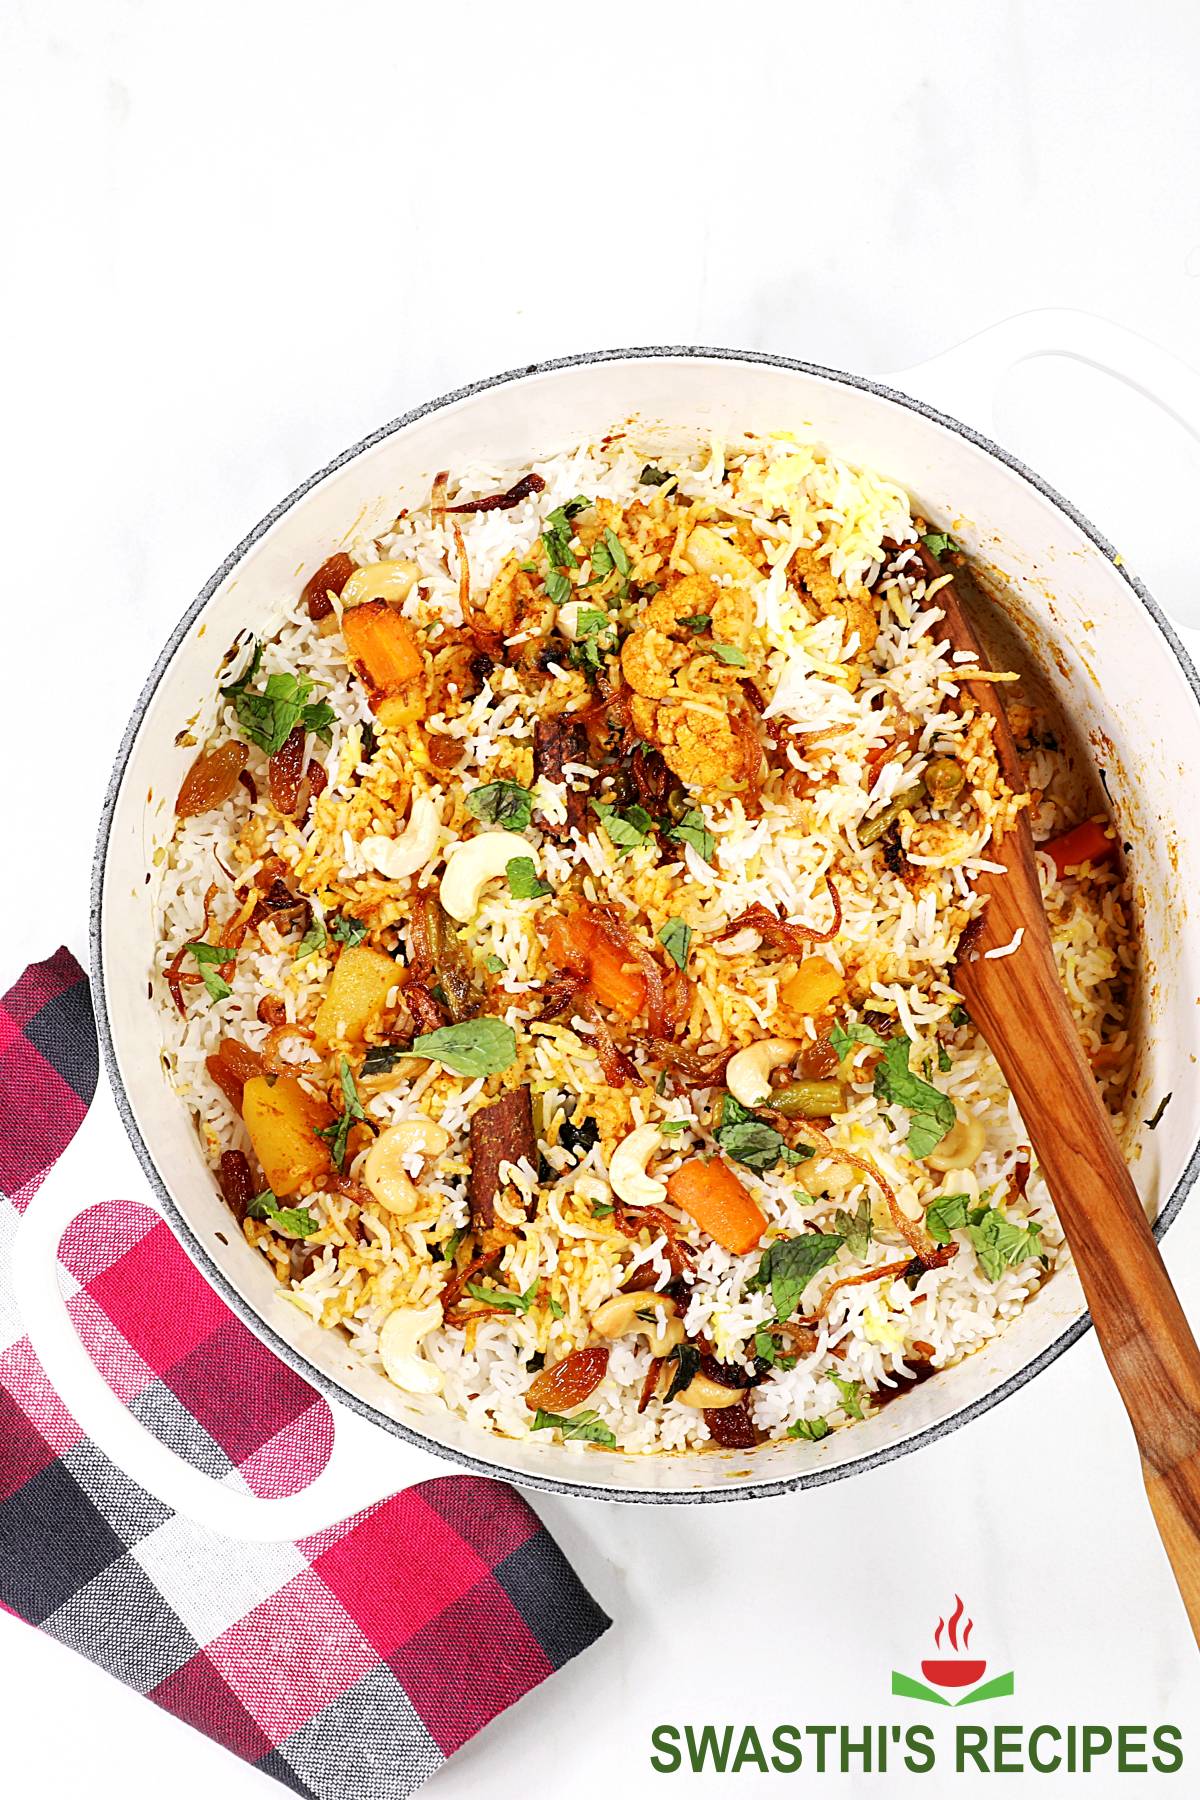
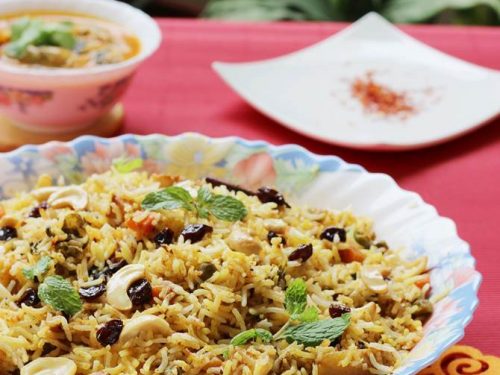
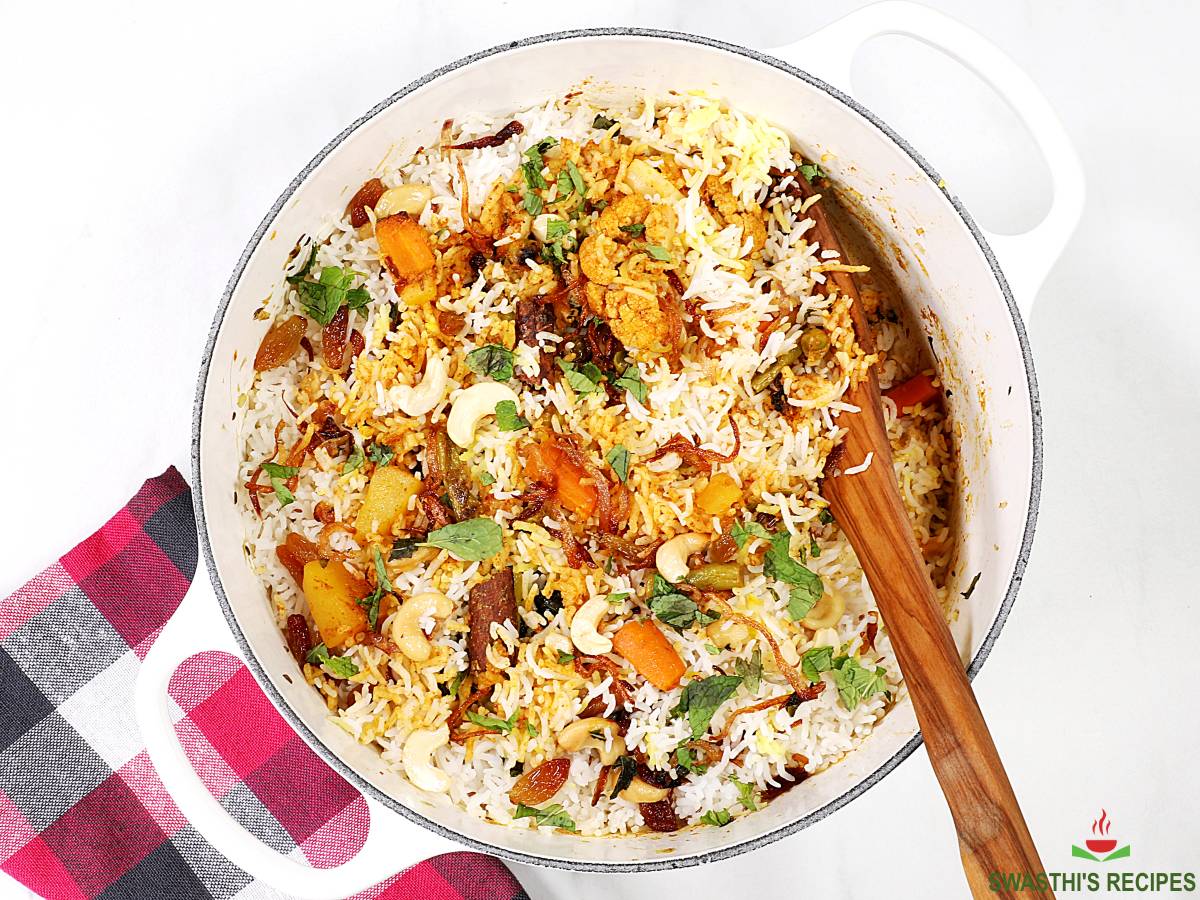
17. Meanwhile layer the hot rice over the curry. Pour the rose & saffron infused milk. Sprinkle the rest of mint leaves, fried onions, raisins and nuts. Reserve half of the nuts and raisins for garnish while serving.

18. Seal the pot with aluminum foil and press down to the sides of the hot pot carefully so the edges stick to the pot, ensuring no steam escapes. Alternately use a thick moist cloth (with no excess water dripping). Place a heavy lid on the pot so the steam does not escape.

19. Transfer this to the hot griddle and cook for 22 minutes on a low heat. You can also cook this over direct flame for 12 minutes at the lowest heat. Once done remove the pot from heat and let it rest for at least 20 minutes.
Alternately bake it in a preheated oven at 350 F (180 C) for 20 minutes. Later rest it in the oven itself for another 15 to 20 minutes.
Serve vegetable biryani with a flat serving spoon, from the bottom of the pot such that every serving gets a portion of the curry and rice. Shorba, Mirchi ka salan, Raita and papads make some of the best sides.
Recipe 2 – Restaurant Style Vegetable Biryani
Restaurant Style Vegetable Biryani
Ingredients
- 2 cups (400 grams) aged basmati rice
- 1 teaspoon sea salt (to cook rice)
- 1 tablespoon oil (to cook rice)
- 6 green cardamoms (divided 2 + 4)
- 6 cloves (divided 2 + 4)
- 1 large bay leaf (torn to 2)
- 2 – 1" cinnamon pieces (divided 1 + 1)
- 1 teaspoon shahi jeera (divided ½ + ½)
- ¼ cup mint leaves (pudina, chopped)
- ¼ cup coriander leaves (chopped)
- ¼ cup (60 ml) ghee (or oil)
- 1 cup (120 grams) onions sliced thin & even, layers separated (1 large)
- 1 green chilli slit (optional)
- ¾ cup (120 grams) carrots (1 large, peel & chop to 1 inch)
- ¾ cup (100 grams) green peas
- ⅓ cup (50 grams) beans (5 to 6, chop to 1 inch)
- ½ cup (85 grams) potatoes (1 medium cut to 1 by ½ inch, keep them in a bowl of water)
- 8 (100 grams) cauliflower florets (keep them medium to large)
- 1½ tablespoon ginger garlic paste
- 1 cup (240 ml) plain yogurt (fresh, not sour, whisked)
- ¼ cup (60 ml) water (more if needed)
- 1 teaspoon Kashmiri chilli powder
- 1½ to 2 teaspoons biryani masala or garam masala
- ¼ teaspoon turmeric
- ½ teaspoon sea salt
- 22 (35 grams) cashews
- 3 tablespoons (35 grams) raisins
- ¼ cup (60 ml) hot milk
- 2 pinches saffron (soaked in hot milk)
- ½ tablespoon kewra water or rose water (mixed with saffron milk)
Method
- Rinse rice well and soak in water for 30 minutes.
- Heat ghee in a heavy bottom pot and fry cashews until light golden. Stir in the raisins and fry until they swell up. Remove to a plate, retaining most of the ghee in the pot.
- Add the sliced onions and spread them in a single layer. Let fry on a medium heat for 5 mins, stirring often in between. Reduce the flame to low and fry for another 3 to 4 mins until caramelised but not burnt. Remove these to a plate and set aside. Turn off.
- While the onions fry, on another burner bring 7 to 8 cups of water to a rapid boil with salt, oil, lemon juice, green cardamoms, cloves, shahi jeera, cinnamon and bay leaf.
- Drain the rice and add to the boiling water. Cook on a high to medium high heat until the rice is just 90% cooked (ensuring the water does not over flow but keeps boiling rapidly). When the rice slightly undercooked and have a bite to it, drain to a colander.
- To the same pan of ghee (you used to fry onions), add bay leaf, star anise, cloves, cardamoms, cinnamon and shahi jeera.
- Regulate the heat to low and quickly saute ginger garlic until slightly aromatic, for a minute.
- Drain the water from potatoes and add them to the pan. Also add carrots, peas, green chilli and cauliflower. Saute on a medium heat for 3 minutes.
- Pour ¼ cup water and cook covered on a medium heat until the potatoes are fork tender but not mushy. (evaporate any excess water)
- Stir in red chilli powder, biryani masala, salt and turmeric powder. Saute for 2 minutes & reduce the heat to low,
- Deglaze with 2 tablespoons water and stir in the whisked yogurt. Cover and cook on a low heat for 4 minutes, until heated through.
- Add ¾ of the fried onions and 2 tablespoons each of mint & coriander leaves. Turn off the heat. Taste test your gravy and adjust salt to taste.
- On another burner, heat a griddle or a pan on a medium heat for dum process. Avoid using non-stick.
- While the pan heats, layer the hot rice over the biryani curry. Pour rose & saffron infused milk. Sprinkle the rest of mint leaves, fried onions, raisins and nuts. Reserve half of the nuts and raisins to garnish later.
- Seal the pot with aluminium foil and press down to the sides of the pot carefully so the edges stick to the pot. This ensures the steam is trapped well. Place a heavy lid.
- Transfer this on to the hot griddle and cook for 22 minutes on a low heat. You can also cook this over direct flame for 12 minutes at the lowest heat (only on a small burner). Once done remove the pot from heat and let it rest for at least 20 minutes.
- Oven Baked – Alternately bake it in a preheated oven at 350 F (180 C) for 20 minutes. Later rest it in the oven itself for another 15 to 20 minutes.
- Serve vegetable biryani with a flat serving spoon, from the bottom of the pot such that every serving gets a portion of the curry and rice. Mirchi ka salan or shorba and a raita make great sides.
Private Notes
Tried this recipe?
Mention @SwasthisRecipes or tag #swasthisrecipes!Ingredients & Substitutes
Basmati rice: It is important to use aged basmati rice as it is considered the best for making biryani. If you are not using aged basmati rice your biryani is likely going to turn mushy. However you may try using newly harvested rice with lesser amount of water. Use the same amount of water as you use to cook the plain steamed rice.
You can also use sella basmati rice which is parboiled version of basmati rice. Though it lacks the original flavor of basmati, it is great to use if you are a beginner since sella basmati rice remains firmer and won’t turn mushy upon cooking.
Sometimes I also use jeerakasala / kaima rice. The method to cook kaima rice is different so please check this Malabar biryani post to know more details.
Ghee or oil: Ghee is the main fat used in a biryani as it imparts a delicious and sweeter tones to the dish. However you may use oil or a mix of oil and ghee.
Mixed vegetables: The flavor of your biryani depends on the vegetables used. So use fresh vegetables that you like. I prefer to use potatoes, carrots, beans, peas and cauliflower. Keep the cauliflower florets larger so they don’t become lifeless and mushy.
Spices: Whole spices slowly infuse the flavors to the biryani. They are the key ingredients and cannot be skipped. Please use a good garam masala or biryani masala. I use a homemade garam masala. (link in the recipe card below).
Yogurt: I use homemade yogurt made from whole milk. Use full fat plain yogurt that’s not too sour. Whisk the yogurt well so it does not split.
Mint and coriander leaves: Mint is crucial to biryani. If you don’t have the coriander leaves you may skip them.
Kewra water or rose water: You can use one of the 2 ingredients. Kewra water also known as kewda is the extract of a tree known as Pandanus odoratissimus. One of this is essential but if you don’t like you may skip. A lot of people don’t like scent in their foods, so use it only if you like. These are available in Asian or Indian stores.
Pro Tips
Quantity of Vegetables: For a perfect biryani, I follow the ratio of 1: 1.25 (Rice: vegetables). You may use slightly higher but using lesser may be too little veggies in the biryani. Your gravy may be too runny and the rice may soak up the excess moisture & turn mushy. Here I have used 400 grams rice: 500 grams mixed vegetable excluding onions.
Chopping vegetables: Keep the potatoes smaller in size about 1 x ½ inch, Cauliflower florets big enough so they don’t turn mushy. Beans and carrots to 1 inch pieces.
Slicing onions: Slice the onions evenly and thin so they fry evenly. Unevenly sliced onions don’t fry well and end up being burnt or under cooked.
Preparing rice: Rinsing and soaking basmati rice as mentioned in the recipe is very crucial to get a non-sticky and perfectly cooked rice grains. Rinsing rice a few times helps to get rid of the starch on the surface which can make the rice sticky. Soaking helps the rice to absorb the water so they expand well while cooking. These 2 steps will ensure the rice grains are cooked to perfection!
Cooking rice: Rice is cooked to 90% in this dum biryani recipe (recipe 2), meaning it is firm and cooked to al dente. It is not fully cooked. This step is very important. If you undercook it at this stage, it will remain hard in the final dish. If you overcook, the grains will becomes mushy after the dum process.
Saffron milk: Saffron infused milk not only imparts a delicate and warm flavor to the biryani but also keeps the biryani rice moist. So do not skip it.
Make ahead: It can be made ahead and the leftovers rock! Simply reheat it by steaming in a pot, Instant pot (0 mins high pressure) or microwave it.
Faqs
Pulao is a one pot dish made via absorption method. But a traditional biryani is dum cooked in which parcooked rice is layered over meat. Ingredients like caramelized onions and saffron infused milk are key in a biryani which are usually not used in a pulao.
3 tips for a moist biryani – Do not let the rice cool and dry out after par-cooking. It has to be moist and straight away go for dum cooking while it is still hot. Trap the steam well by sealing the pot fully. Pour saffron infused milk on top.
Homemade biryani is healthy since it has no preservatives or additives like color. However it is high in calories due to ghee, nuts, raisins and other ingredients used. So eating it in moderation is important.
About Swasthi
I’m Swasthi Shreekanth, the recipe developer, food photographer & food writer behind Swasthi’s Recipes. My aim is to help you cook great Indian food with my time-tested recipes. After 2 decades of experience in practical Indian cooking I started this blog to help people cook better & more often at home. Whether you are a novice or an experienced cook I am sure Swasthi’s Recipes will assist you to enhance your cooking skills. More about me
Follow Swasthi’s Recipes
Comments
Good presentation
Easy to understand
Thanks Anjaly
I have tried making biryani so many times & it didn’t turn out like restaurant. But my love for biryani kept my hope alive and finally I came across your recipe. It is PERFECT. Thank you very much for getting this recipe out to everyone. I have tried many of your recipes and they are amazing.
Hi Rajshree,
So happy to know that you like this vegetable biryani. Thank you for letting me know. Appreciate your time!
Simple and easy vegetable biryani. I tried it and turned out delicious. I don’t have a cooker so tried it in a pan and it worked really well.
Glad to know Harini. Thank you so much
Thank you. It turned out better than I expected. I also used cauliflower, a quarter cup of cashews, pan fried sultanas and 9 oz paneer. Served with raita and it was a complete Indian meal
Wow! That’s nice to know Claire. Thanks a lot for sharing back
Can I use sella basmati rice and frozen veggies? How do I adjust the cook time?
Yes you can use sella basmati. It takes the same time but soak it. Yes to frozen veggies, thaw them and pat dry with kitchen papers if required
My favorite veg biryani for a quick meal. I used shan biryani masala and greek yogurt this time. It was even more easier than using homemade yogurt and garam masala. Thank you Swasthi
Happy to know store bought options work for you Lavanya. Thanks for letting me know how it turned out for you
This is by far the best vegetable biryani I’ve made and it’s delicious. What better when it’s one pot and easier steps. Thank you
Brilliant recipe. I have been using swathis recipes for many years now
This is a huge favorite dish, but also on the more complex side. Your detailed description, the photos, and everything else made this excellent recipe also easy to follow, and the results were fantastic!
Thank you so much David. Glad you like it
Excellent vegetable biryani. Turns out so good every time. This time I used frozen mixed veggies so had to cut down little water
Your vegetable biryani is my family’s absolute favorite! I make it often and it turns our great with the suggest kind of biryani basmati rice. I intend to make it with 3 cups of rice tonight. Do you know if I can cook it in the oven? Please advice
Knew people in South India make biryani with coconut milk but never tried it. I made your veg biryani with half coconut milk & half water. Turned out excellent but next time I would doble the chili powder. Thank you swasthi
made many times already since covid times. amazing recipe.
It’s too good. For water measurement, for 1 cup rice and 1cup veggies I took 13/4 cup water
Turned out really well. Even my fussy boys who do not like biryani, enjoyed it.
Thanks Zahra. Happy to read that
Dear Swasthi,
You are an amazing cook! Like every other recipe I’ve tried from your website your restaurant style vegetable biryani was a great hit in diwali party. We made the curry a day ahead and reheated it before layering on the day of serving. Thank you it was delicious with your salan and raita.
Swasthis Vegetable biryani is my favorite one pot meal. Never goes wrong if you use the correct amount of water.
Thanks Bella. So happy to know this is your favorite biryani
Love your recipes. They always turn out excellent. Thank you so much
So happy to read that Susan. you for sharing back
My brother-in-law was from Bangladesh and introduced me to the wonderful flavors of his culture… this was spot on fabulous!
Thanks for trying Jacky
I made this for the first time tonight in the Instant Pot tonight! For Instant Pot users, you may want to parboil the potatoes first if using. I tried blanching them, but 5 minutes in the Instant Pot was not enough to cook through.
The recipe as a whole came out absolutely delicious and the whole apartment smells wonderful. Instead of the green chili, I used one bhut jolokia. I think it works well in this dish if you can handle a moderate amount of spice and enhances the savory and sour notes. Also, don’t leave out the whole spices! It’s what makes the whole dish work.
Thank you again Swasthi for a delightful and healthy recipe!
Thanks for sharing back your experience Ken. Yes whole spices bring in a lot of flavor here. Small bite sized diced potatoes should cook well. I found that using large portions of mature/ old potatoes or too many potatoes won’t cook well because most of the liquid is soaked up by the rice. As you said next time, parboil them before using. Thanks again Ken
I made this rice today for my family and it was definitely a hit!! Thank you so much for the one pot recipe as well!
Glad your vegetable biryani turned out great. Thank you Shelly.