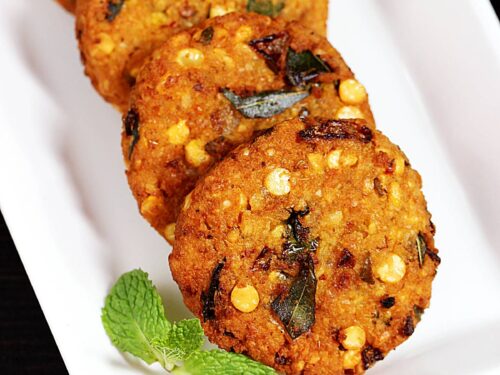
Medu Vada Recipe (Garelu)
Updated: June 4, 2022, By Swasthi Shreekanth
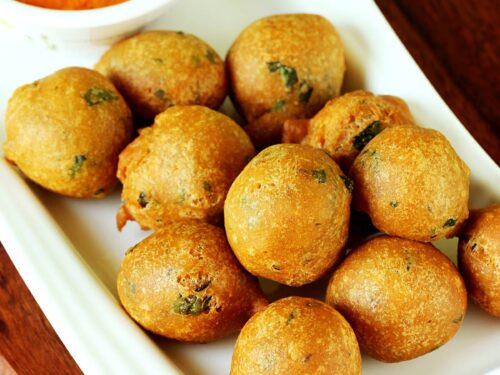
Medu Vada are crisp, fluffy & delicious donut shaped lentil fritters from South Indian Cuisine. Vada with Coconut Chutney or Tiffin Sambar is a popular Breakfast relished in a lot of South Indian homes & restaurants. Make delicious, crisp yet soft and fluffy vada at home with my time-tested traditional recipe. I also have a lot of troubleshooting tips and tricks to make the best medu vada at home. Once you learn to make these, I am sure you will ditch your favorite restaurant & make these often at home.
What is Vada?
Vada are a kind of deep fried savory snacks mostly made with lentils, spices and herbs. The Word “Vada” may have been derived from the Sanskrit Term “vataka”. According to the popular Indian Food Historian, KT Achaya, vada dates back to ancient India, as far as 500 BC with mentions of the food as soaked and ground pulses, fried in ghee.
Till day, traditionally made vada are offered to Deities/ Gods in Temples and Hindu homes during puja.
Indian cuisine is a melange of different regional cuisines so you will find many kinds of vada across India. Vada is basically a kind of fried snack known by different names such as bada, wada or bora, with recipes varying by region, community and home. They can be made with lentils, vegetables, grains and even with tapioca pearls.
Masala vada, medu vada, Maddur vada, batata vada, Dahi vada are some of the popularly known in Indian Cuisine.
About Medu Vada
Medu vada are traditional South Indian fritters made with urad dal (black lentils), spices and curry leaves. “Medu” is a Kannada word meaning “Soft” and “Vada” are “crispy Indian fritters”. So medu vada, also sometimes simply mentioned as “VADA” are essentially soft from inside yet crisp on the outside.
Known by different names such as Garelu in Telugu, uddina vade, medu vade in Kannada, ulundhu vadai in Tamil and uzhunnu vada in Malayalam, they are made and relished across the South Indian states.
Growing up, medu vada aka Garelu was a staple in our home as my mom would offer these to Goddess Lakshmi and Durga during Friday Pooja. We Telugu speaking people also make them for an offering during Varalakshmi vratam, Gouri puja, Diwali and Durga Navratri.
In fact our festivals are incomplete without making vada since we also serve them as a part of the festive meal. Depending on the region and family traditions various spices and herbs are added to the batter.
South Indian foods like masala dosa, idli, rava dosa, medu vada served with coconut chutney and sambar are hugely popular even in the restaurants across the world.
My Recipe
My traditional recipe to make these medu vada comes from my Mom and I have also shared all her tips and tricks to make them perfectly crispy, fluffy and delicious every time. Making perfectly crisp and fluffy vadas at home is easy if you follow the recipe without missing out the minute details I have mentioned in this post.
The recipe involves only three steps – soaking lentils, grinding them to make fluffy batter and lastly shaping small portions of the batter & frying. Traditionally medu vada batter is ground in a manual stone grinder but a lot of us also grind it in an electric mixer grinder/ blender or a wet grinder.
Making fluffy batter is the key to crisp and fluffy vadas. So you need a good strong and powerful blender that can grind your lentils really well to a fluffy texture. If you use a regular low watt grinder you may end up with hard and dense vadas and even more your blender may break down.
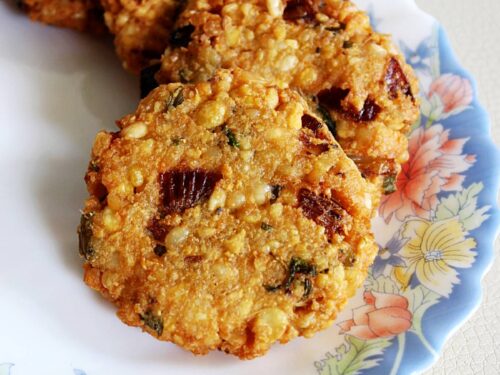
The basic medu vada is made with just urad dal, water and salt. To flavor them ingredients like crushed black pepper, green chilies, ginger, cumin seeds, curry leaves and onions are used. At home we do not add any other ingredients if making for Naivedyam. This is a tradition we have followed.
Other times my mom would add all those aromatic ingredients and sometimes onions were replaced with fresh shredded cabbage which really goes well in these fritters.
To make perfectly crisp and fluffy vadas do check out my faqs, pro tips and notes which I shared below.
More Vada recipes
Batata vada
Masala vada (chana dal vada)
Mixed dal vada
Sabudana vada
Alasanda vada
Photo Guide
How To Make Medu Vada (Stepwise Photos)
Preparation
1. Add 1 cup urad dal to a large bowl and wash it well rubbing with your hand. Rinse it well at least 3 to 4 times & drain the water. This removes the white powdery substance on the urad dal.
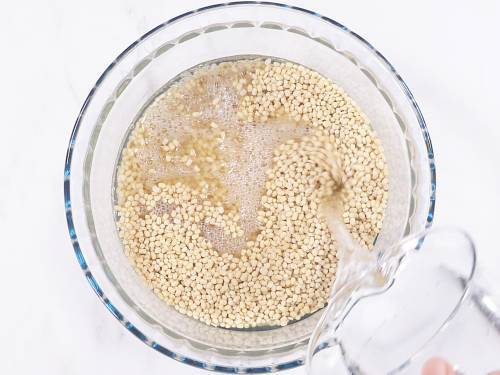
2. Add fresh water and soak it for at least 4 to 5 hrs. Soaking them for at least 5 hours makes the batter fluffy and increases in volume. But if you do not have so much time, you can soak for 3 hours but the texture is not the same. If using organic dal you can soak for 8 hours with good results. While the dal soaks, keep about 1 cup of water in the refrigerator to chill.
Make batter
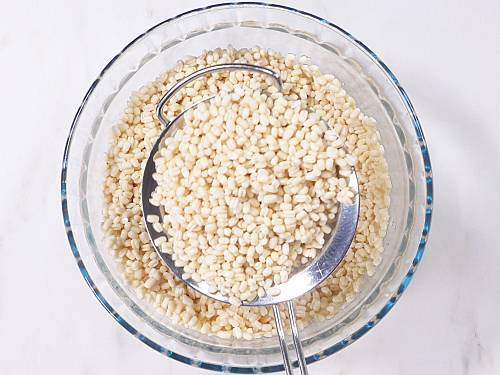
3. Later discard the water completely from the dal & give a good rinse. Drain the water completely.
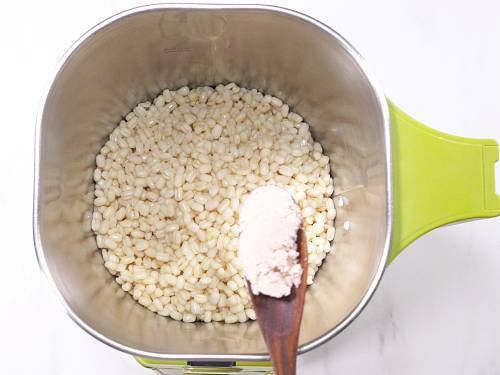
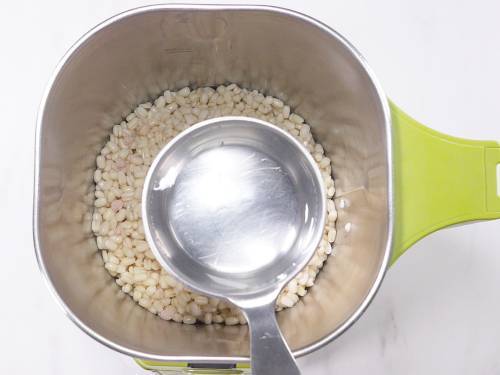
4. Add the dal to a grinder or blender jar along with 1/3 teaspoon salt.
5. Sprinkle 3 tablespoons ice cold water to start off. Blend for a short time about 25 to 30 seconds.
6. Next scrape the sides and the bottom to release the dal that’s stuck.
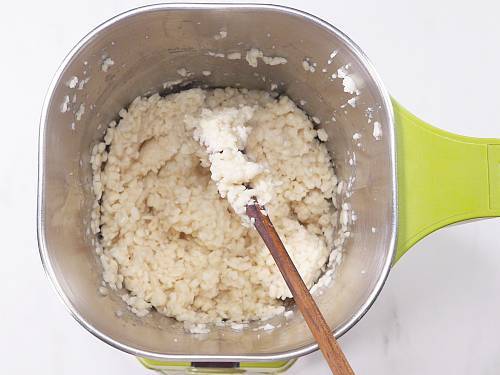
7. As and when needed sprinkle evenly about only 1 ½ teaspoon water each time. Whether you make in the wet grinder or blender, the process is same. Scrape off the sides and grind again. The batter will be coarse but must be thick. Sprinkle water as needed again.
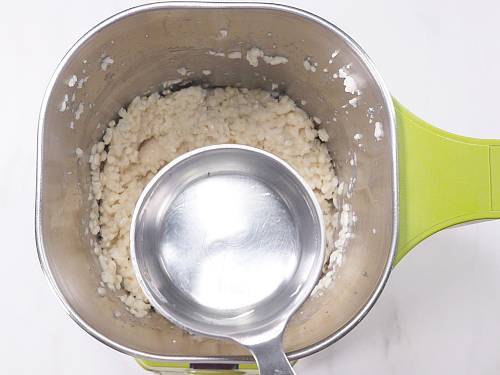
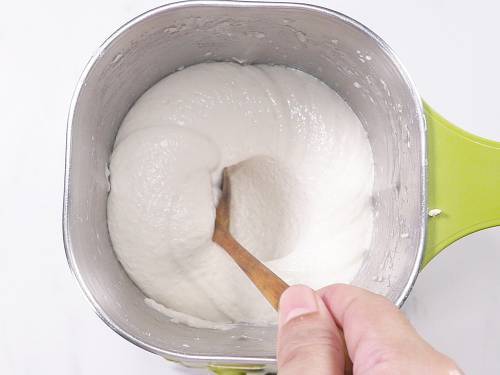
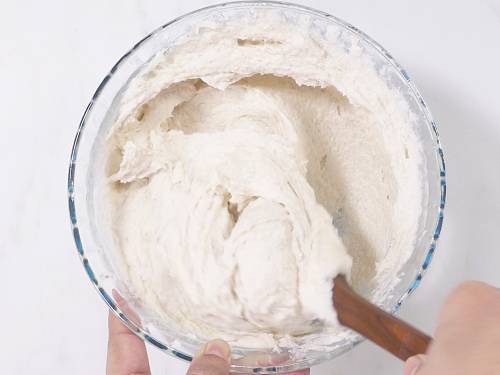
8. Grind till the batter looks fluffy, thick, lightly aerated and white in color. (like you see in the picture). Ensure your blender does not become warm or hot while you grind as this will give a bitter taste.
Consistency of Batter
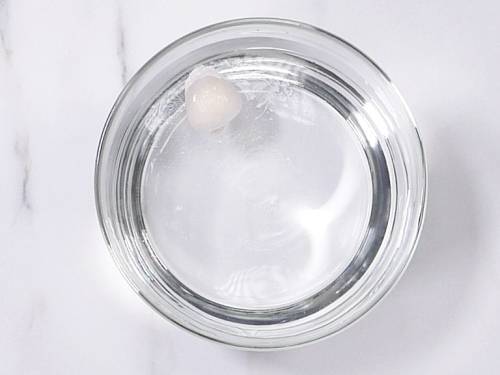
9. Check if the batter is done correctly. Take a small bowl filled with water. Take little batter and form a ball, drop it in the water. If the consistency & texture of the batter is light, the batter floats well.
The batter will not float if the consistency is very thin. Read the notes below what to do if the batter becomes runny/thin.
10. Transfer the batter to a bowl, beat the batter with your hand in clock wise direction for 30 to 40 seconds. This makes the batter more fluffy and aerated. This is very important. You can skip this step if making the batter in wet grinder.
11. To make the hotel style medu vada, you can add a tiny pinch of baking soda, half teaspoon crushed pepper, 1 to 2 chopped green chilies, 1 tablespoon fine chopped ginger, 1 sprig curry leaves and 2 to 3 tbsps chopped onion or fresh coconut. Since I made these for the puja, I did not add any to half of the batter. To the other half I added everything else but not soda. Mix the batter well.

How To Shape Medu Vada
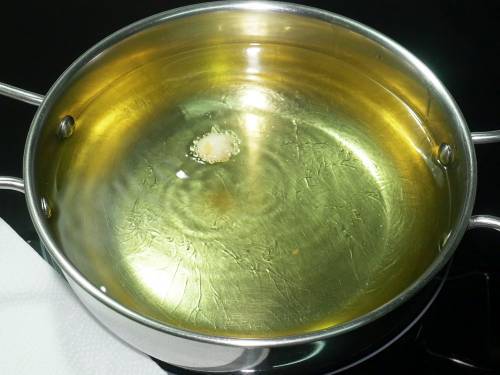
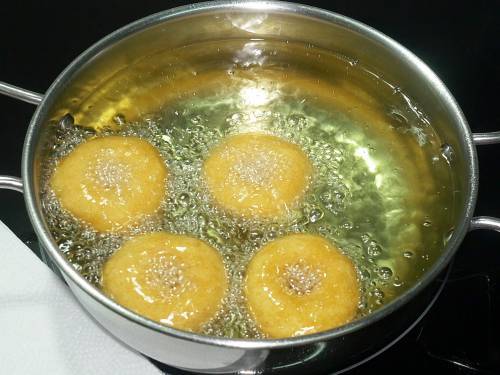
12. On a medium flame, heat oil in a deep pan. Ensure there is enough oil in the kadai so your medu vada floats and fries well.
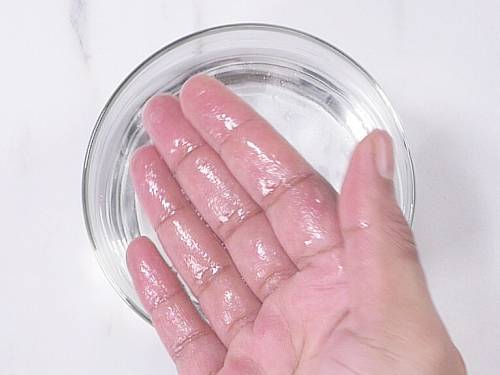
13. Method 1: Dip your fingers in water (water should not be dripping from your fingers).
14. Take small portions of this batter to your fingers. Make a ball.
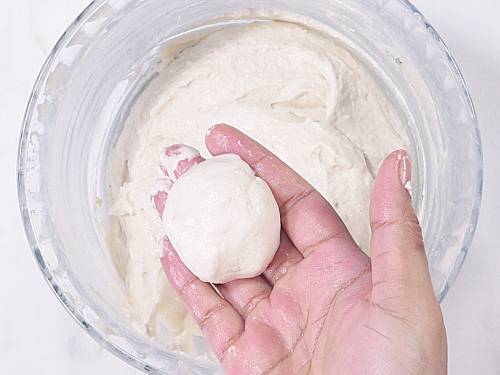
15. Slightly flatten the ball with your thumb. Next make a hole in the center. If the batter sticks, dip your thumb in water. If you are new to making medu vada, follow the second method below or practice this a few times before frying. I always make these following the second method.

16. Before sliding the medu vada to the oil, ensure it is hot enough. To check, drop a small portion of batter to it. The batter must rise without browning a lot. This is the right temperature.
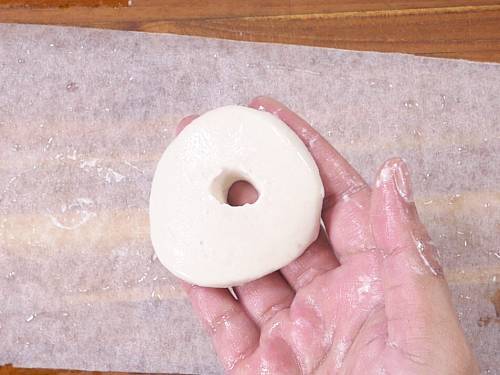
17. Method 2: Place the ball on a greased sheet or greased parchment paper. Flatten it slightly and make a hole in the center.
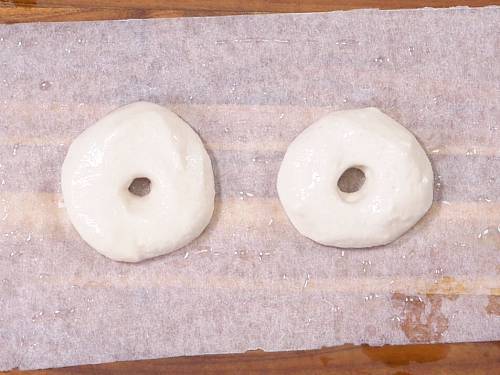
18. Once the oil is hot enough, ensure the flame is to medium. Dip your fingers in water. Please ensure there is no excess water dripping from your hand. Lift the side or corner part of the sheet with your left hand and transfer the medu vada on to your fingers (right hand).
19. Face your palm towards the oil, drop in the hot oil by shaking your fingers gently. Take care. Drop these just by shaking your fingers. Gently slide a few.
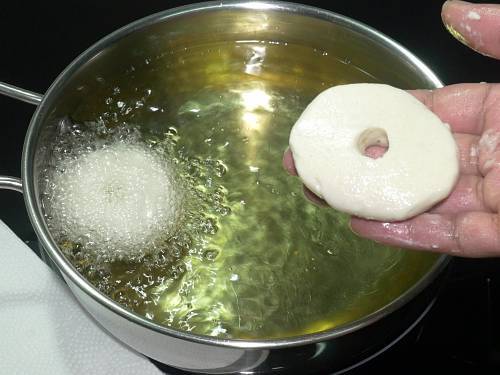
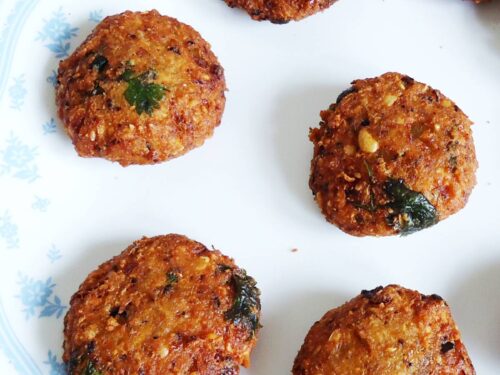
20. Fry medu vada on a medium flame till they turn golden & crisp. Towards the end if you like them deep golden, fry them on a slightly higher flame for 2 mins.
21. When done, remove them to a colander. Shape and fry medu vadas in batches till all the batter is used up.

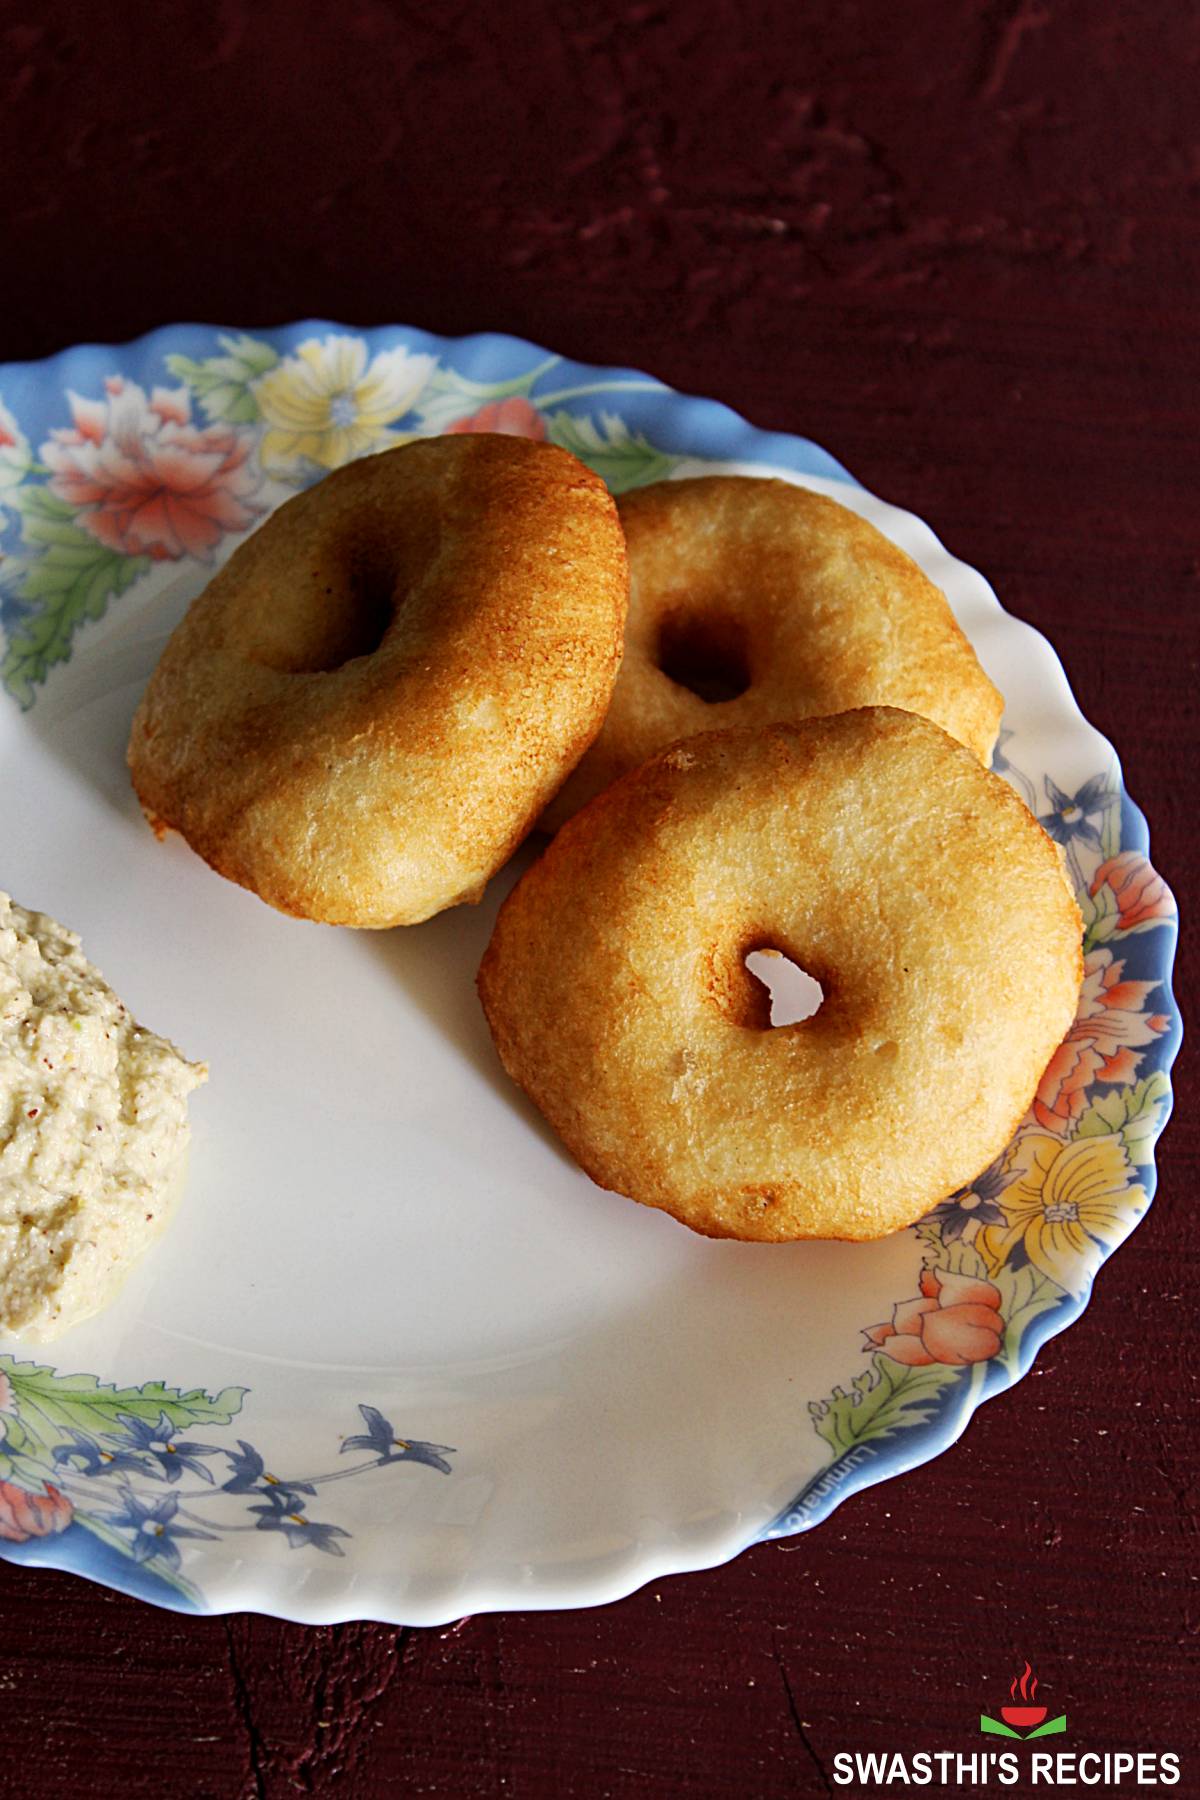
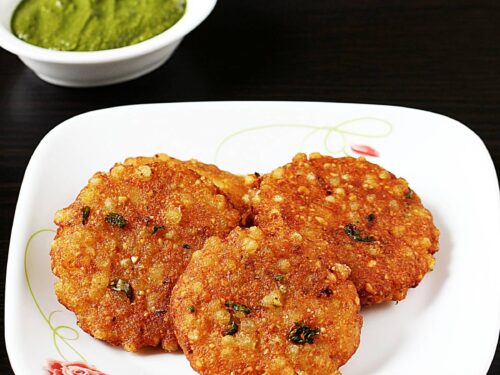
We offer garelu to the Goddess first. Serve medu vada with coconut chutney & tiffin sambar. Here I have the picture of both – plain & with spices & onions.
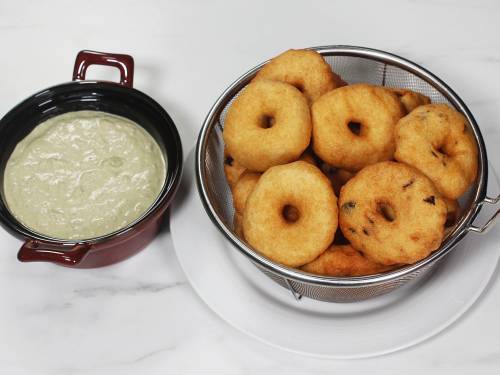
We offer only the plain ones during pooja.
Faqs
Like any other deep fried foods, vada becomes soft and lose their crispness as they cool down. To keep them crisp for longer, place a cooling rack over a baking tray and pop them in the oven. Preheat your oven with keep warm settings (80 C to 100 C or 175 F to 200 F) for at least 15 mins, then place the hot fried vadas over the cooling rack. Continue to move them to the oven as you fry.
You can simply refry them in hot oil Or reheat to crisp them in an preheated oven at 180 C or 360 C for 3 to 4 minutes or until crisp.
If the oil is not hot enough or if the urad dal is over soaked, vada can absorb lot of oil. Also if the lentils are ground too long in a wet grinder, the batter can become feather light and vadas can soak up a lot of oil. So ensure you don’t oversoak the lentils, grind them just until light and fry the vada in hot oil.
Soaking the lentils well for at least 4 hours is very important. Under soaked lentils won’t yield a fluffy batter and the vadas turn out dense and hard. Not using enough water while grinding and not aerating the batter enough can also make hard vada. Lastly aged lentils that have been in the shelf for a long time do not make fluffy batter so use lentils that are fresh. Avoid using lentils that have picked up an yellow shade.
Frying vadas in extremely hot oil will brown the vadas from outside but won’t cook them inside. So always ensure the oil is hot enough but not smoking hot. Also fry them on a medium flame until crisp, golden and cooked through.
Can I make vada batter without wet grinder?
In hotels & restaurants, medu vada batter is made in wet grinder. This gives the best fluffy texture from inside and crispy texture outside. Most traditional South Indian households too use a wet grinder to make the batter.
But every time I make garelu I use my mixer grinder. I have a very large wet grinder so I rarely use that for grinding. We can make fluffy medu vada even without a wet grinder.
Pro Tips & Notes
- Firstly do not let the mixer-grinder or the batter heat up while grinding. Warm or hot batter makes hard medu vada. Sometimes they may even taste bitter. So always use ice cold water to grind the lentils.
- If the batter becomes slightly runny, you can mix 1 to 2 tbsps rice flour (at room temperature).Then beat it well to aerate. If the batter turns to be runny still, I suggest you to make punugulu or urad dal bonda.
- Other alternates are to use fine powdered poha (attukulu). Poha works great to soak up excess moisture in the runny batter.
- If you are a beginner make the medu vada on a damp cloth, plastic sheet or cling flim and then transfer to the hot oil. Do not make it in your hand or fingers.
- Lastly adding salt later to the batter can thin it down, so make sure you add while grinding.
- Use only very little ice cold water to grind the batter. Using not more than 1 1/2 tsp. at one time, which literally means you have to sprinkle the water.
- If using organic urad dal, you can soak it for 8 hours.
Related Recipes

Recipe Card
Medu Vada Recipe (Garelu)
Ingredients
- 1 cup urad dal (or skinned black gram)
- ⅓ teaspoon salt (adjust to taste)
- Ice cold water
- Oil for deep frying
- ¼ to ½ teaspoon pepper corn (crushed coarsely)
- 2 to 3 green chilies (chopped)
- 4 tablespoon onions (chopped) (1 small)
- 1 sprig curry leaves (chopped)
- ½ teaspoon cumin seeds (jeera)
- 1 teaspoon ginger fine grated
Method
- Wash dal several times and soak in lot of water for at least 4 to 5 hrs.
- Drain the water completely and transfer the dal to a mixer grinder jar. If you have a wet grinder, you can use it.
- Sprinkle 3 tablespoons water. Next add salt and start grinding.
- Next scrape off the sides and then grind again. Whenever needed sprinkle only as much as 1 ½ tsps. Ice cold water evenly.
- Again continue to grind to a coarse thick batter. Ensure your grinder does not become hot.
- Sprinkle water. Grind again till the batter looks fluffy and white.
- Transfer this to a bowl. Aerate the batter by beating it with your hand in a clockwise direction for 30 to 60 seconds.
- Test the batter if it is aerated well. Drop a small batter ball in bowl full of water. The ball has to float meaning it is light. This is needed to get fluffy medu vada.
- If the batter doesn’t float well, means either the batter is runny or is not aerated well. Read the notes below to know what to do with runny batter.
- If the batter is in right consistency still it is not floating well. Then beat the batter once more.
- Add crushed pepper, cumin, ginger,scurry leaves, green chilies and onions. Mix everything well.
- Heat oil in a deep heavy bottom kadai or pan on a medium heat till hot enough.
- Drop a small amount of batter to check if the oil is hot. The batter raises if the oil is hot enough.
- Dip your fingers in water or oil to moisten your fingers. Water should not be dripping.
- Take small portions of batter. Shape to a ball, slightly flatten with thumb.
- Dip the thumb in water, again no dripping water. Make a hole in the center.
- Gently slide the vada in the hot oil by gently shaking off the fingers.
- Or place the ball on a greased sheet. Flatten it slightly and make a hole in the centre.
- If the oil becomes too hot, regulate the flame to medium.
- Moisten your fingers again. Lift the corner part of the sheet and transfer the vada on to your fingers. Then drop it just by shaking your fingers.
- Fry medu vada till they turn golden on both sides.
- Make them and fry them in batches till you use up all the batter. In between every batch, wait till the oil heats up, if not hot.
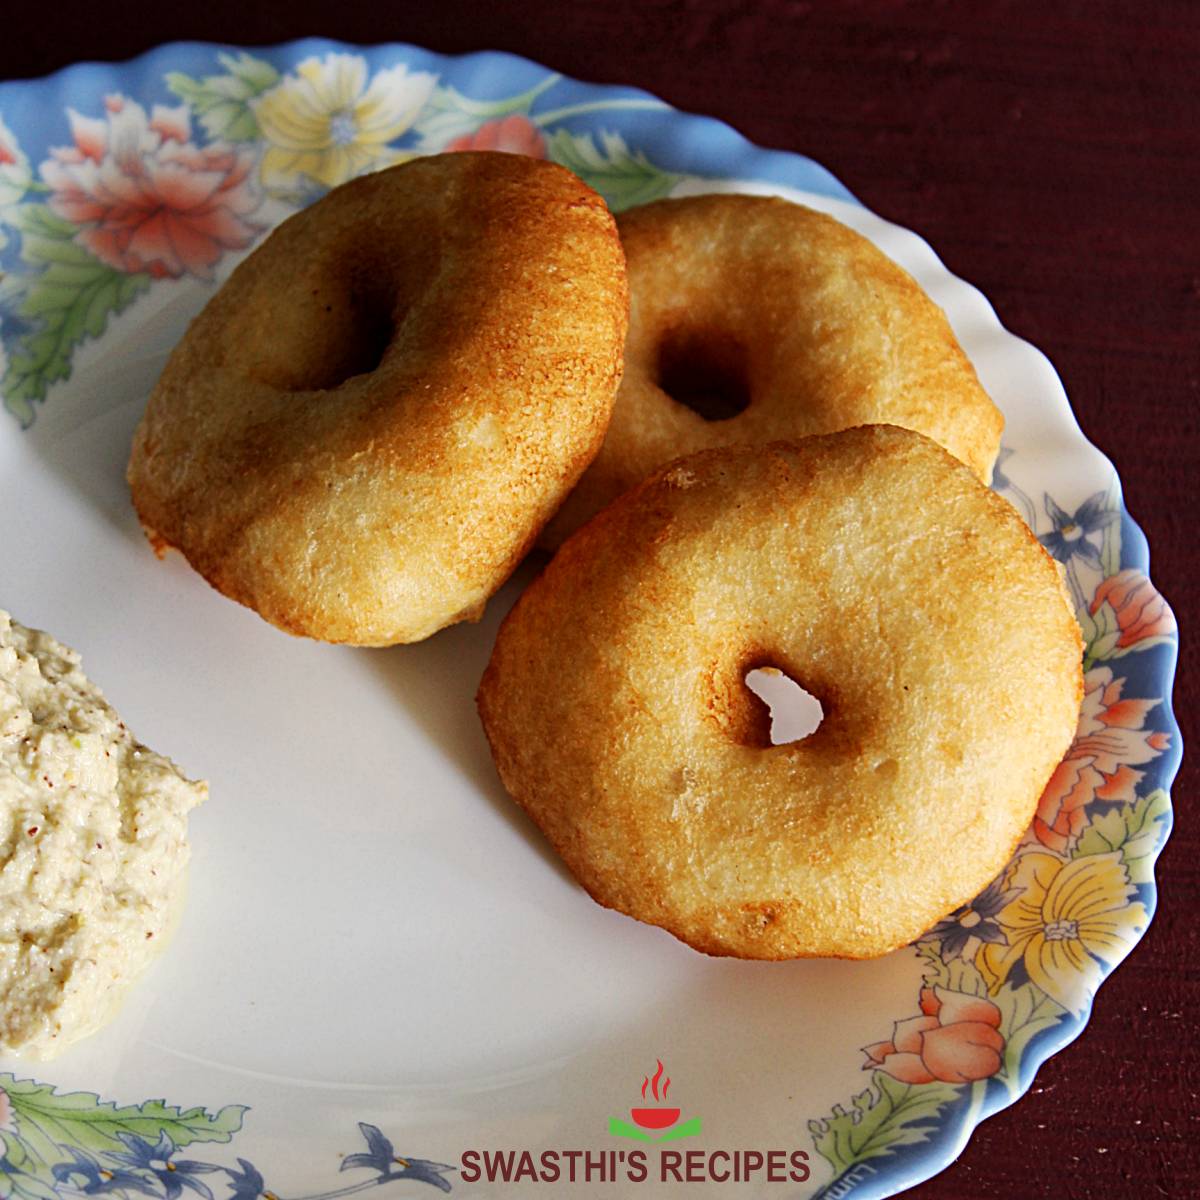
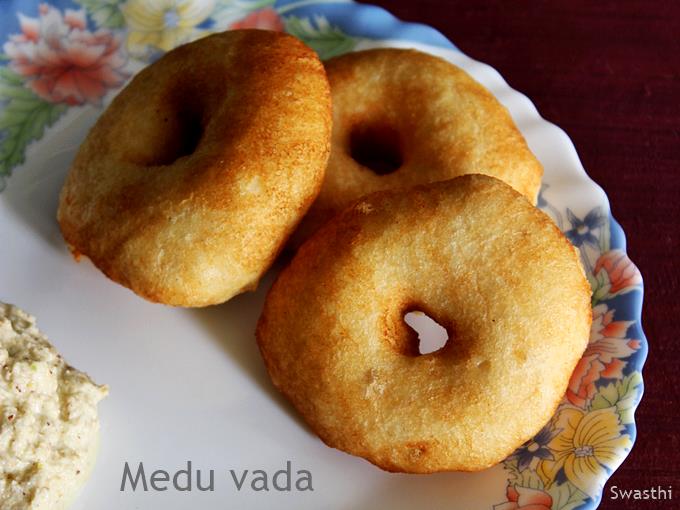
- Serve medu vada with coconut chutney or tiffin sambar.
Notes
- Vada recipe is not for beginners. To try this recipe you must know atleast the basics of deep frying – how to manage deep frying.
- Take care not to use too much water to moisten your fingers. Any water droplets in the oil can cause hot splashes of oil.
- You can also use oil instead of water to grease your fingers before you shape the vadas.
- Sliding vada to oil that is not hot enough can cause splatters.
- The amount of water to use for batter changes with the soaking time and the kind of dal. 6 to 7 tbps water is what I use for organic dal that’s soaked for 5 hours.
Private Notes
Tried this recipe?
Mention @SwasthisRecipes or tag #swasthisrecipes!Medu Vada Recipe was first published in July 2014. Updated and republished in June 2022.
About Swasthi
I’m Swasthi Shreekanth, the recipe developer, food photographer & food writer behind Swasthi’s Recipes. My aim is to help you cook great Indian food with my time-tested recipes. After 2 decades of experience in practical Indian cooking I started this blog to help people cook better & more often at home. Whether you are a novice or an experienced cook I am sure Swasthi’s Recipes will assist you to enhance your cooking skills. More about me
Follow Swasthi’s Recipes
Comments
What kind oil do you recommend using?
Any high smoke point oil suitable for deep frying is alright. In India people use peanut or sunflower oil. I use steam refined coconut oil
This recipe is excellent, especially the detailed instructions for grinding the dal and frying the vadai. It had been many years (decades?) since I last made medu vadai and I was apprehensive about getting the batter right. My South Indian husband declared them perfect and kids gobbled them up. Thank you for a spot on recipe!
Thank you so much Nivedita. Very happy to read that you got them right
Many thanks for the mixer vada recipe. However, when I use wet grinder, the batter is runny and absorbs too much oil. How can I improve that?
Hi Ruchi,
The batter could be runny due to oversoaking or adding too much water while grinding. If the dal is oversoaked, it has plenty of moisture. 3 to 4 hours of soaking is ideal for wet grinder. Too much moisture or too much grinding will make them soak up oil. Grinding for too long will make the batter super light and that’s going to make them very oily. Ideally we stop grinding when the batter is very slightly coarse but at the same time it should be light enough to rise to the surface when you drop a small amount in a bowl of water. Hope this helps
Nice!
How long can we store the batter
It is best to use it the same day but keeps good for 2 days in the refrigerator. Bring it close to room temperature before frying
Wonderful and helpful akka, God bless you emmencely
Can I keep the batter in the fridge and make the next day to. Save time
Yes Vijaya. You can. Bring it close to room temperature by keeping it out of the fridge for 30 mins before frying
Tried them and they came out good. I guess making medu vada needs some practice. What is the best way to reheat them?
You may crisp them in the oven or air fryer. You can also refry them in oil. Thanks for trying Pavithra. Yes you need some practice.
Hi swasthi, i tried the recipe. The taste was amazing thanks to your tips and my kids loved it but alas the shape was a . I made the vada on the paper but couldn’t make it leave my hand. It was sticking. What seems to be the error? Is the batter too wet? Or should i use oil on my hand
Hi Malvika,
Getting well-shaped medu vada at the first try is slightly difficult but sometimes it could be a runny batter. If the batter is not thick enough the batter goes out of shape. It requires some practice and it is best to practice them once or twice a week until you get them properly. It may take 4 to 5 trials. If you are afraid to use water, you may use oil on your fingers. I basically smear oil on the parchment and then dip my fingers in water or oil. Both work & this helps the vada to leave your fingers. Sorry for the late reply I’m currently on a long vacation. Hope this helps
Please clarify if we need to use urad dal whole or urad dal split
Yes use skinned whole urad dal
HI Swathi,
Thanks for the recipe. Can I make the batter ahead of time? and leave it in the fridge to make it ready for the next day?
Hi Bhavika,
Yes you can. People leave it for 2 to 3 days and that’s alright if you are using a wet grinder. If you are grinding in a Indian mixer/grinder, one day is alright. Bring it closer to room temperature and whisk/beat it well before frying. Hope this helps
The vada recipe is the best, and in such detail. Made them years ago with your recipe and will now start preparing them again at home. More than 5 stars to your recipes. Love from NZ
Cam we ferment batter before frying vadas?.
No. This kind of vada is not made with fermented batter
Perfect medu vada. I used my new stone grinder and got great results. The comment section is really helpful. Understood not to overgrind the dal. Thank you
Will there be a change in soaking time if I use split skinned urad dal? Any other suggestions I should take if I attempt vada with this type of dal?
Hi,
Split urad dal is not good for making medu vada, especially if you are using a mixer grinder. It should be alright to use a wet grinder/ stone grinder. Soaking for 4 hours should be alright.
Good quality skinned whole urad is difficult to find in my city.If I do find it in South Indian stores,then it’s always old stock. I hesitate to ask my South Indian neighbour’s for half a kg of whole urad dal because they get it sent all the way from their home state. Bigbasket dal I’ve tried twice with poor results.
Yes I understand. I have the same experience. I have carried a few times from bigbasket Bangalore to Singapore and didn’t get the best results. For making medu vada, we usually see the dal and choose else the results are not guaranteed. So online orders are not a good choice. Wish I could help you better
Hi Swasthi akka, thank you so much for the detailed step by step photos in the recipe. I followed the same and the vadas came out so well in my very first attempt!! It was just magical to see those vadas fluff up .. thank you so much.😊
Hi Swasthi,
Can’t thank you enough for this recipe. It made my day and perfect Medu Wada at very first attempt. I am dancing out of Joy..
Thank you so much. <3
Great recipe, followed the instructions perfectly to get great fluffy vadas.
Hi Swasthi,
For me medu vada was always a failure till I followed your recipe point by point yet it did not come out fluffy dear. Though it tasted too good the fluffy part was lacking. Can you please let me know how to make fluffy vadas.
Thanks
Rita
Hi Rita,
It could be the dal itself. A lot of times old dal is the cause. Try buying urad dal that looks more white rather than dull pale color. I find the dal from big basket is really new (not marketing, it’s my experience). Also try soaking a little longer. The last option could be to add a pinch of baking soda at the time of aerating. Use a whisk in place of hand. Hope these help
Hi Swasthi , what Blender are you using? Am not happy for idli/vada batter with the one I have. Thanx for all the great Recipes. Easy to follow and make.
Hi Deepa,
I too have the same problem. I use ultra, preeti and national panasonic. All of these have some or the other problem. I use
ultra mixer grinder for idli/dosa batter and masala powders. It is very good to blend but has a problem with the lids which don’t last long. They break within a few months. We have replaced the lids (from another brand) so it is working.
Preeti is okay but takes long to make chutney and can’t grind dry masala well. It is okay for vada batter.
I also use National Panasonic because this has a local warranty in SG (where I live). I use this to grind purees for curries and chutney. Batter and masalas take really long in this. I’m looking for something else now which can be used for everything. Hope this helps.
Can you get Vitamix mixers in Singapore? Preferably a commercial power one? That’s what I have and it will blend anything.
Thanks Lynn. Yes we do get but I am not sure if it can grind the lentils to a thick and fluffy texture without heating up. Because I have heard from people that even vitamix heats up soon while blending this kind of batter. As you said never thought of checking a commercial kind. Thanks again
Vitamix is great for dosa/idli (not suitable for vadai). The batter will be ready in 10min. I use the Magic Mix food processor for medu vadai. perfect consistency.
Thank you for sharing about the magic mix. That’s really helpful! Would you mind sharing the power/watts – is it a 1100 W or 950 W
Superb! The recipe was spot on. I loved the detailed instructions. Especially, the amount of water, and details related to soak time and type of urad dal.
I have never been able to make good vadas. They’ve always been a flop. But with your recipe they came out quite well.
I made vadas as per the recipe. Followed it to the Ticked all boxes. The taste was great. Just that the vada was crispy on the outside but inside, though cooked, was dense. It was not airy. Does that have to do with the quality of the urad dal or did I need to put more water?
Hi Sridevi,
Sometimes yes it could be the urad dal. Fresher urad dal (from the current years harvest) makes fluffy vadas. When the batter is done correctly it turns white in color and won’t be pale. It also looks fluffy. This is the only indication. Also grinding without soaking or not adding enough water also makes harder & dense vadas. Unfortunately there is no way to explain this and it only comes by practice. I would say try a few times until you know what works for you – more water or better quality dal or longer soaking. Hope this helps