Veg Dum Biryani, How to Make Vegetable Dum Biryani
Updated: August 7, 2022, By Swasthi
Veg dum biryani recipe – Biryani was brought by the mughals to India during the mughal reign. It became very popular as one of the most nutritious, rich and royal foods. Since the authentic hyderabadi biryani was dum cooked with meat, ghee, nuts and yogurt, it was considered as a nutritious and wholesome dish. There are sources that say “veg biryani” was born during the same time and was prepared by the vegetarian community working for the mughals. There are so many kinds of veg biryani one gets to see on a restaurant menu like kerala biriyani, lucknowi biryani etc.
Veg Dum Biryani
Hyderabadi vegetable dum biryani is one of the most popular, aromatic and delicious food loved by many. Making a vegetable biryani can be as simple as making it in a pressure cooker or one that is prepared with a fresh ground masala and dum cooked like the one shown in this post.
This vegetable dum biryani recipe is roughly adapted from the hyderabadi vahchef’s video and is one of the best veg biryani that I can ever make.
To make vegetable dum biryani flavorful and delicious use the best quality aged basmati rice, premium quality spices, masala powder and fresh herbs. You can use a store bought masala powder or can make some from my biryani masala powder recipe (link in the recipe card below).
For this veg biryani recipe, veggies like carrots, peas, potato, cauliflower and beans are used. Avoid using veggies like brinjal, mushrooms or capsicums unless you have a personal liking towards them. You can also use soya chunks or meal maker nuggets if you like.
Making a good biryani is a regular affair at home and this collection of 30 biryani recipes shows my love for the home cooked dum biryani. Though the preparation & dum process is a bit time consuming, the results are great.
If you do not prefer to go for a elaborate recipe, You may check this quick restaurant style veg biryani and this super quick veg biryani in presssure cooker.
Photo Guide
How to Make Veg Dum Biryani
Preparation
1. Wash and soak rice for at least 30 mins. While the rice soaks you can go ahead with the next steps.
2. I highly recommend using fried onions for making a good hyderabadi biriyani. The aroma of these fried onions is great and cannot be substituted with any other ingredient and not even with pan fried onions. Thinly slice onions and fry them in hot oil until they turn crisp and golden. Set aside. These are also sold in super markets as fried onions (not onion flakes).
3. You can also shallow fry, this is how you can do it if you like to shallow fry. Heat oil in a pan. Add even & thinly sliced onions. Also separate the layers before adding.

4. Fry them until golden and brown. Do not burn. Keep stirring often to evenly brown them and prevent burning.
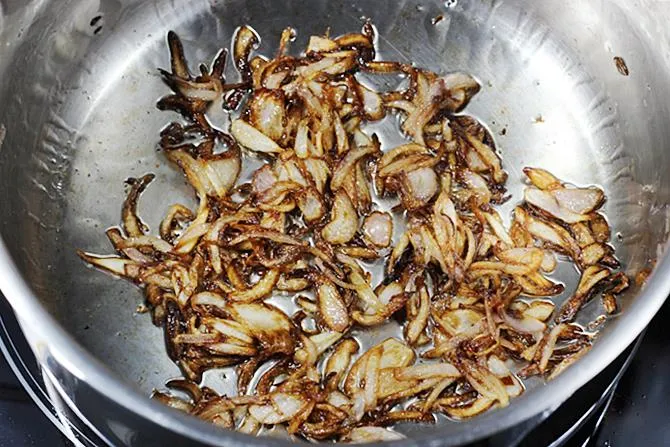
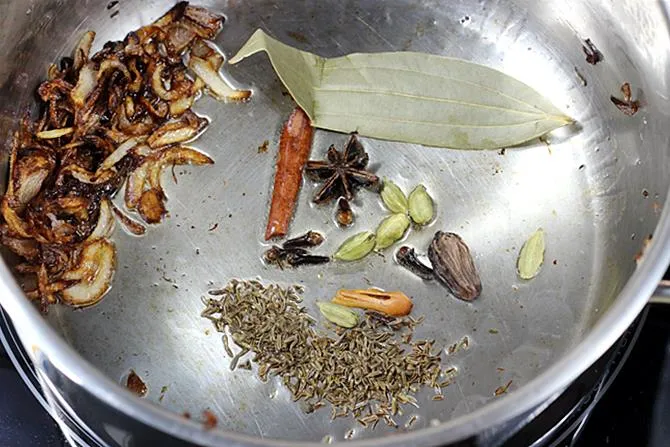
5. Set aside half of these. Move the rest of the onions to a side in the pan. Off the stove for a while to prevent burning the spices.
Make Gravy
6. Add all the whole spices except shahi jeera. Sauté till you get an aroma. Takes around a min, do not burn. Add shahi jeera and sauté until they crackle.
7. Switch on the stove and lower the flame. Add ginger garlic paste.

8. Saute till the raw smell goes off. Keep stirring.

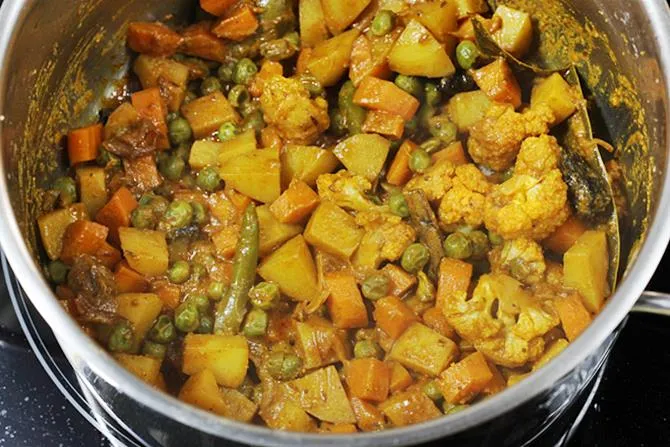
9. Add all the vegetables and fry for 2 to 3 mins.
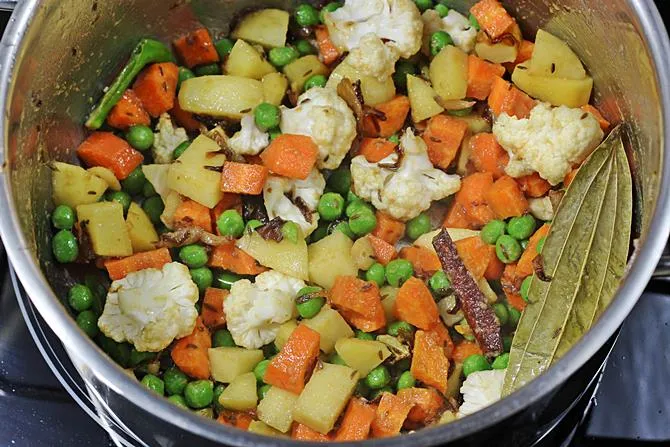
10. Add turmeric, salt, red chili powder and biryani masala powder.
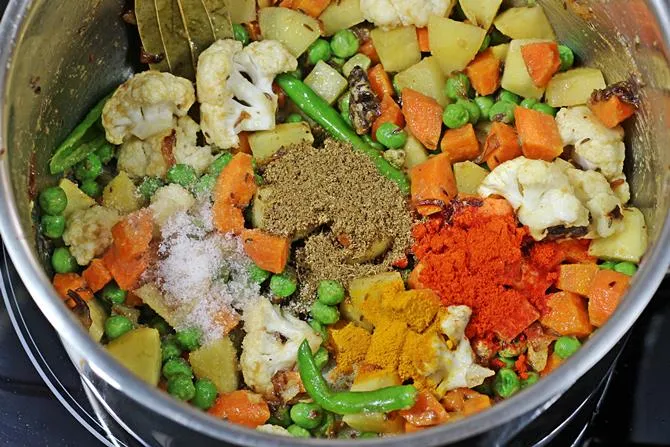
11. Fry till it turns aromatic for about 2 to 3 minutes.
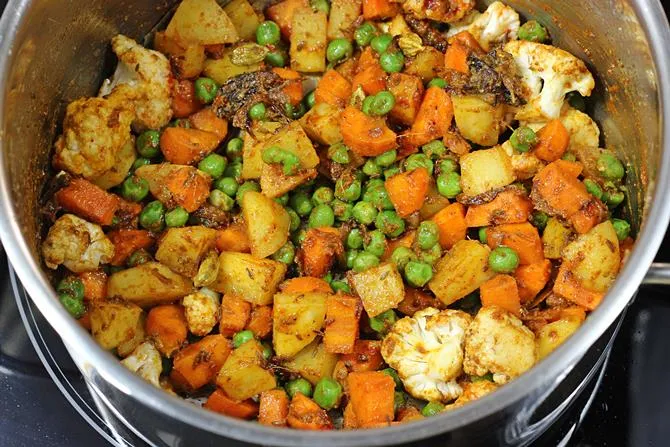
12. Pour 100 ml yogurt. Set aside rest of the yogurt for further use. Mix Well.

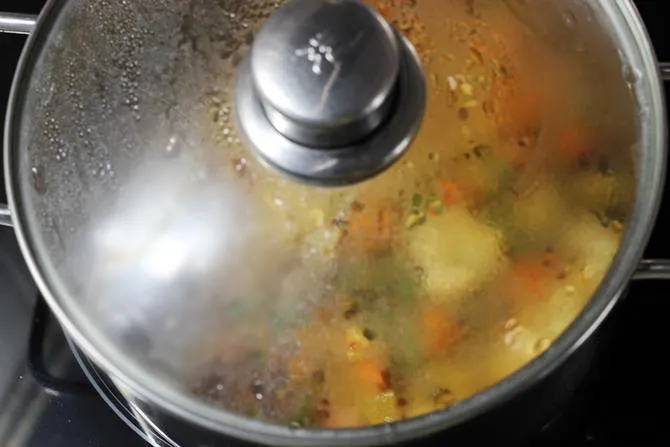
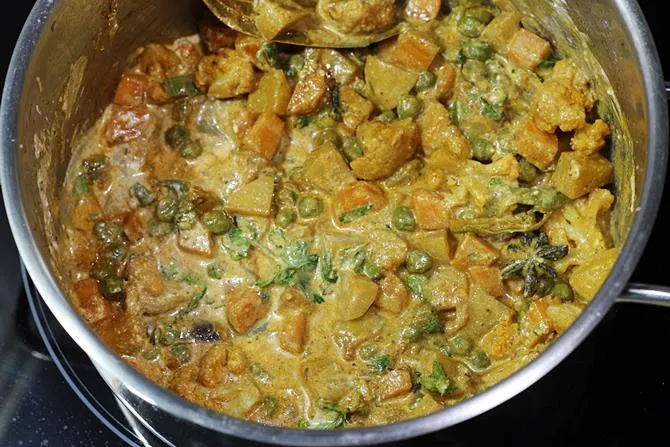
13. Cook covered till the veggies are cooked al dente, just cooked. Cook covered if needed. Do not overcook the veggies. Off the stove when done. While the veggies are getting cooked, you can proceed with the next step.
Cook Basmati Rice
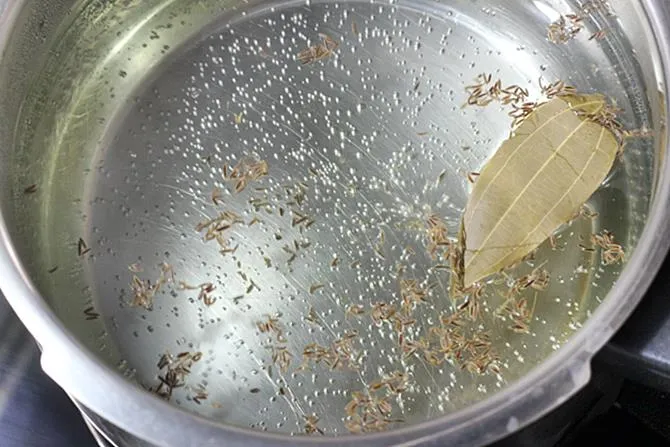
14. In a large pot, bring 5 cups of water to boil, add oil, salt, shahi jeera and bay leaf. Adjust the salt as needed.
15. Add washed, soaked and drained rice.
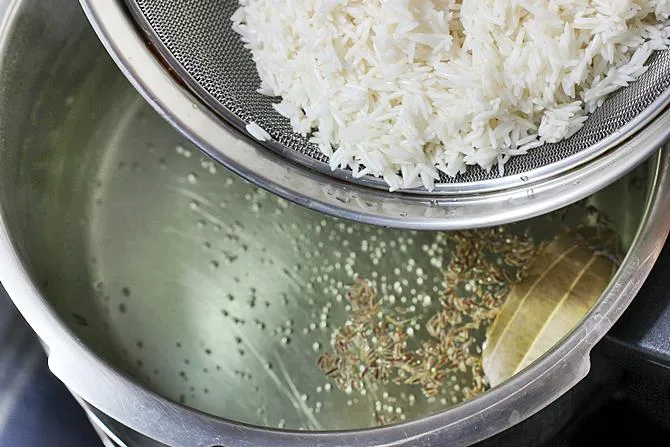
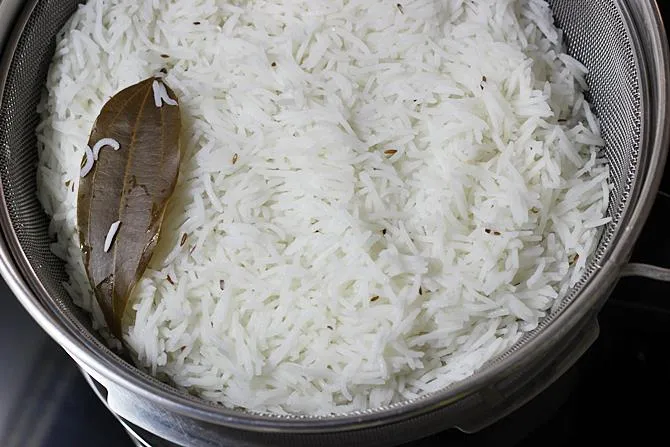
16. Cook this rice till it is 90% done or al dente (just cooked). You must be able to get a bite into the rice.
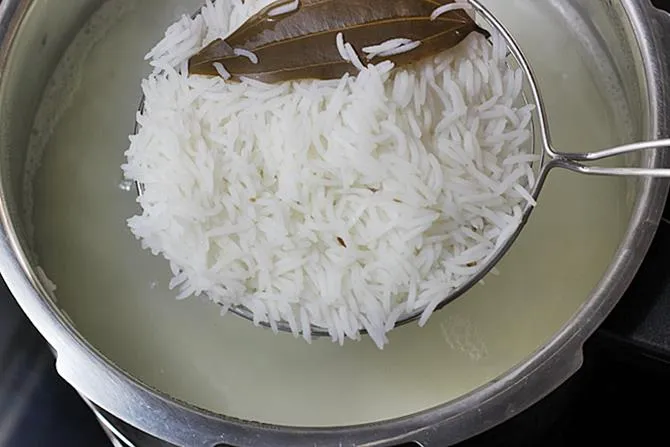
17. Drain off the excess water and set aside. You can soak saffron in 2 tbsp of this hot water or in hot milk. Set aside.
Layer Basmati Rice and Veggies
18. Make sure the veggies are cooked al dente. If you like to make a 2 layer biryani, set aside 1/3 of the cooked veggies. If you are using a small pot for dum, then it works good to set aside half, If you use a wide pot, then just go ahead making a single layer.
19. Add the rest of the curd, mint and coriander leaves to the dum pot.
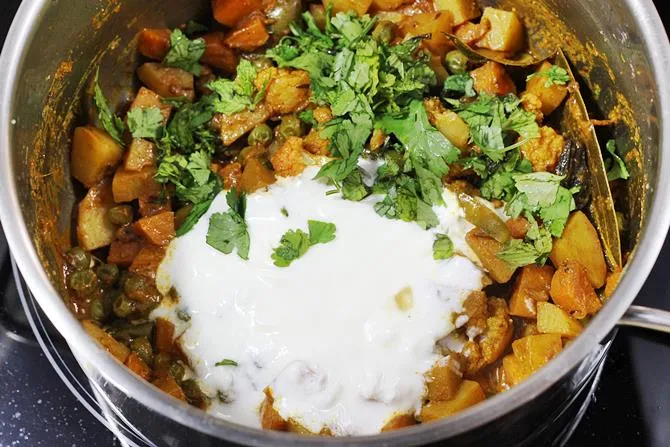
20. Mix well. Spread it well evenly.
21. Layer half of the rice, If you have set aside half of the curry then layer it now, if you have not set aside then just sprinkle 2 pinches of biryani masala powder. Then sprinkle few fried onions, mint and coriander leaves.
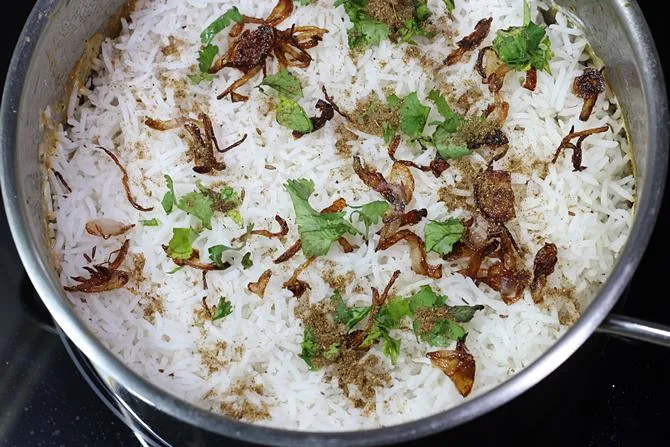
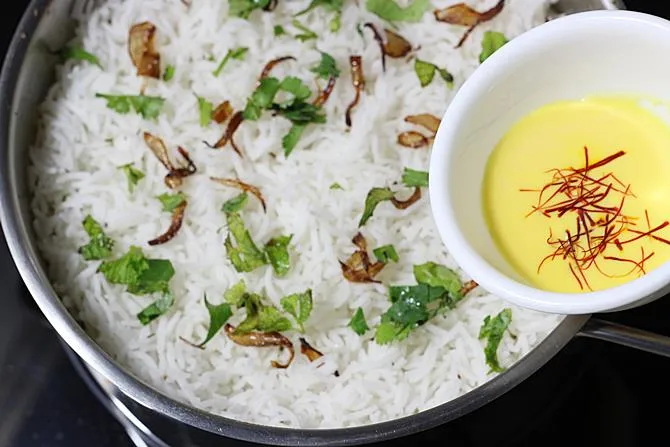
22. Repeat layering rice, mint, coriander leaves, fried onions and then pour soaked saffron milk.
Make Vegetable Dum Biryani
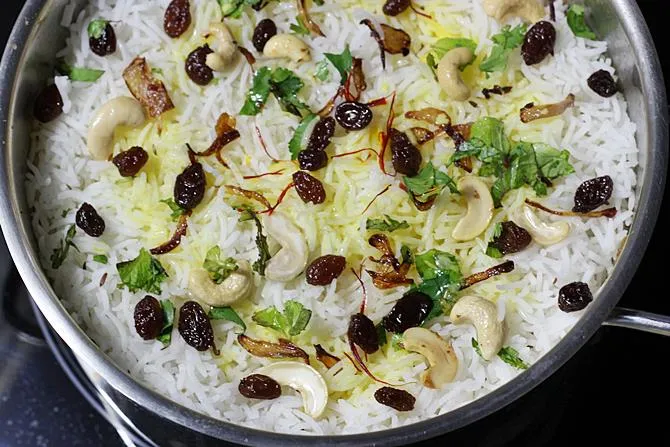
23. I fried cashews in a small pan in hot ghee, then added raisins towards the end. Poured the ghee and then the nuts raisins over the rice evenly. You can also add a tsp of kewara water for mughalai flavors.
24. Begin to heat an old heavy bottom tawa and proceed with the next step.
25. Cover the pan with 2 thick moist kitchen towels or just seal with aluminium foil. Place the lid and a heavy object on the lid. I do not place any heavy object, as my lid itself is very heavy. Or you can make dough made of wheat flour. Moisten the rim of the pan, place this dough around the rim and place the lid over it.
Press the lid tight so that it sticks to the dough tightly and no steam vents out. I do not prefer to do this as this mess up the pan and cleaning is a great pain. Move this pan to the hot tawa, cook on medium flame for 5 mins. Set the flame to low. Cook this way for 5 to 7 mins. Since the vegetables and rice both are already cooked al dente, the biryani rice turns out perfect. Allow it to rest for at least 15 mins.

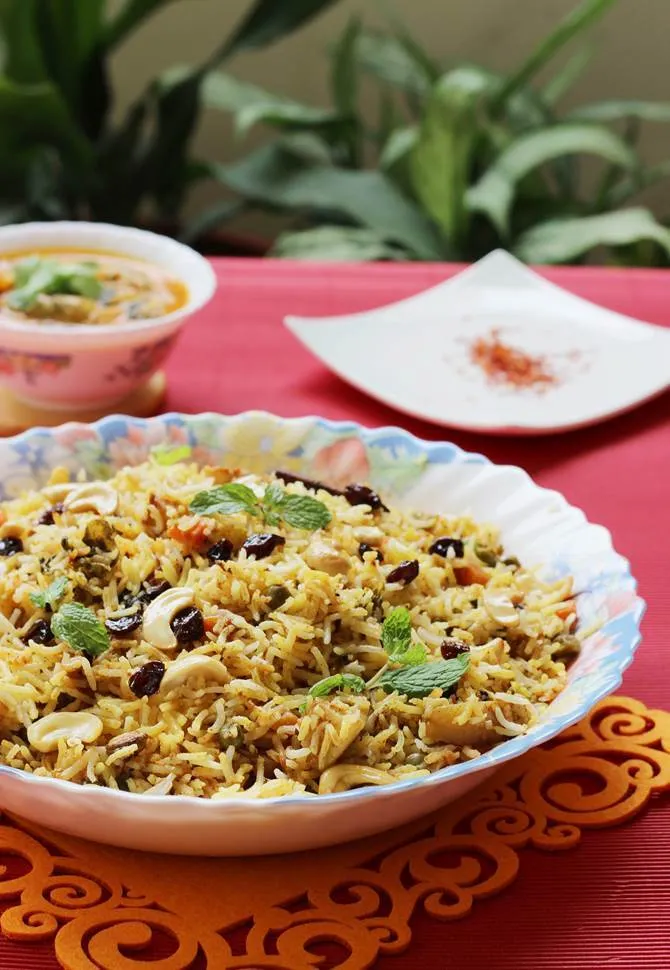
Veg biryani is ready to serve. You can mix up the entire rice and veggie mixture for even flavoring and spice. You can also serve it without mixing for the marbled look. Just serve from the bottom to the top in portions. Make sure each serving gets a proportionate amount of spiced veggies and rice.
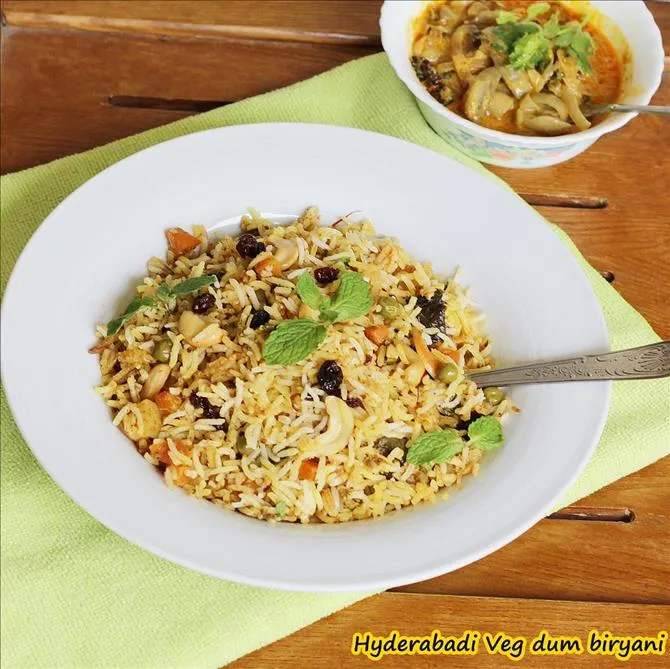
Serving suggestions: Veg biryani can be served with a raita or shorba. You can choose one from these
Collection of raitas or
Collection of biryani gravy.
Recipe Card

Veg Dum Biryani (Vegetable Dum Biryani)
For best results follow the step-by-step photos above the recipe card
Ingredients (US cup = 240ml )
- 1 tbsp ginger garlic paste
- 1 tsp biryani masala powder or garam masala(any ready made powder is ok, adjust to suit the spice levels)
- 1/3 tsp red chili powder (adjust as needed)
- 1/8 tsp turmeric
- 1 cup curd or 250 ml yogurt / dahi (not very thick and not very thin)
- 4 tbsp ghee or oil
- strands saffron Few
- 3 tbsps milk hot or water to soak the saffron strands
- Raisins as needed
- Cashews as needed
Fried onions
- 1 onion large , thinly sliced about 1/2 to 3/4 cup or store bought fried onions.
Veggies
- 8 florets cauliflower medium sized
- 1 potato large , boiled, cubed (peel the skin and boil till ¾ done)
- 1 carrot large, chopped
- 1 handful green peas
- 4 to 5 beans chopped
- 1 ½ tbsp Mint leaves / pudina minced
- 2 tbsp Coriander leaves chopped very finely
- 2 green chilies slit
Whole spices
- 2 inch cinnamon stick
- 4 green cardamoms
- 1 black cardamom
- 2 strands mace big
- 1 star anise
- 6 cloves
- 1 bay leaf
- ½ tsp shahi jeera
cooking rice
- 1 ½ cups basmathi rice aged
- ¼ tsp shahi jeera
- 1 bay leaf
- Salt to taste
Instructions
Preparation
- Thinly slice onions and fry them in oil till golden and crisp. Set these aside half of this. If you are using store bought fried onions, you can skip this
- In the same pan, add whole spices and saute till they begin to sizzle.
- Add ginger garlic paste and fry till the raw smell goes off.
- Add parboiled potatoes and the rest of vegetables. Fry for 2 to 3 minutes.
- Add turmeric, masala powder and red chili powder. Mix and fry well for 2 minutes till you begin to get an aroma.
- Pour 100 ml yogurt and mix. Cook till the vegetables are done to tender. You can cover and cook. Cook uncovered if there is lot of moisture after the veggies are cooked.
- While the veggies cook. Bring lot of water to a boil and cook rice till al dente along with bay leaf and shahi jeera. The rice has to be cooked grainy and not mushy. Drain it off in a colander. Soak saffron in 3 tbsps of this hot water or hot milk. Set aside.
- If you like to make a 2 layer veg biryani, set aside 1/3 of the cooked vegetable mix. Now mix together the rest of the cooked veggies, rest of the yogurt, mint, coriander, nuts and raisins, few fried onions. you can do it in a pressure cooker or any heavy bottom utensil.
How to Make Veg Dum Biryani
- Layer the rice over the vegetable mix. Then layer the 1/3 cooked vegetable mix or 2 pinches of masala powder. Sprinkle some fried onions, mint and coriander.
- Layer rice over it again, then the fried onions, mint and coriander leaves and pour off the saffron milk. Fry nuts in a tbsp ghee, saute raisins and then pour this over the rice. Place a moist clean cloth to seal the rim. You can even use a foil or atta to seal the utensil.
- Place the dum utensil on a hot tawa and cook for 5 minutes on a medium flame and then on low for 5 to 7 minutes based on the thickness of your utensil.
- Serve hyderabadi veg biryani hot or warm in layers of rice and gravy.
For the oven method:
- Preheat the oven to 180 C and bake for 20 mins. if you feel it is still very moist beneath, bake for another 5 to 10 mins. This depends on what kind of baking dish you use. Usually ceramic ones get done faster.
Notes
NUTRITION INFO (estimation only)
© Swasthi’s Recipes
About Swasthi
I’m Swasthi Shreekanth, the recipe developer, food photographer & food writer behind Swasthi’s Recipes. My aim is to help you cook great Indian food with my time-tested recipes. After 2 decades of experience in practical Indian cooking I started this blog to help people cook better & more often at home. Whether you are a novice or an experienced cook I am sure Swasthi’s Recipes will assist you to enhance your cooking skills. More about me
Follow Swasthi’s Recipes
Comments
Followed the recipe exactly but layered the vegetable biryani in a oven tray and baked for 30 mins. Came out perfect and it was delicious.
That’s lovely! Thank you Ramya for sharing back.
Hello!
I have just returned from Hyderabad and am very excited to try this recipe.
Under the whole spices list, you have 6 cloves listed, could you share what 6 cloves of please?
Thank you,
Shawna
Hello Shawna,
It is a spice named clove. I have the pictures in the step by step photos. Please take a look
Have made biryani twice using this receipe and it turned out amazing!!!
Thank you Kusum
Very nice recipe, I tried at home it was liked by every family member also our neighbor appreciate the taste
Thank you Rajiv
Hi Swathi
I have to say that every recipe I have made of yours turns out absolutely amazing! You are definitely my go to page for any recipes I’m looking for.
I am going to be making this for bhai bhji this year but I am a little confused and hope you can help.
I am going to be layering the biryani and I note from the instructions that some yogurt is added to the whole mixture of the veg. You then instruct to remove 1/3 of the veg if we are layering and add remaining yogurt, coriander etc to the remaining veg. Is there no yogurt, coriander etc that gets mixed in with the veg removed for layering?
I hope this makes sense and I look forward to your response.
Jigna x
Hi Jigna,
Thank you so much! Yes you understood that right. We add a small batch of yogurt initially to the veggies and cook that, set aside some of the veggies and then we add the next batch of yogurt. I have another dum cooked vegetable biryani here. If you want you may take a look at that. That one is a simplified version of this recipe with fewer steps. But both yield the same results. Hope this helps.
Made this again with your shorba and mirch ka salan recipes. Everything was so balanced. In awe of your insights and so so glad you are sharing these with us.
Glad to know Sandy.
Thank you
Great recipe Thank you for sharing, came out really well.
Glad to know Shwetha
Thanks for leaving a comment
Hi Swasthi,
Thank you for this wonderful recipe. The proportions were accurate and the biryani came out fabulous! Everyone loved it!
Welcome Sheily
Glad to know it came out great. Thank you
Made it multiple times and it tastes awesome.
Thanks Neha
I followed exactly the same step by step… Just turned out amazing…. Planning to try egg dum biriyani this wknd…. Khili khili zayke se bharpur…
Thanks Mallika
Glad to know it turned out good.
Hope you enjoy the egg biryani
The best veg biryani ever
Thanks Divya
I love this recipe and easy one to prepare. Simply superb
Thank you Manasa
This tastes just amazing. My family who used to consider only meat biryani as real biryani loved it immensely. Thank you so much.
Hi Avishek,
You are welcome! Glad you all loved it. Thank you!
This receipe is too too yummy.. have tried it multiple times and everytime it treated well. Thank u for this mind-blowing receipe
Hi Shruthi,
You are welcome! Glad you like it. Thank you so much!
Can we add panneer and soya chunks to it ?
Yes You can add about 3/4 cup paneer and half cup dry soya chunks. Add the soya along with veggies and paneer just before layering the rice. You can also fry the paneer and then add.
Can we make rice in presure cooker
Hi, You can check this veg biryani in cooker
Hi, I tried this today for my son s birthday party. It was a super hit. Thanks for the recipe.
Welcome Shreedevi
Glad to know it turned out good.
Hi Swati
The biryani recipe is simple and yet so tasty. Thanks for the recipes. If I have to make something Indian I look for your recipes first. Thanks for sharing.
Vamsi
Hi Vamsi
Thanks for trying the recipes. Glad to know the biryani turned out good.
Hi Swasthi,
Thank you so much for sharing this recipe! My husband just loves this briyani. I have made it a number of times when I had guests over and they have all loved it too. Everyone asks and I direct them to your website 🙂 The recipe is perfect and just so delicious
I appreciate it so much!
Thanks
Deval
Hi Deval Patel,
You are welcome. Thanks for the comment. Made me very happy.
Thanks again
🙂
Hi Swasthi, thank you for sharing your recipes. This recipe turned out so well, so yummy. All at home loved it. Seek your advice, which veg gravy will go well with this briyani, plan to cook for my friends,.
Thank you again.
Regards
Vanitha
Welcome Vanitha
Thanks for trying. Glad to know it came out well. You can try this shorba recipe. This soya chunks kurma also will go very well.
Thank you Swasthi, will do, regards Vanitha
Hello. If you wereto double the portions of this recipe would you keep the amount of spices the same or add extra. Also for a vegan alternative would it be ok to use yoghurt made from coconut instead?
thanks
Hi Abbie
You will have to double the spices. I guess it works with coconut yogurt but haven’t tried it anytime. So not sure how it tastes.