Dosa Recipe, How to make Dosa Batter
Updated: June 26, 2024, By Swasthi
Dosa Recipe from scratch, including how to make Crispy Dosa Batter at home. My video and step by step photos will help you master the technique of making perfect dosas. No matter you are a novice or a skillful cook, these tips & tricks will guide you make the BEST South Indian Dosas of different kinds – crispy, soft, restaurant style, home style and healthy high-protein types.
Dosa also known as Dosai, is a classic popular South Indian crepe made with fermented lentil and rice batter. Restaurants often serve them as a meal with coconut chutney and sambar. But they taste equally good with any other spicy chutney or vegetable kurma.
About Dosa Recipe
The traditional process to make dosa starts by soaking rice and lentils, which are later ground to a batter and fermented overnight in a warm place. After a good fermentation, the batter increases in volume, becomes light with plenty of small air pockets and develops a slight tangy flavor.
The batter is spread like a crepe on a hot griddle/pan known as tawa or dose kallu. It is cooked with a little oil, ghee or butter until crisp. The joy of eating hot crispy dosas with your favorite Coconut Chutney, Potato Masala or Tiffin Sambar is unparalleled. At home we also love these with Aloo Chana kurma.
Dosa recipes vary across households and regions of South India. They can be made with varying proportions of rice and lentils, which decide the texture and flavor of your dosai. I share 4 recipes in this post which I use often for my family meals. If you ask me why 4 recipes and not one?
South Indians need different kind of dosas for every mood and season. Crispy, when you crave a restaurant meal. Soft, when you want something comforting, 2-in-1 batter when you are unable to decide between idli-dosa. High-protein type when you want to increase your protein intake. I can’t say one is better than the other because all these serve the purpose.
I am often asked about the equipment and tools you need, Ingredients and substitutes, Can I soak the rice and lentils together, and whether to add salt before or after fermentation. So I have answered all of them here.
Equipment & tools required
Blender or a wet grinder? To grind the lentils and rice, you need a blender, mixer/grinder or a wet grinder. To make smaller batches like this recipe, a blender works well (ex: a NutriBullet). You don’t necessarily need a high speed blender (like a Vitamix or Blendtec) or an Indian mixer/grinder with a steel jar.
A blender with at least 750 watts will be capable of doing the job if you soak the ingredients well, for longer. It is great to have a wet grinder/stone grinder if you eat idli dosa very often. A wet grinder is capable of grinding large amounts of rice and lentils that can serve a family of 4, for a few weeks.
Griddle/ tawa: If you are a beginner you may start learning to make dosa on a non-stick griddle. In India traditionally a cast iron tawa (ex: like a lodge 10.5”griddle) is used to make dosas. This kind of tawa has low edges like a griddle which makes spreading easier. A pan with high edges won’t let you spread the batter well.
Ingredients & Substitutes
Basically you need only 2 ingredients – lentils and rice to make basic dosas. Using other ingredients improve their texture and flavor.
- Lentils – Traditionally classic dosas are made with skinned urad dal (split white dal or whole gotta). They are skinned from black lentils, also known as matpe beans or vigna mungo. You can make dosa with just urad dal (like my recipe 2, 3 & 4 below) but restaurants have introduced us to chana dal, which help improve the flavor and color of these crepes. These lentils are known as Bengal gram. These can be replaced with toor dal – split pigeon peas but we love the flavor chana dal imparts.
- Rice – Though you can use any kind of non-sticky rice, short grain raw rice like sona masuri and ponni give the best results. A good substitute is basmati rice (not sella) or a combination of raw rice & idli rice/ short parboiled rice works. Using 100% parboiled rice or idli rice has not yielded me consistent result.
- Methi seeds -These are known as fenugreek seeds and are used in smaller amounts to help with fermentation. You can substitute the seeds with ground fenugreek. If you live in warmer climate, you can make dosa without methi.
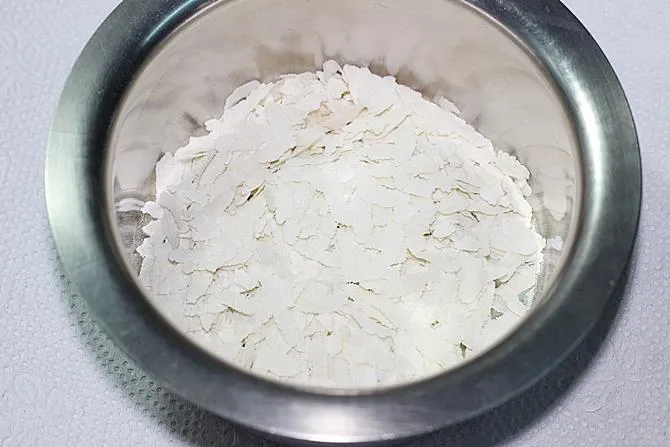
- Poha – It is known as flattened rice & helps to make your dosas light, without being dense. This gives similar results as that of cooked rice. But cooked rice can make your batter go bad (stale) during warmer days.
- Cold Filtered water – Use filtered/de-chlorinated water. Chlorinated water can inhibit the growth of natural yeast required for fermentation. Your batter may not ferment at all if you use tap water. We use cold water because we don’t want the batter to heat up.
When to add salt? (Top FAQ)
The most debated topic in South Indian Cuisine is “when to add salt to idli dosa batter?” Every South Indian home has a different answer to this, based on their experience. So experimenting is essential to know what works for you.
Adding salt before fermentation:
Pro – It is ideal to add sea salt/ Indian rock salt (or non-iodized salt) before fermentation during winters as these natural unrefined salts helps with the fermentation process. However you should avoid using table salt and iodized salt as they inhibit the growth of yeast required for fermentation.
If you use an equipment (instant pot/oven/) to ferment your batter, adding salt early before fermentation is not required.
Con – By adding salt to the entire batter, you lose the chance to store it longer. Salted batter often turns too sour within a week while unsalted batter keeps good for 2 to 3 weeks.
Can I soak dal & rice together?
This is the next most FAQ. Traditionally they are always soaked separately because the lentils are supposed to be ground to a fluffy and smooth texture while the rice is ground to a slightly coarse texture. It is believed the fluffy texture of the dal helps make dosas lighter and the coarse texture of rice gives the required crispiness to the dosa.
Secondly, blending time for dal and rice is different. Dal finishes faster while rice takes longer. By grinding these 2 together you may need to blend longer. This is an extra load to your blender, which can eventually break down or heat up the batter. I have heard this from many people.
However I know people soaking and grinding them together, so you may do the same if you want. It should taste the same.
For more dosa recipes, you can also check
Instant Wheat flour dosas
Brown Rice Dosa
Set dose
Pesarattu
Cheese dosa
Oats dosa
Ragi dose
Jowar dosas
Recipe 1 – Crispy Dosa Recipe
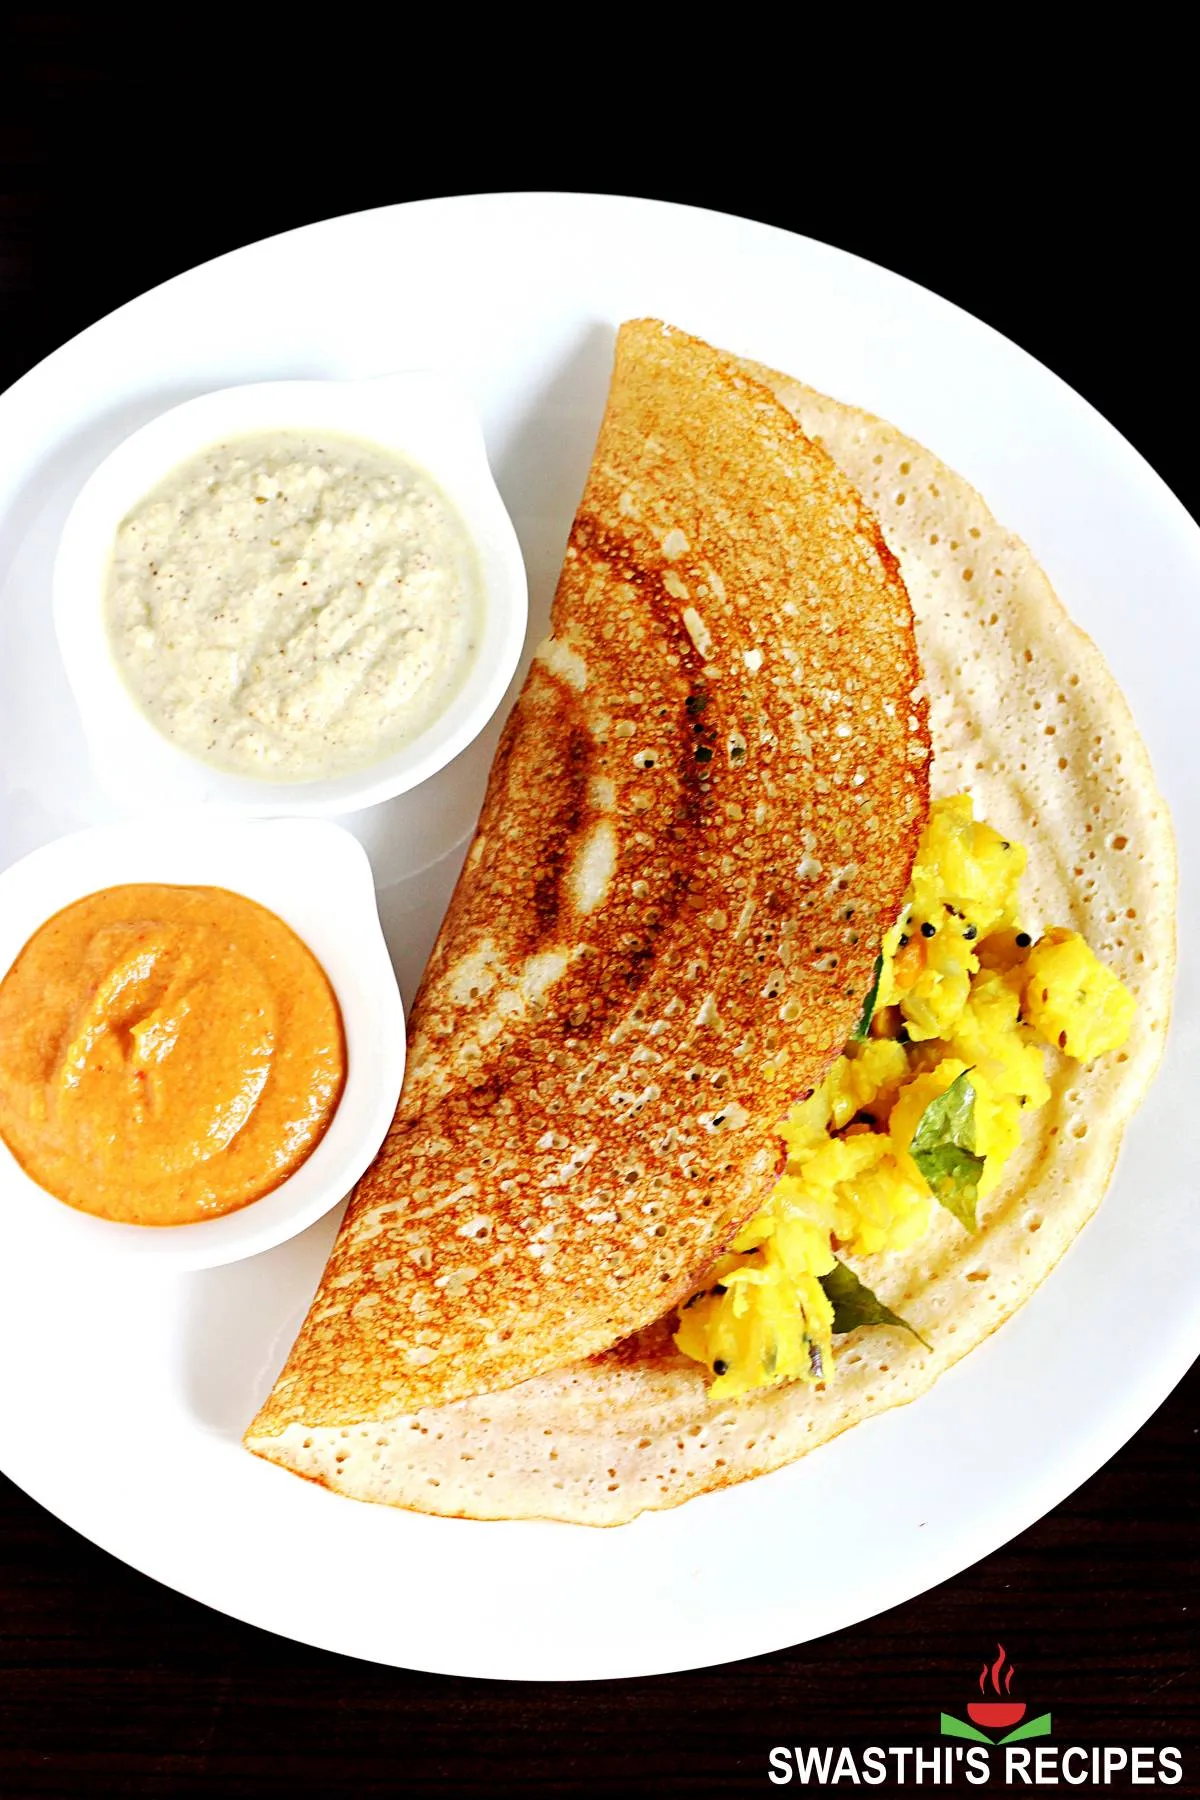
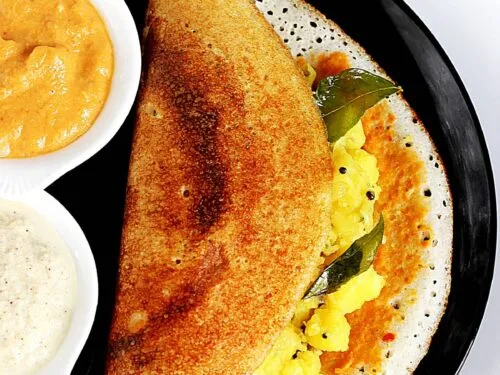
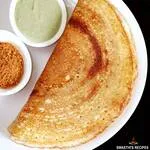
This recipe yields one of the best tasting brown & crispy dosa. This batter can be used to make masala dosa, crispy plain dose, uttapam, masala paniyaram and sweet paniyaram. I follow this recipe the most for my regular breakfast. The masala dosai shown in the first pic is made using this recipe.
Typically most proportions yield red to brown color dosa only when made on cast iron tawa, but this recipe yields brown crispy dosas even when made on non-stick.
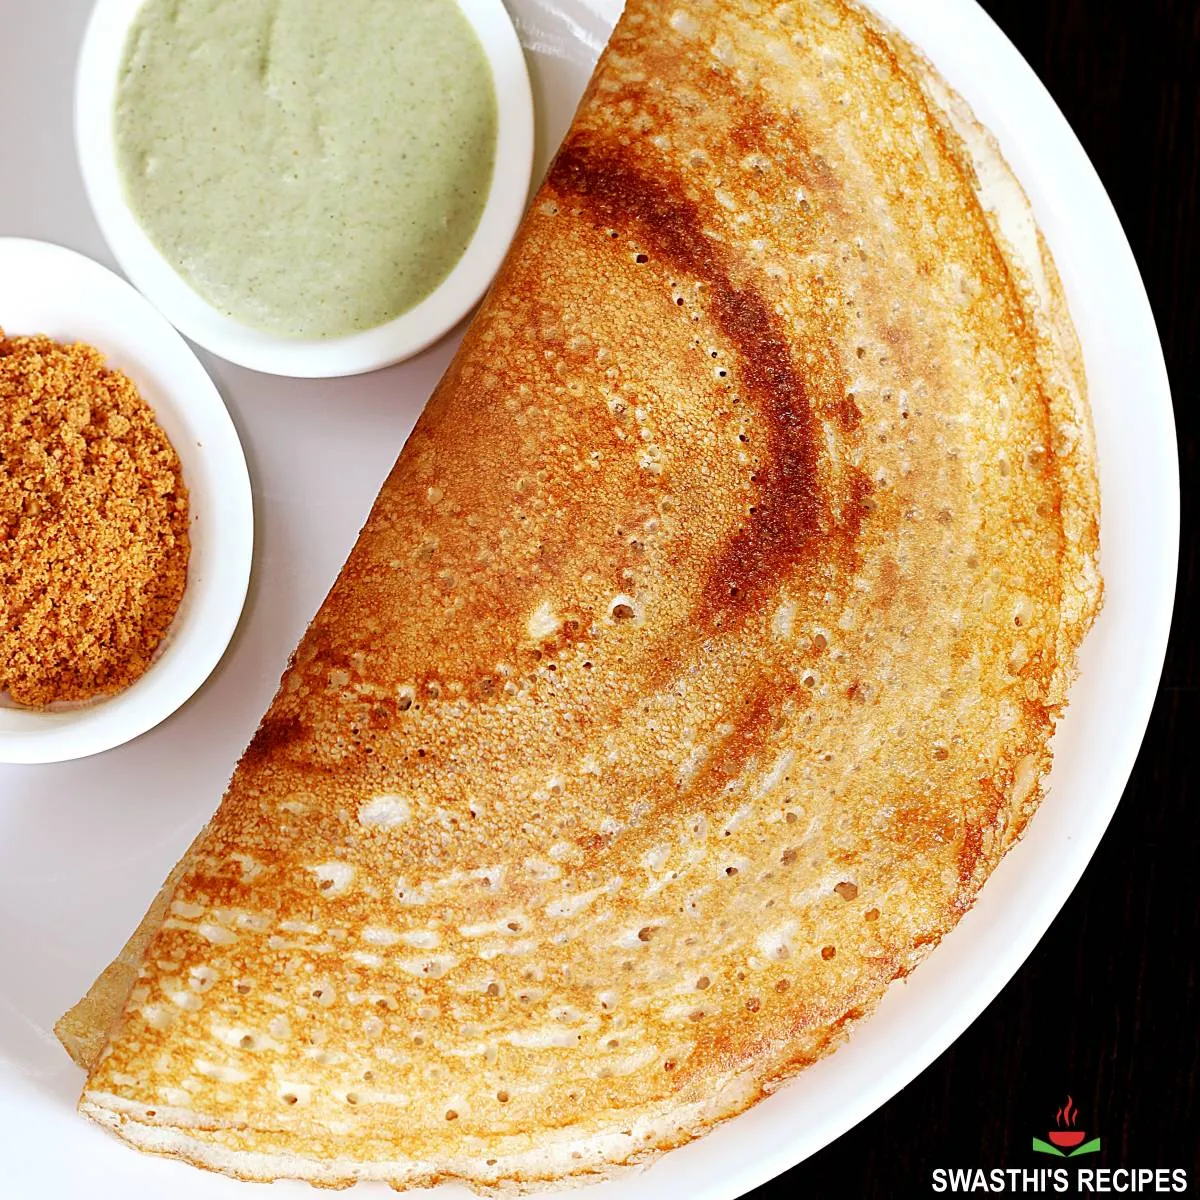
Photo Guide
How to make Dosa Batter (Stepwise Photos)
Soak Lentils & Rice
Recipe 1
If you want to soak all the ingredients together, you may do that but first read my faq section to know the difference.
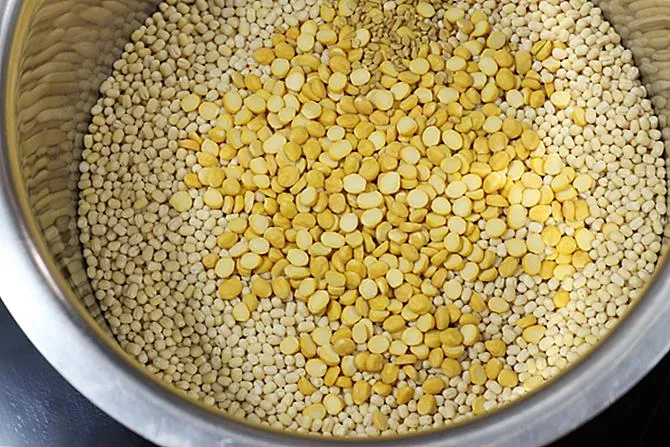
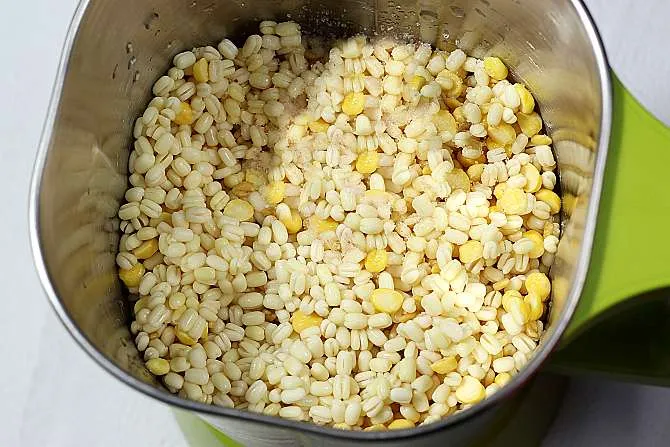
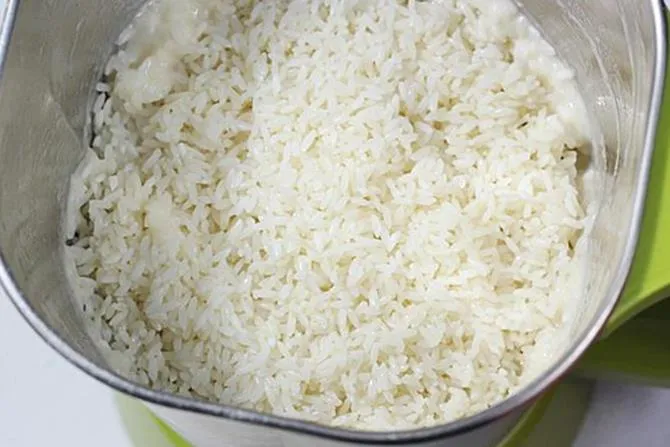
1. Add ½ cup urad dal (skinned black whole lentils), 2 tablespoon chana dal (bengal gram) and ½ teaspoon methi seeds to a large bowl/pot. Add 1½ cups raw rice to another bowl.
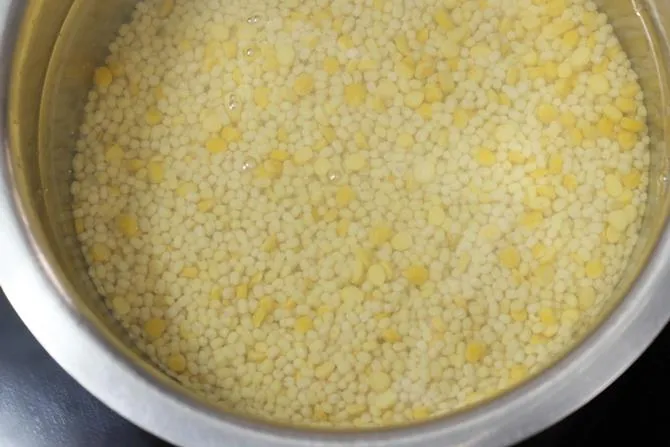
2. Rinse dal thoroughly a few times and soak in lots of filtered water for 4 hours. During cold weather they can be soaked up to 6 hours or even overnight.
3. Rinse rice too a few times until the water runs clear. Soak in enough filtered water for 4 hours. Same here as well, during cold weather they can be soaked up to 6 hours or even overnight.
4. 30 mins before blending the batter, rinse and soak 2 tablespoons poha (beaten rice) with ¼ cup filtered water for 30 mins.
Make Dosa Batter
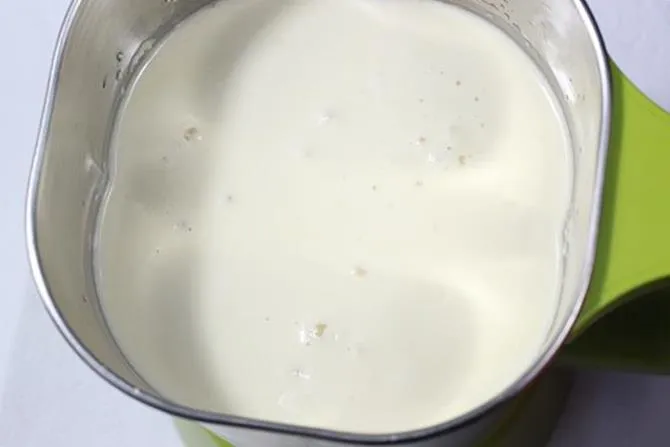
5. Add soaked poha to the grinder jar or container first. Drain the water completely from dal and pour ¾ cup cold filtered water. (If you want to add salt read my faq section below to decide.)
6. Blend until smooth, frothy and bubbly. If needed add more water. I add another 2 to 4 tablespoons water. But do not make it thin or runny. It must be a thick batter yet of pouring consistency. (Check video for consistency)
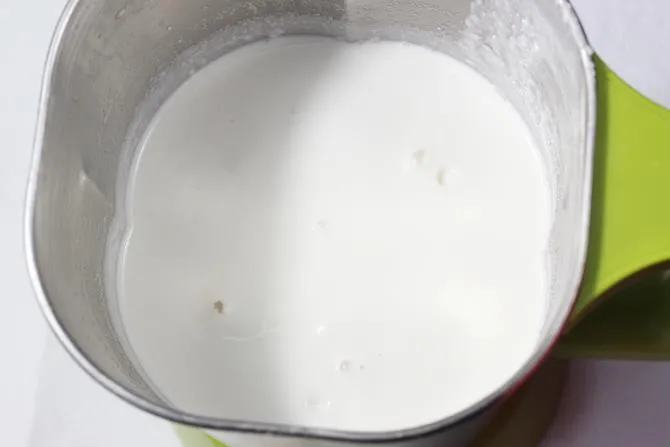
7. Transfer the batter to a a large bowl. Drain rice completely and add to the blender jar. Pour ½ cup water. I use another 2 tbsps more.
8. Blend to a slightly coarse batter.(not as coarse as semolina/suji)
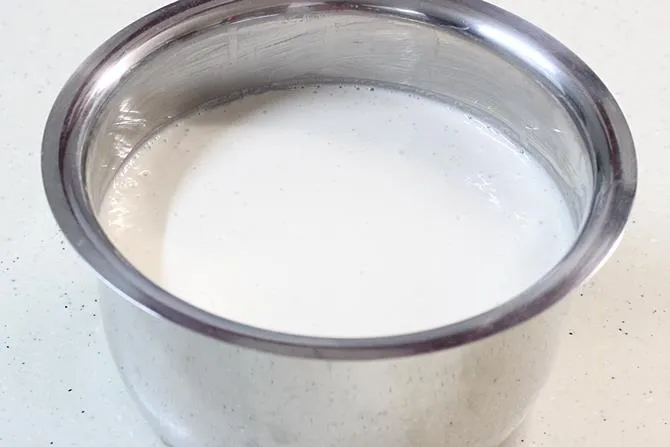
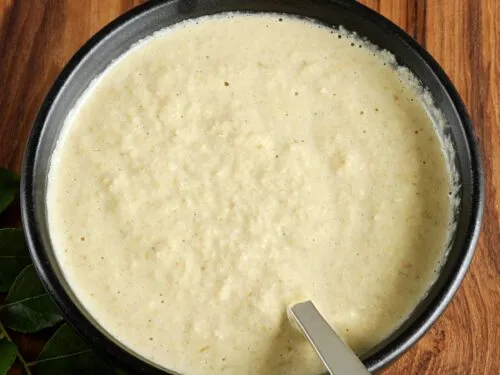
9. Add the rice batter to the urad dal batter. Mix both of them well. The warmth in the hand is said to help in fermentation if want you may use your hand but I don’t. The prepared batter must be of pouring consistency yet thick and not runny.
If it is too thick you may pour some water at this stage and mix. Thick batter won’t ferment well. If it is slightly runny, it is still fine. (check video for consistency)
When I make 2x & 3x recipe, I use 2 glass or ceramic/steel bowls to ferment and refrigerate the dosa batter. I divide and distribute the batter to 2 bowls. Undisturbed batter stays good in refrigerator for longer without going sour.
How to ferment Dosa Batter
10. Cover and ferment it in a warm place until the batter rises and turns bubbly. If you live in a warm region, you can leave it on the counter overnight. It may take anywhere from 5 to 16 hours depending on the temperature.
To ferment in colder regions, preheat the oven at the lowest heat settings (120 F or 50 C) for 5 to 7 mins (no longer). Turn off the oven and keep the dosa batter inside with the oven light ON. Or Alternately, place the batter bowl in your instant pot steel insert, press yogurt settings with a timer set to 8 hours (12 to 14 hours during colder days). Use an external lid and not the IP lid.
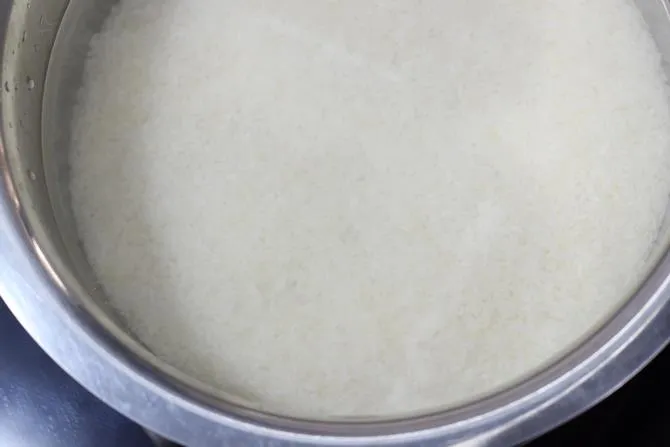
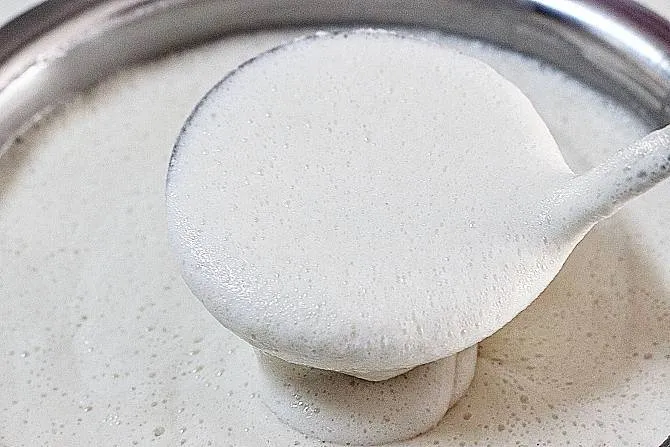
11. When I made this, I had to ferment for 16 hours in a closed kitchen cabinet. When properly fermented, the batter rises and turns light, fluffy with lots of pores & bubbles. The batter was half of the bowl before fermentation. It rose a little over ¾.
Fermentation test: To check, drop half a spoon of this batter into a bowl of water. Well fermented batter floats.
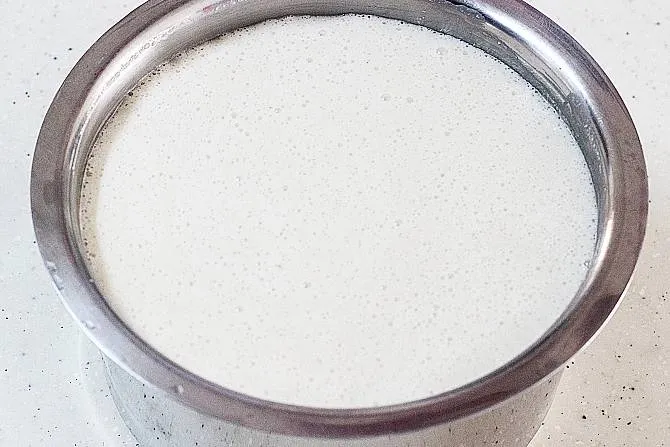
12. This is a closeup shot of how the batter looks after fermentation.
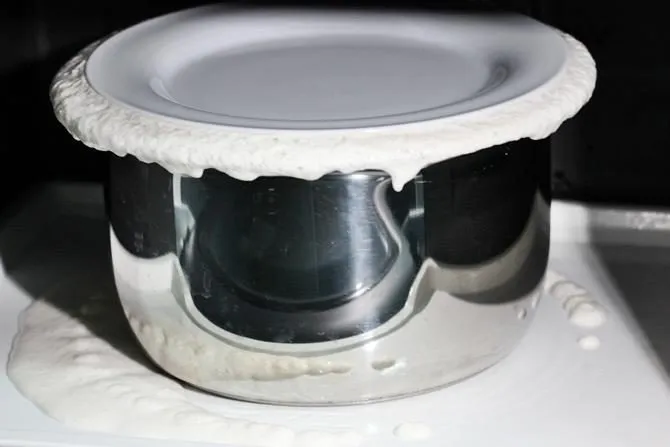
13. Do not over ferment the dosa batter as it turns sour and the batter is not so good to spread on the griddle. This is a picture of over fermented batter just for your reference.
Make Dosa
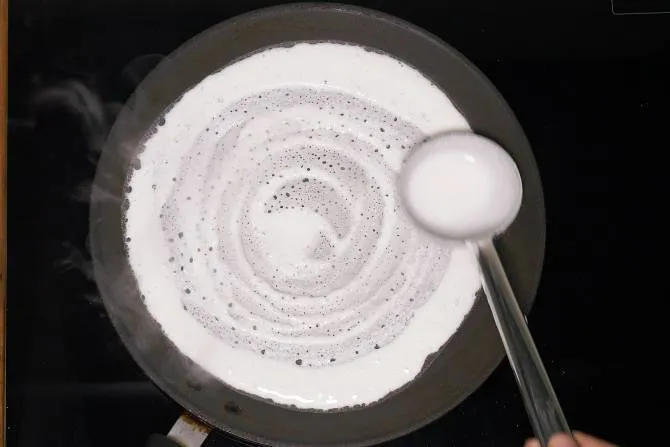
14. Once your dosa batter is well fermented, stir it gently and take a required portion to a small bowl. Keep the rest of the batter in the refrigerator for 1 to 2 weeks. The batter will be thick after fermentation. Add salt and pour little water, to bring it to a pourable and spreading consistency. (only to the portion you are going to use now). (check video for consistency).
16. Heat a dosa griddle/ tawa on a medium heat. When it is slightly hot, add a few drops of oil and spread it with a kitchen paper or a half cut onion (pierced with a fork/ butter knife on the rounded side to hold).This prevents the dosas from sticking to the pan. It is important not to leave excess oil on the griddle, so wipe down if required.
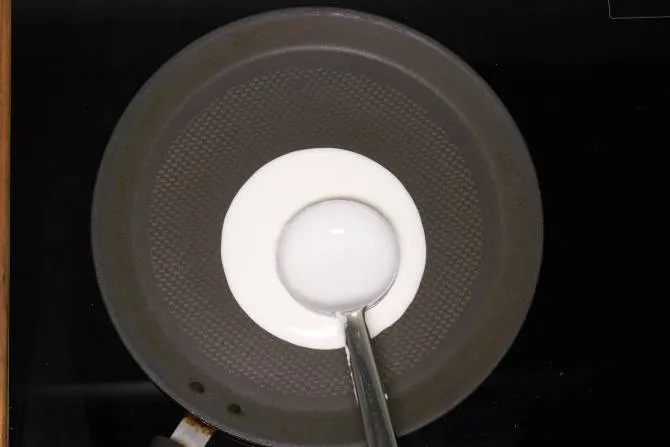
17. To check if the pan is hot enough, sprinkle a few drops of water over the pan. If it is ready, it should sizzle. Reduce the heat to low or medium, stir the batter with a ladle and take a ladle (¼ cup) of dosa batter & pour in the center of the hot griddle/ tawa.
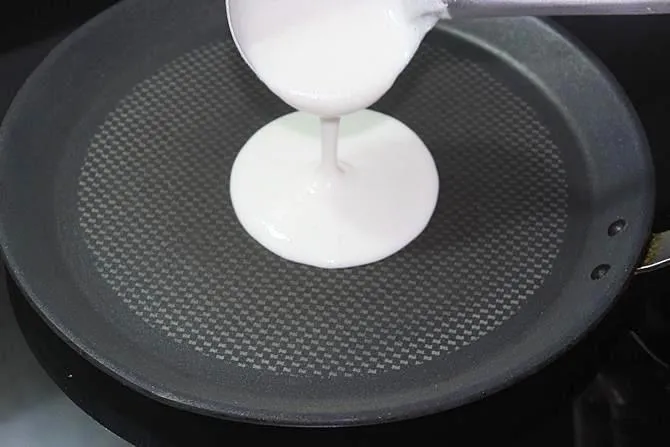
18. Immediately begin to spread it evenly with the base of the ladle – starting from the center, in an outward circular motion in a clockwise direction. (Check photos or video in the post)
Troubleshooting tip: If you are unable to spread the batter because it got stuck to the pan, it means either the pan is too hot or the batter is too thick. Reduce the flame and cool down the pan slightly. If that doesn’t work then pour little more water to your batter to bring to right consistency. Also too much oil on the empty pan won’t let you spread the batter well.
19. This is how your dosa should look.
20. Increase the heat to medium high or high and drizzle 1 tsp oil/ghee/ butter across the edges & on the dosa. The edges of the dosa will begin to leave/ come off the pan when done.

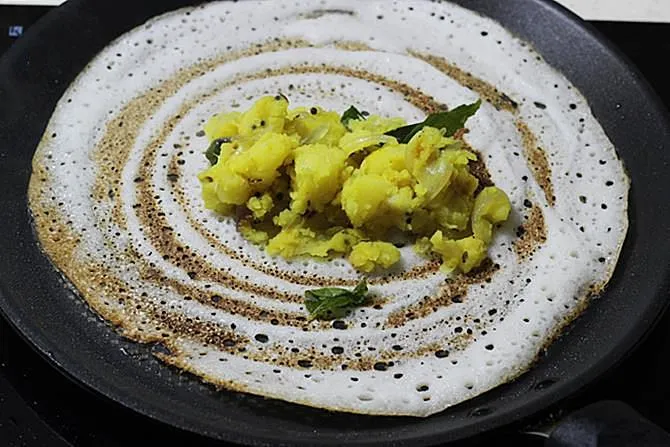
22. Cook until the base turns golden & crisp. Run a thin wooden turner/spatula across the base of the dosa, starting from the edges to the center. Optional – If you want you may cook on the other side – turn it to the other side and cook for a minute. Turn again and cook the base for 30 seconds to crisp it.
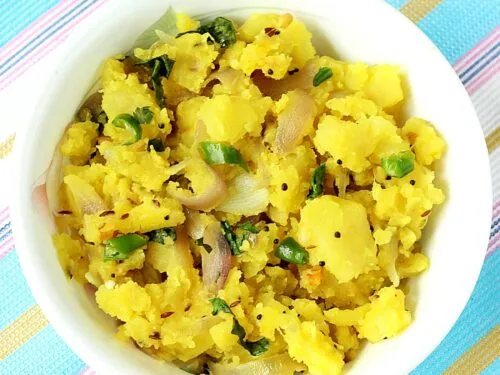
22. Since I made the masala dosa, I used this potato masala for filling. Plain dosa is most commonly served with coconut chutney. Fold the dosa and remove to a serving plate. Before making the next dosa, reduce the heat to low. You can also rub the cut onion and then pour the batter. Make sure there is no excess oil on the pan.
Serve the dosa right away when it is hot. They begin to soften as they cool down.
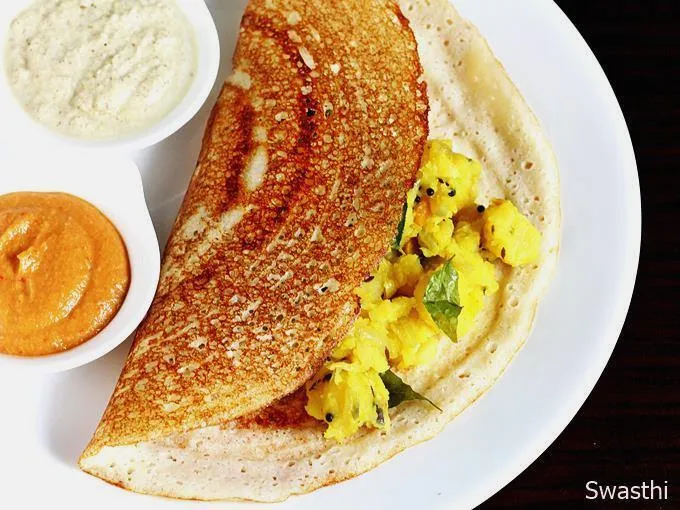
Photo Guide
Recipe 2 – Soft idli & Crispy Dosa (2-in-1 batter)
These ratios yield good crispy as well as soft dosas and can be used to make soft idlis as well. Just mixing the batter matters. A runny batter yields soft dosas. Making with moderately thick batter, but of spreadable consistency yield crispy dosas.
This can also be used to make masala dosa, paniyaram, uttapam and also soft idli. The only difference from the first recipe is the color. These do not turn as red or brown like the other one but will be golden. If you like to make your idli and dosa batter in one go in the same blender or wet grinder, then this may be for you.
Ingredients
½ cup whole skinned urad dal
1½ cups raw rice for blender – 2 cups for wet grinder
½ tsp methi seeds (fenugreek seeds)
2 tbsp poha (flattened rice) (substitute ¼ tsp methi seeds)
salt as needed (if you add before fermentation, use non-iodized salt like sea salt or Indian rock salt)
Recipe 3 – Sada dosa recipe
These ratios yield good crispy as well as soft dosas but the color won’t be brown. A runny batter yields soft dosas and a moderately thick batter makes crispy dosas.
This batter can also be used for idli, if urad dal is from the new harvest and the rice from old harvest. Aged dal or dal from old harvest won’t make good idli and vice versa new rice makes sticky idli. So aged rice & new dal is preferred if you are making idli with this batter.
This can also be used to make idli, paniyaram, uttapam. This dosa batter recipe needs just 3 ingredients
Ingredients
½ cup whole urad dhal
1½ cup rice
salt as needed (if you add before fermentation, use non-iodized salt)

Recipe 4 – High Protein Dosa Recipe
Healthy, high protein and high calcium dosa. These are made in most Telugu speaking homes. Great food for all, including folks recovering from illness, kids and babies above 9 months and even for under nourished.
I make this sometimes when the hubby asks for it since he loves the flavor. These have a unique flavor & taste of urad dal. If you like it, you may not look for any other recipe.
They must be served right out of the pan as they turn lightly crisp, not as crisp as the other recipes I have shared in this post.
I highly recommend this, if you have babies & kids at home (especially underweight kids). Also good for those looking for high calcium foods and even for breastfeeding mothers.
Ingredients
Half cup whole urad dal
1 cup rice
Related Recipes

Recipe Card
Dosa Recipe, How to make Dosa Batter
For best results follow the step-by-step photos above the recipe card
Ingredients (US cup = 240ml )
Recipe 1 – Ingredients for crispy dosa
- ½ cup urad dal (or whole skinned black gram)
- ¾ to 1 cup cold filtered water (to blend dal)
- 1½ cups rice (regular raw rice or basmati rice, Refer notes)
- ½ cup cold filtered water (to blend rice, may need 2 tbsps more)
- 2 tablespoon chana dal (bengal gram)
- ½ teaspoon fenugreek seeds (methi seeds) (optional)
- 2 tablespoon poha (flattened rice)
- ½ teaspoon rock salt (or non iodized salt or crystal salt)
Recipe 2 – Idli & dosa batter (2-in-1)
- ½ cup whole urad dal (skinned whole black gram)
- ¾ to 1 cup cold filtered water (to blend dal)
- 1½ cup rice (regular raw rice or basmati rice, refer notes)
- ½ cup cold filtered water (to blend rice, may need 2 tbsps more)
- ½ teaspoon methi seeds (fenugreek seeds) (makes dosas golden)
- 2 tablespoons poha (flattened rice, or substitute ¼ teaspoon methi seeds)
- ½ teaspoon rock salt (or non iodized salt or crystal salt)
Instructions
- Rinse together urad dal, chana dal and methi seeds thrice and soak in enough water for 4 to 6 hours.
- Rinse rice thrice and soak in enough water for 4 to 6 hours. (If you have a high speed blender you may rinse and soak them together, read faqs)
How to Make Dosa Batter
- Rinse and soak poha in ¼ cup water for 30 mins, before blending the batter.
- Drain the water from the dal & transfer to a blender jar along with soaked poha and water. Grind to a smooth & bubbly batter. It should be of thick pouring consistency. Transfer this to a large pot (enough to hold the fermented batter).
- Drain the water completely from rice & add it to the jar. Pour water and blend to a smooth or slightly coarse batter. It will be of thick pouring consistency.
- Pour this to the batter bowl and mix well. (Check video to see the final consistency)
Fermenting Dosa Batter
- Cover the bowl loosely and ferment it in a warm place until the batter rises and turns light & bubbly. It may take anywhere from 6 to 18 hours depending on the temperature.
- If you live in a warm region, you can leave the batter bowl on the counter overnight.
- To ferment in colder regions, preheat the oven at the lowest setting (120 F/ 50 C) for 7 mins, no longer. Turn off the oven and keep the dosa batter inside with the oven light ON. Alternately, place the batter bowl in your instant pot steel insert, press yogurt settings with a timer set to 8 hours (12 to 14 hours during colder days). Use an external lid and not the IP lid.
- Optional Fermentation test: Well fermented dosa batter rises & increases in volume. It looks airy, with plenty of tiny bubbles. To test, drop half a spoon of this into a bowl of water. Well fermented batter floats. If it has not reached this stage, ferment longer.
- Stir the dosa batter once. Transfer the required portion to a small bowl and add salt as required. Refrigerate the rest for up to 1 to 2 weeks.
- The fermented batter usually becomes thick, pour little water to thin down & bring it to spreadable consistency. (Check video or photos in the post)
How to Make Dosa
- Heat a dosa griddle/ tawa on a medium heat. When it is slightly hot, add a few drops of oil and spread it with a kitchen paper or a half cut onion (pierced with a fork/ butter knife on the rounded side to hold).This prevents the dosas from sticking to the pan.
- To check if the pan is hot enough, sprinkle a few drops of water over the pan. If it is ready, it should sizzle.
- Reduce the heat to low, stir the batter with a ladle and take a ladle (¼ cup) of dosa batter & pour in the center of the hot griddle/ tawa.
- Immediately begin to spread it evenly with the base of the ladle – starting from the center, in an outward circular motion in a clockwise direction. (Check photos or video in the post)
- Increase the heat to medium high or high and drizzle oil/ghee/ butter across the edges.
- Cook until the base turns golden & crisp. Run a thin wooden turner/spatula across the base of the dosa, starting from the edges to the center.
- Optional – If you want you may cook on the other side – turn it to the other side and cook for a minute. Turn again and cook the base for 30 seconds to crisp it.
- Fold the dosa and remove from pan. Before making the next dosa, reduce the heat to low. You can also rub the cut onion and then pour the batter.
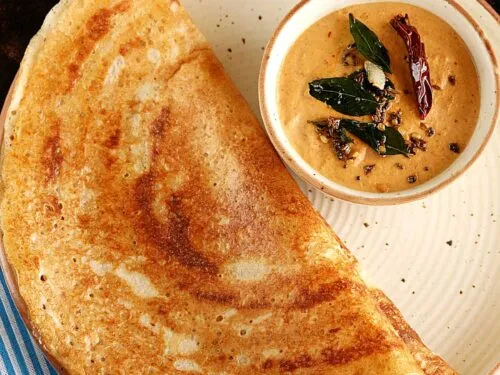
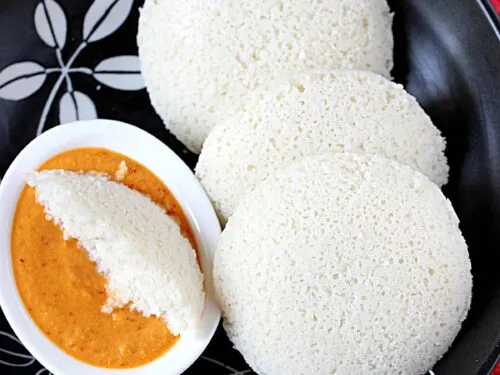
- Serve dosa with coconut chutney, potato masala & tiffin sambar.
Notes
- It is essential to use cold water while blending else the batter can heat up.
- Blend dal to a smooth & fluffy consistency and the rice to slightly coarse texture, this makes the best crispy dosas.
- The amount of water mentioned in the recipe is for whole skinned urad dal & raw rice with 4 hours of soaking. If you soak them longer or use another kind of rice or urad dal, you may need more or less water.
- Type of Rice: The taste & texture of the dosa depends on the kind of rice used. Here are my latest updates: You can use basmati rice or any short grain regular raw rice like sona masuri or ponni.You can also use 1 cup regular raw rice and ½ cup parboiled rice or idly rice.You can also use ¾ cup raw rice and ¾ cup parboiled rice or idly rice.Experiment with the above proportions and find what works for you the best in terms of taste and texture.
- I have shared troubleshooting tips along with the step-by-step photo instructions. If you are a beginner, you may follow that.
- To make the batter in wet grinder, Soak the methi seeds separately. First add the soaked methi seeds to the wet grinder container. Begin to grind sprinkling water little by little. After sometime it will become fluffy, thick and frothy. Then add the urad dal and poha blend until fluffy. Followed by rice. If your wet grinder does a very good job, then you can also add dal, rice and poha together.
Video
NUTRITION INFO (estimation only)
© Swasthi’s Recipes
About Swasthi
I’m Swasthi Shreekanth, the recipe developer, food photographer & food writer behind Swasthi’s Recipes. My aim is to help you cook great Indian food with my time-tested recipes. After 2 decades of experience in practical Indian cooking I started this blog to help people cook better & more often at home. Whether you are a novice or an experienced cook I am sure Swasthi’s Recipes will assist you to enhance your cooking skills. More about me
Follow Swasthi’s Recipes
Comments
Thank you 👌🫶💫🇧🇪
i tried your dosa recipe.turned out really good..thank you 🙏🙏
Sorry, I accidently posted my comment on the wrong recipe. I was talking about mutter paneer.
It’s alright Arthur. Thanks for sharing back with us
Swasthi, this recipe is absolutely delicious! I think we’ll add more spices next time, we like it spicy. Thank you for including weights of ingredients, that is very helpful.
Hi Swasthi,
I tried the dosa batter recipe for the first time. And i think my batter did rise a little. And it looks a little foamy too, I left it for 13 hours. However, when i pour a drop of batter in a cup of water it floats for few seconds before sinking. Does that mean it has not fermented well?
Hi Manisha,
Yes may be! If your batter is runny, it won’t float even if it is fermented well. I think I’m late but in such situations you may leave it longer. I recommend not to over ferment the dosa batter. Moderate fermentation is alright
Hi, can we use brown rice instead of white rice in recipe 1
Hi,
You may check this Brown rice dosa
Dear Swasthi,
Is it better to use only sona masoori rice or a combination of sona masoori and idli rice? I have the option for both. Which yields better flavor/texture. I am making this only for dosas, not idlis.
Hi Milan,
Only raw sona masuri (not parboiled) gives best results for dosa. Hope you get to try
Delicious, fail proof recipe, thank you ma’am
Welcome Sandeep
Excellent recipe and excellent explanations. Thank you. Finally could make delicious dosas
Glad to know Nandini.
Excellent n elaborated recipe!
Thanks for sharing!
Dear Swasthi,
Thanks to your thorough explanation, we have uttapams and dosas regularly in our house in Finland, right by the arctic circle!
It took me many failed attempts to nail the fermentation process, though. What didn’t work for me was to put the batter in the oven with the light on. The batter would go sour, as the temperature in my oven would go to high. However, what did work , and works every time now, is putting the batter in the sauna (with either turned off, or turned on to 30 degrees Celsius for 6 hours). Sauna is a sealed warm place, that maintains perfect temperature for the batter <3 Almost every household in Finland has a sauna, so this may be a helpful tip for families in the deep North!
I am grateful for your work, and for the yummy Uttapams! <3
Loved reading that! Thank you Anna for sharing what worked for you. This is really going to help others. Appreciate your time!
Thank you
Hi. I’m trying your dosa recipe. Love your other recipes btw. But just wanted to clarify, I’m from Malaysia, for the fermentation, if I’m only using the batter the next day night, can I still leave the batter out or should I put it in the fridge? I’m anxious it may over ferment if I leave it out
Hi Deenika,
Thank you. When the batter is ready (meaning fermented), you should move it to the refrigerator else it will continue to rise and turn sour. Remove the batter 1 to 2 hours before making the dosas & leave it on the counter. This helps to come down close to room temperature. Very cold batter makes white dosas, not golden. Hope this helps
Great post. Thank you. Dosa batter came out really well and dosas tasted delicious 🙏🏽
Happy to read that Akanksha. Thank you for letting me know!
Very helpful for beginers and others too,thanks a lot Swathi
Great recipe, easy to follow and tasted great.
My mom uses the last recipe 🙂
Hi Swasthi, I love your recipes, but I need your help please.
I followed the idly-dosa-batter recipe, soak them both separately for 4.5 h (powerful blender), then wet-grind them separately with filtered water. Then mix the batters (no salt) – until then it all seemed well.
Our house is around 23-26 C. I used your crispy dosa recipe before and used your oven method, but with switching the oven off after 7 min it didn’t ferment even when left over night, so last time I put the oven back on at 50 degrees and the same batter did ferment perfectly in half a day.
Now this time I put the batter in the oven and left it at 50 degrees from the start over night, but I was surprised to see zero fermentation the next morning. Do you know what I did wrong? Too hot? Dal too old? Salt?
Many thanks!
Hi Sabrina,
Thank you. 50 C could be too high (may kill the natural yeast developed during soaking). Try soaking longer and preheat the oven to 50 C. Put the batter in and reduce to 40 to 45 C. Let the oven run for 3 hours and then let it ferment undisturbed for 8 to 12 hours.
How cold it is in your home that you have to ferment for 16 hours? I’m heartbroken – I made the batter last night and it’s hour 7 with no rising. I didn’t add salt early, because it’s about 70 degrees here in NYC so I figured that would be warm enough? I also left it on my stove, and the pilot light has some warmth. I’m also thinking the water is too chlorinated?? I followed instructions to a T and am now depressed 🙁
Hi Ss,
Don’t worry it will still be fine. Move the batter to a oven with the pilot ON and temp setting to the lowest like I mentioned in the post. It should be ready in about 5 to 6 hrs. Our indoor temperature is around 77 to 80 F (25 to 27 C) all round the year and I live on a high floor so it takes me about 16 hrs. I have been using oven with great results. Hope this helps
Perfect presentation.
Help! Are you supposed to use the soaking liquid as well when you blend or drain completely and disregard the soaking liquid for both lentils and rice?
Hey Rebecca,
sorry I am too late. If you live in a cold country, you may use some of the lentil soaking liquid to speed up the fermentation. Using that during summers or on warmer days can make your batter too sour.