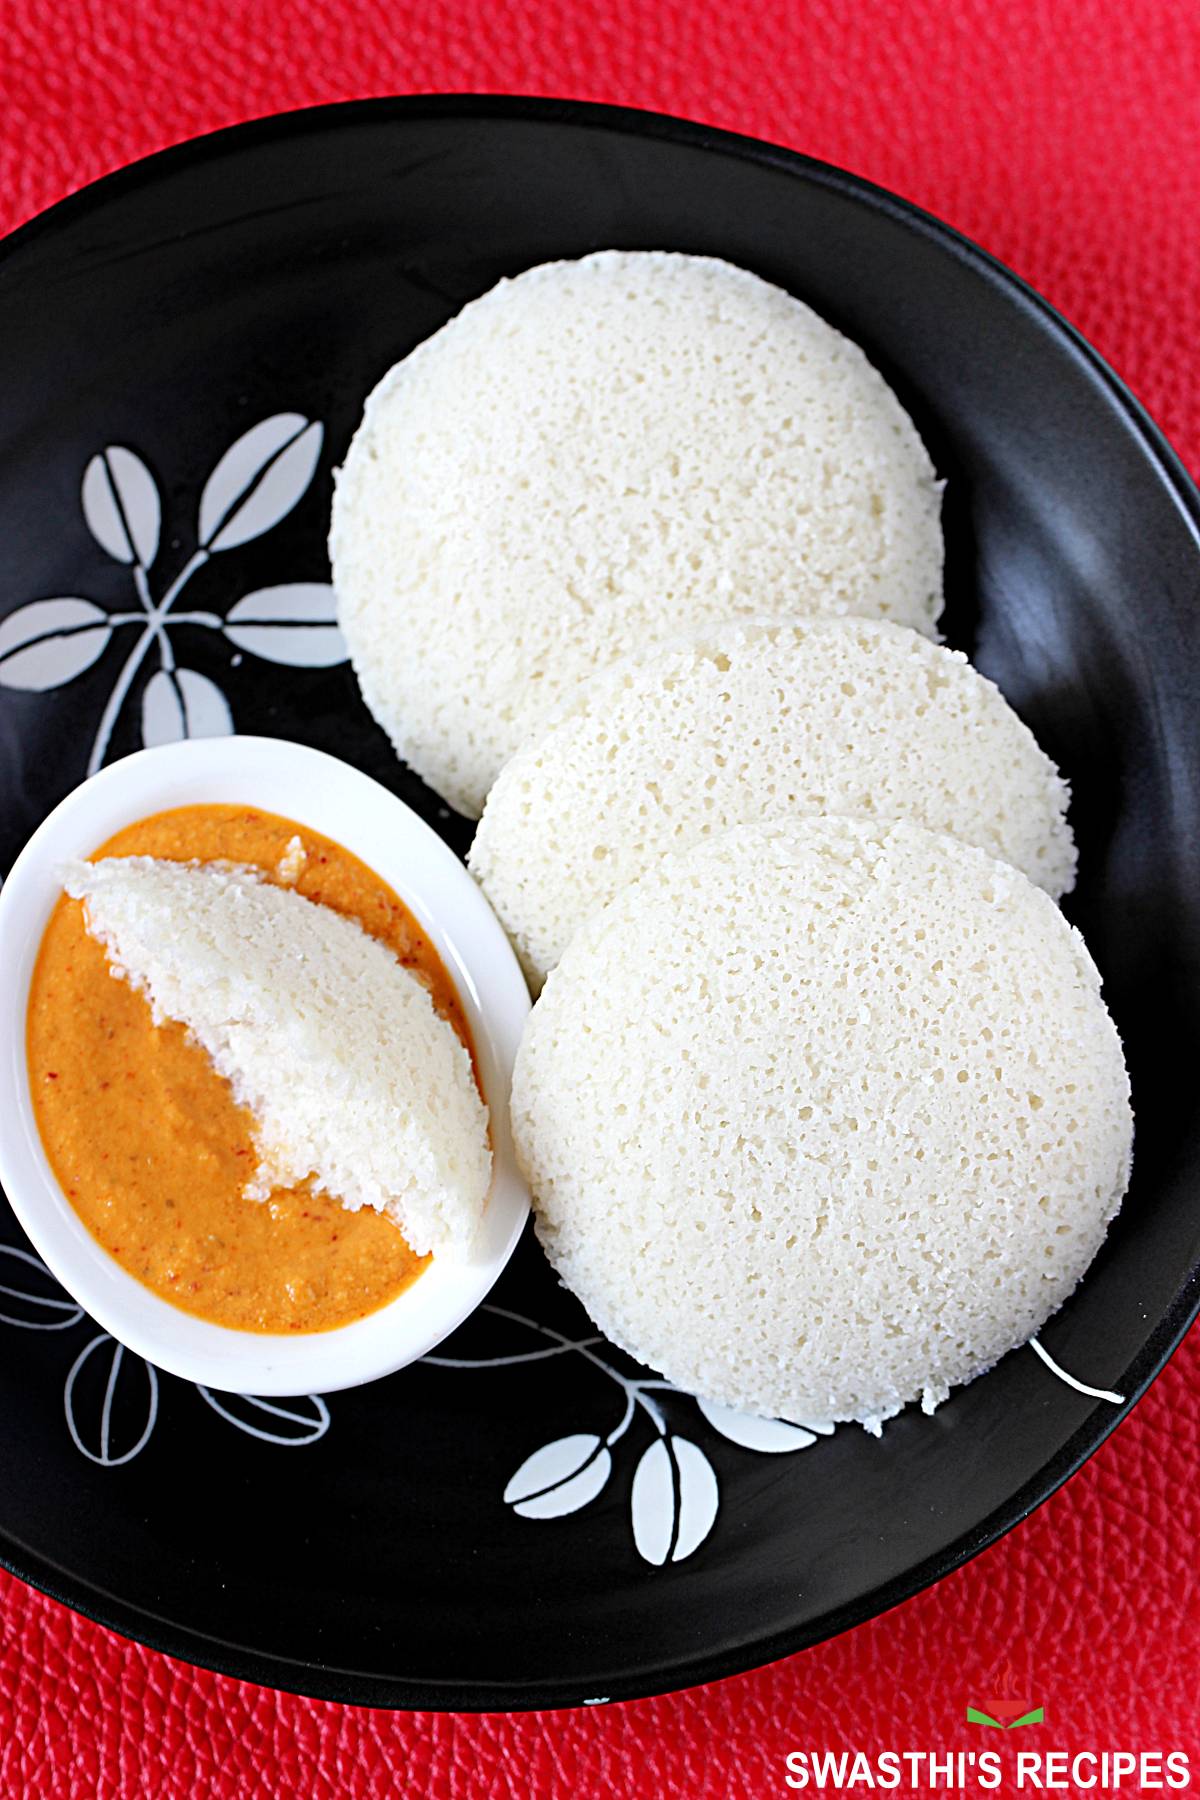
Idli Recipe (Idli Batter Recipe with Pro Tips)
Updated: February 5, 2023, By Swasthi Shreekanth
Idli Recipe, Learn how to make soft Idli Batter using rice or rava. Making soft and fluffiest Idlis at home is really an art which you can easily master with my step by step recipe guide. In this post I share 2 ways to make healthiest and softest Idli at home. The first one is using rice and the other is using idly rava, which is also known as rice rava in some parts of the world. Both the methods will give you soft idlis.
Making Idli using rava is a breeze, we don’t need to grind the rice to make the batter. The texture of the idly made using rava also turn out very soft and nice.
About Idli
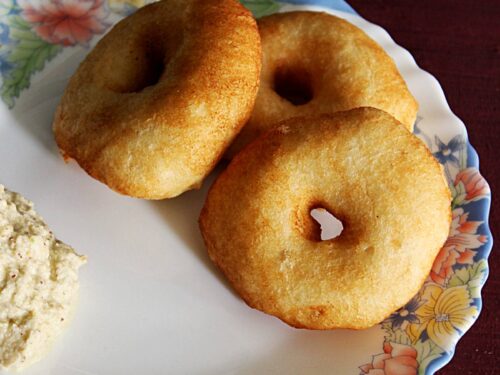
Idli is a soft & fluffy steamed cake made with fermented rice & lentil batter. These are one of the healthiest protein packed Breakfasts from South Indian cuisine. They are easily digestible as the rice & lentils known as DAL are soaked, ground, fermented & then prepared by steaming the batter. These are served with a chutney and or with a tiffin sambar.
Is idli healthy? Idli is considered to be the healthiest food due to the unique method of preparation which enhances the bioavailability of the nutrients in urad dal and rice. Soaking the lentils, blending to batter and fermenting enhances the nutrients and they are still preserved as the batter is steam cooked for a short time.
Table of contents
This is what makes idly suitable to all including babies to people on diet and even to the aged, who generally have poor digestion.
If you are wondering what is idli made of ? Idli is made with urad dal ( skinned black gram) and rice. Urad dal is high in protein and calcium. It is absorbed by the body better in the form of idly as it is made from soaked & fermented batter.
How to make healthy idli? Restaurants & Hotels use a ratio of almost 1:4 (dal : rava or rice, as rice is cheaper & more profitable for them). So I suppose we must favor more dal as it is high in protein and less rice or rava specially for home cooking. Since the cost doesn’t matter for home cooked foods as long as they are healthy, tasty and nutritious.
My Idli Recipe
This Idli Recipe does not need too much of rice or rava, yet you can make super white, soft, light and fluffy idlis every time.
When it comes to fermenting, dal contributes more towards the fermentation rather than the rice. So using lesser rava or rice too you can make super soft idly. To make them healthier use lesser rice and more dal.
My Idli Recipe doesn’t call for using cooked rice. So it is the same traditional recipe which has been followed for generations in South India – to soak the grains, blend, and then ferment the batter. Lastly steam cook for health benefits.
Process of Making Idli Batter
There are 2 ways idli batter can be made
1. The first method uses idli rava which is made of a special kind of parboiled rice. This method is very popular in the south Indian states where the idli rava is available. Making idlis using this method is super quick as the rice need not be ground.
2. The second method is a traditional one which uses idli rice or parboiled rice. However they can be made with most kinds of rice including sona masuri, ponni or parmal rice.
How is Idli Batter Ground?
Traditionally idli batter was ground in a stone mortar pestle to make the urad dal batter very light and fluffy. This light fluffy batter is the key to soft, fluffy and pillowy idlis.
In the current days, it is made either in a wet grinder or blender. Wet grinder works as good as a stone mortar in grinding the urad dal to a smooth and fluffy texture. If it is made in wet grinder then ingredients like poha or methi seeds can be skipped.
Most people prefer making batter in a blender as it is easy to handle. If the batter is made in blender then poha or methi seeds will be helpful to make fluffy idlis.
Blender vs Wet Grinder for Batter
As per my experience both yield the same results if good quality dal is used & blended following the correct method. I do have a wet grinder & blender.
I use the wet grinder only when I have guests home from India. During other times I use the regular blender. Making idli batter in wet grinder is good for larger families – like 5 or more. Otherwise it is quite easy to manage with a blender.
4 Important Factors to Make Soft Idli Batter
(Based on my experience), no matter whether you use a wet grinder or a blender.
1. Age of the dal: Urad dal from the current year’s harvest is best suitable to make soft idli. But how do we identify? The current year’s yield will be white in color with no pale yellow shades on it.
While the yield from the previous years, will be pale yellow in color. Or sometimes pale yellow spots on the dal. Using the new dal will surely result in good fermentation.
This gives you super soft idly provided you take care of the other 3 factors. For those who are not accessible to fresh stock, other ingredients like fenugreek seeds or poha are used to aid the fermentation.
2. Non-iodized salt: always use enough non iodized salt, avoid iodized salts since it do not favor the fermentation process.
3. Temperature to ferment batter: Cold climates do not favor fermentation process. So keep your batter in a warm place. If you live in cold countries, use a preheated oven for fermenting it. Or turn on the light in the oven.
You can also use the fermentation or yogurt making option in your oven, electric cooker or Instant pot.
4. Lastly consistency of idli batter (the amount of water to use): For good fermentation, the batter must be of the right consistency. If you make it runny or thin, it will not rise. But the fermentation will be ok, though not perfect. The result will be wet and flat idly.
But again, if your batter is too thick batter, it will not ferment. I understand this as “the organisms need enough moisture for a healthy cultivation”. So blending it to a right consistency is important. So the soft idli batter must be of a thick but pouring consistency.
Tips to Ferment Batter
Temperature: Warm temperatures between 25 to 32 C (80 to 90F) are ideal for fermentation & it takes about 8 to 12 hours. A higher temperature is just fine and will ferment the idli batter much faster. So you need to watch and move it to the refrigerator once it doubles & before it turns too sour.
Soaking time: Batter won’t ferment quickly at lower temperatures. So basically you need to play with the soaking and fermentation times to check what works during winter and summers. Longer soaking time helps in activation of wild yeast. So soak the rice and dal for longer during cold days.
Dechlorinated water: Avoid chlorinated water to soak and even to blend. Chlorinated water kills the yeast and hinders fermentation process. So use dechlorinated water. Use google search to find ways to dechlorinate water easily.
Fermentation During Winters
Avoid over rinsing soaked rice and dal as it removes the wild yeast completely. We need this wild yeast to assist fermentation.
For better fermentation use the same water in which you soaked your urad dal. But avoid during summer as it leaves a wired & sour smell in the batter.
Speaking of the idli dosa batter, when to add salt – before fermentation or after fermentation is one of the most debated topic. So try and check out what works for you. I add salt before fermentation throughout the year. My mom always adds powdered rock salt after fermentation during summers and before fermentation during winters.
What kind of salt to use? Avoid using table salt or any salt that has added iodine and anticaking agents as they both hinder the fermentation. You can use sea salt, rock salt or pink Himalayan salt that do not have any anticaking agents added to them.
Create a warm atmosphere for the batter
If using microwave convection oven, use your yogurt settings. You can also use Instant pot with the yogurt settings ON (low). I have more details below.
For OTG, Preheat the oven to lowest such as 60 to 80 C or 140 to 175F for 10 mins. Wait for 5 to 7 mins so the temperature comes down a bit. Then place the idli batter inside.
Avoid keeping batter in a very hot oven, this will kill the existing yeast in the batter and won’t ferment. For regular traditional/gas oven, turn on the light.
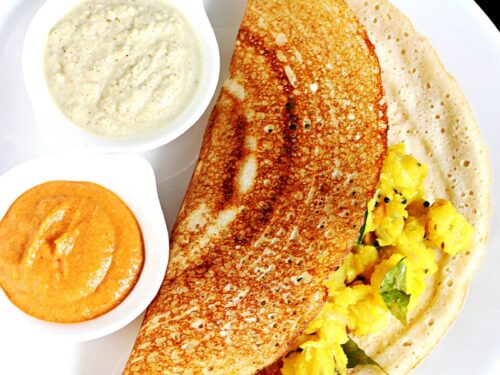
You may like other South Indian recipes,
Dosa
Masala dosa
Upma
Uttapam
Paniyaram
Photo Guide
How to Make Soft Idli (Stepwise Photos)
1. Prepare the following:
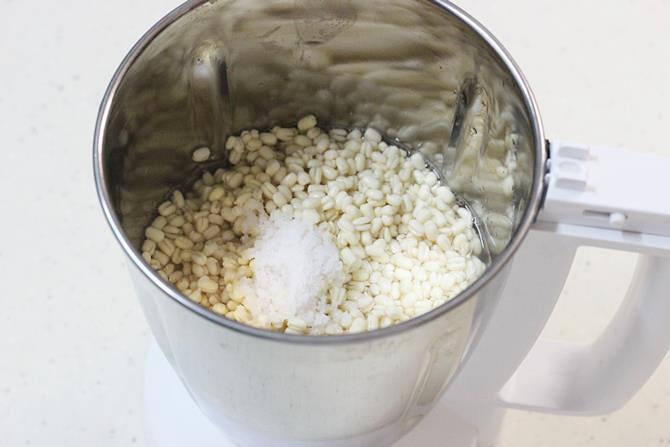
- Add ½ cup dal to a bowl and wash few times until water is clear. Pour fresh water and soak for about 6 hours
- If using fenugreek seeds, soak ½ tsp teaspoon seeds with dal. or soak 2 tablespoons poha, 30 mins before blending.
- Add 1 cup idli rice or 1 cup + 2 tablespoons idly rava to another large bowl. Rinse a few times until water runs clear. Drain the water and soak it. If using rava, nicely squeeze the rava and rinse to get rid of the unwanted stuff.
Make Batter
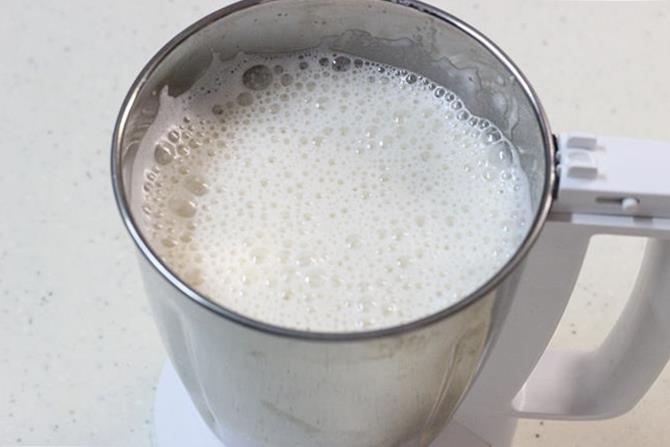
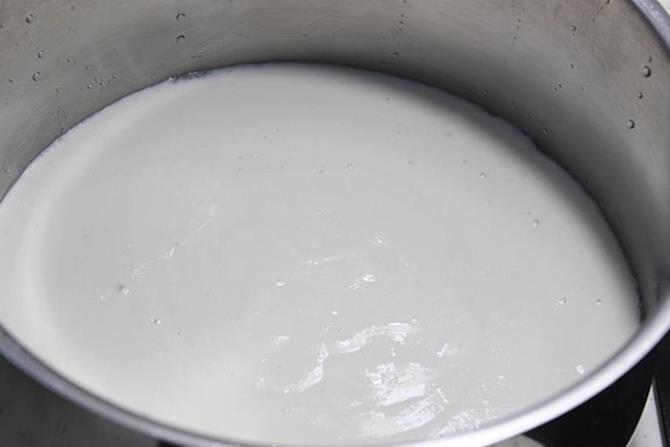
2. After 6 hours, drain off the water from the dal and add it to the blender along with salt. If you live in a hot place, then skip adding salt now and add it after fermentation, just before making idli. Add ½ cup cold water & blend it smooth. Using cold water prevents the blender or grinder from turning hot. If the batter turns up hot, idli may turn hard.
3. Pour 2 to 4 tbsps more water only if needed and blend till you get frothy thick smooth batter. Do not make it very runny.
4. Transfer this batter to a large pot or bowl.
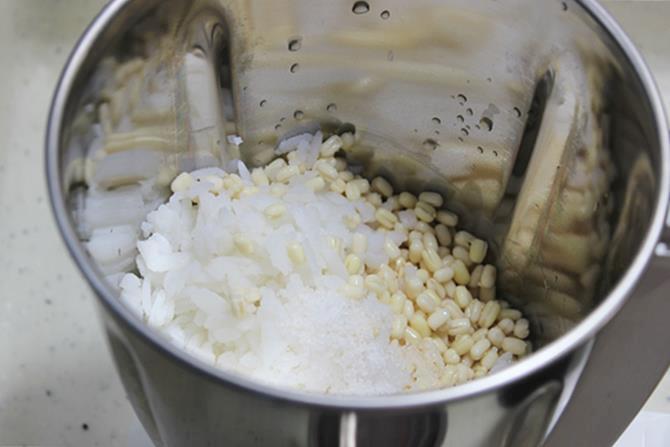
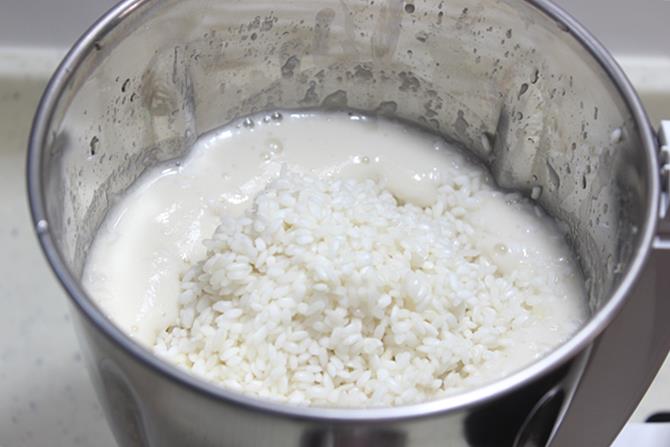
5. If using rice refer method 2 with detailed step by step photos below. A short description is here as well. Add rice and water to the blender and grind coarsely. Pour it to the batter and mix well. Follow from step 6.
If using idly rava: Squeeze off the water by taking rava in between your palms and with pressure try to remove excess water. Transfer this to a plate. Squeeze again any excess water.
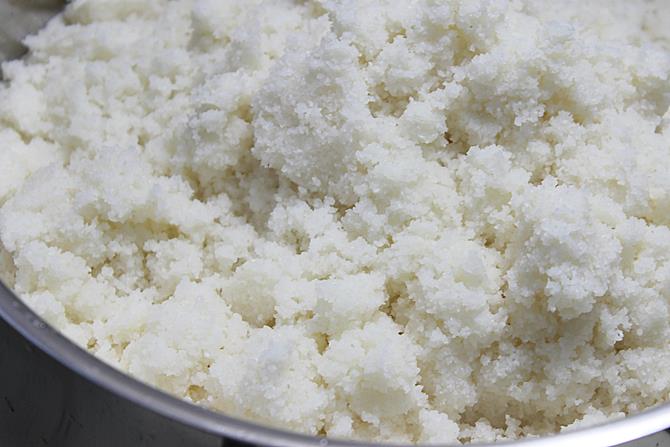
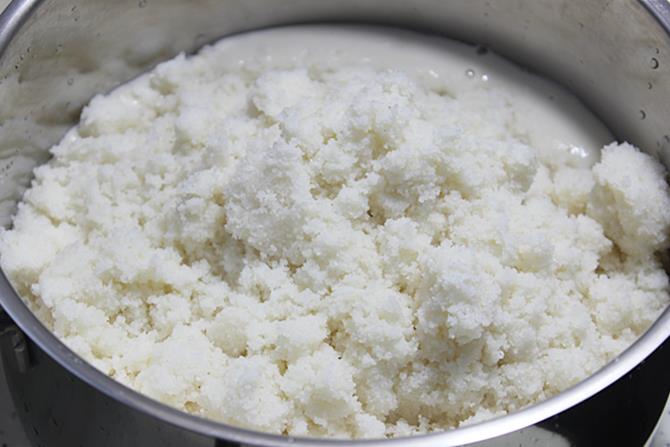
6. Next transfer it to the batter. If you are some one who do not like the slight coarse texture of rava, then you can also blend it well. Then add to the urad batter.
Ferment Idli Batter
7. Mix well with your hands. Keep it aside for fermenting in a warm place for 6 to 12 hours, depending on the climate. It may take up to 18 to 20 hours too sometimes. Do not use air tight jars or containers for fermentation.
If you live in a cold country, you can place it in the oven with the light bulb ON. Or preheat the oven to 120 F or 50 C for 10 to 12 mins. Keep the loosely covered batter bowl inside.
Or If you have a instant pot or microwave (with yogurt function), then you can also turn it ON with the yogurt setting (low) for 6 to 12 hours or until the batter doubles. You have to experiment to know the exact fermentation time.

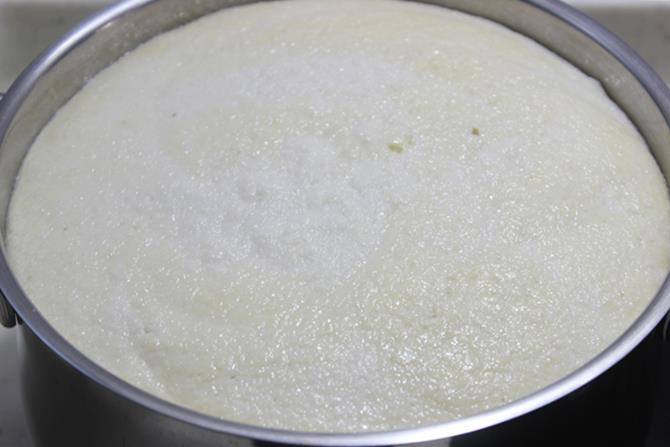
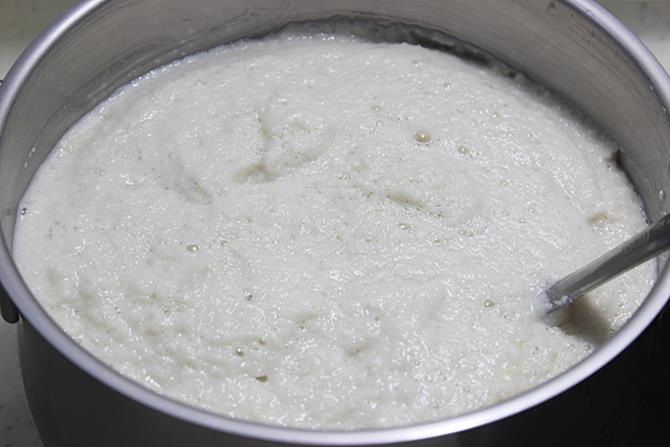
8. After fermentation the batter has to double and turn light, fluffy and bubbly. This time when I made this I had to ferment for about 18 hours as the climate was windy and cold.
9. Gently mix the batter, very lightly to make it uniform. Sometimes after steaming, idlis will rise and collapse due to the aeration in the batter. So it is ideal to give a gentle stir once. This will also bring the batter to a uniform consistency. I prefer to stir gently only 1 to 2 times. It may shrink when we do this.
Steam Idlis
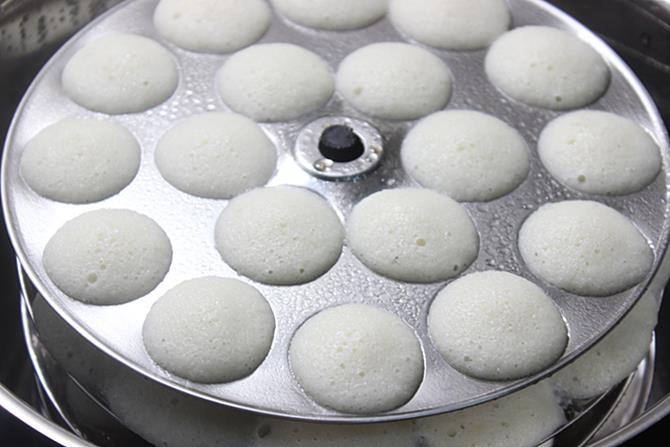
10. Bring water to boil in a steamer or pressure cooker without weight on a medium high flame. Grease the idly plates. If needed sprinkle little water. The batter should be of thick pouring consistency. Pour it in the molds.
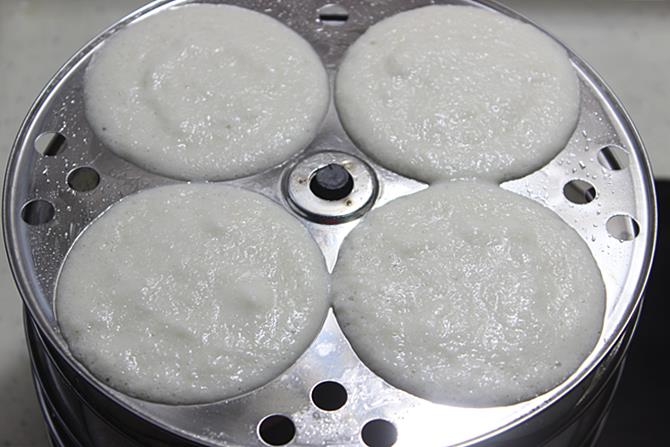
11. When the water begins to bubble up rapidly, place the idly stand in the steamer. Steam it for 10 minutes. Remember you need to be a bit tricky to adjust the flame. If the flame is very high, the water may bounce to the idly plates. If it is to low, they may not get steamed enough. So the flame should be on a medium high. Off the stove after 10 minutes. Leave it for 2 minutes. Remove the plates from the steamer and allow them to cool for 2 to 3 minutes.
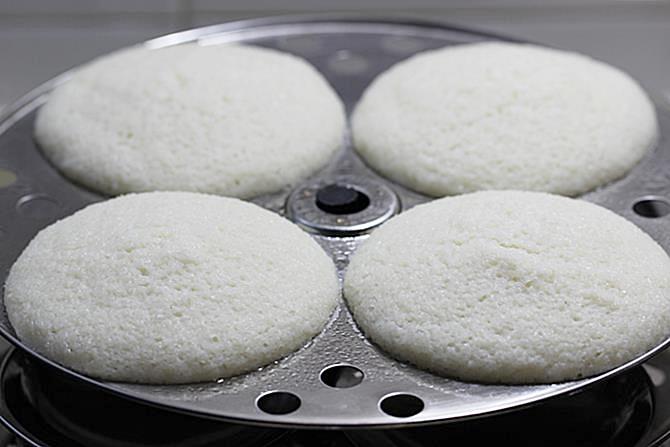
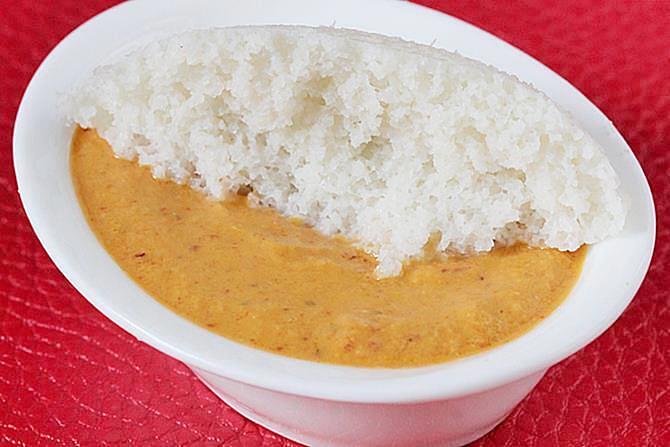
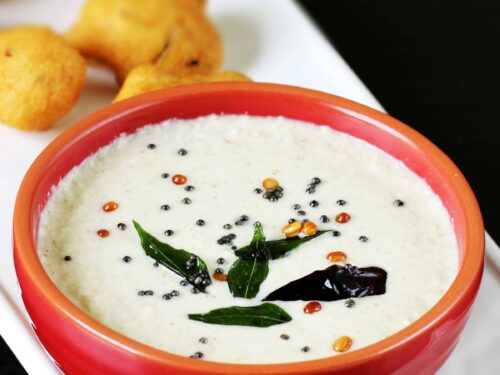
12. Loosen the idli from the plates with the help of a spoon and then remove them to a plate. Add some ghee and serve with coriander coconut chutney or peanut chutney. You can also find a collection of 33 South Indian Style chutney recipes.
What to Serve With Idli?
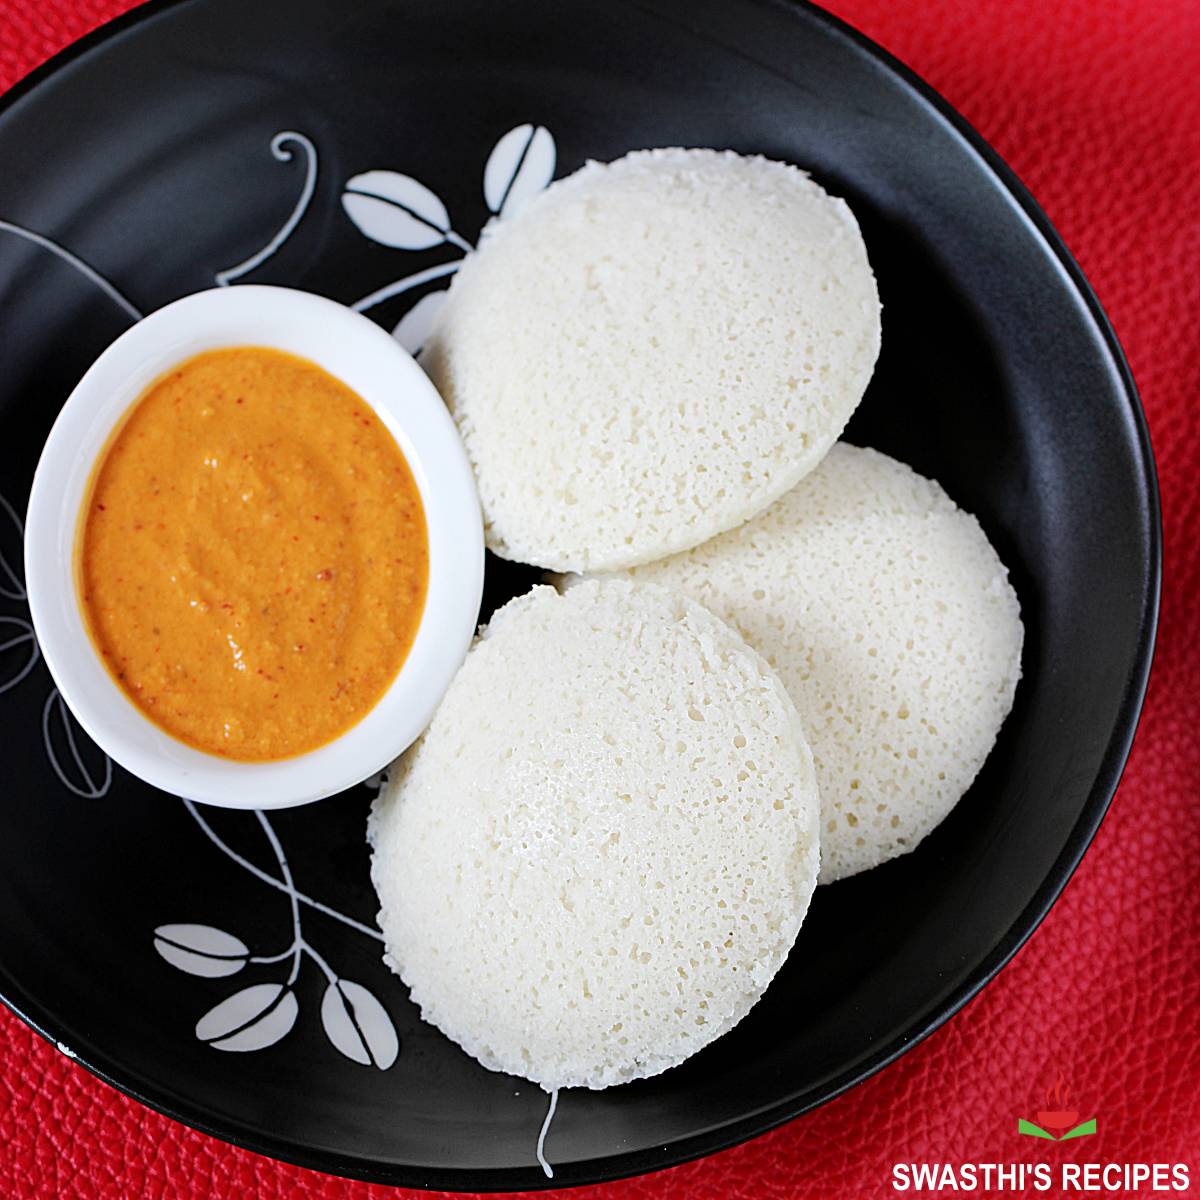
Idly is mostly eaten with a variety of chutneys & a variety of sambar. Here are some popular chutneys that are served
Tomato chutney
Coconut chutney
Pudina chutney
Ginger chutney
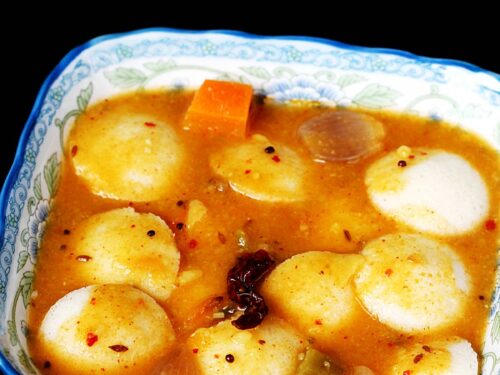
We also eat Idli for a meal sometimes, most often it is for dinner. Then I prepare some kind of sambar along with some mini idlis for my kids. Here are some sambar options you may like to check.
Idli sambar or tiffin sambar
Vegetable sambar
Drumstick sambar
Photo Guide
Method 2 – Idli Using Rice
The step by step photos shown below were made with half cup urad dal and 1 cup rice with 2 tbsp poha using recipe 1
1. Blend soaked dal,salt and poha adding water as needed until thick and frothy.
2. Grind rice until smooth or coarse to suit your liking. Add water as needed. Batter must be neither too thick nor too thin.
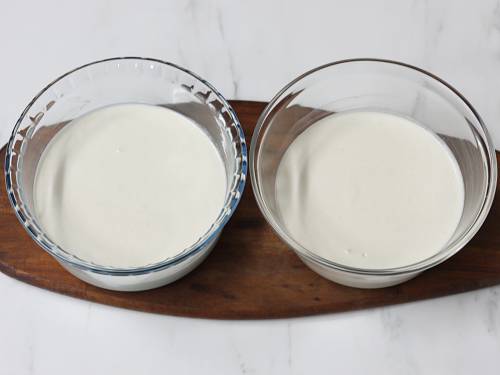
3. Next transfer to a pot. Set aside until fermented. The time it takes depends on the climate. I doubled the recipe 1 and made this. So I had to transfer the idli batter to 2 bowls.
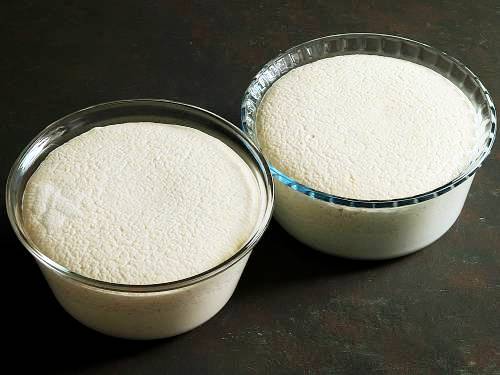
4. After 14 hours, the batter fermented, doubled in volume and had a bubbly texture. Give a gentle stir only twice.
5. Lastly I greased the plates and poured the it in the plates. Steamed for exactly 6 to 7 minutes in the bubbling steamer. Since i made mini idli steamed for just 6 to 7 minutes else they has to be steamed for 10 minutes. Mini idli go well with idli sambar.
Faqs
Idli rice is the best to make soft idlis. However you may also use parboiled rice or basmati rice. During the lockdown I had made them with different kinds of rice. Aged short grain parboiled rice, raw rice & basmati rice (not parboiled rice) also worked well.
Idli rice is a kind of short grain fat parboiled rice that is cheaper than the regular parboiled rice.
Steam them exactly for 10 minutes on a moderately high flame. I do it on the highest heat. Place the idli stand in the pot only when the water comes to a rolling boil. Cover immediately and then start the 10 mins timer. The timing is the same irrespective of the size of your steaming pot.
They can turn hard if the batter hasn’t fermented well. Make idlis only with well fermented batter that looks well aerated & has risen. Also avoid over cooking them as it makes them hard.
If the batter has fermented partially, then you may wait for few more hours. But if it has not fermented at all even after 18 to 24 hours, then it is good to quit the trial and use it to make dosa, dibba rotti or punugulu. Trying to ferment the batter longer may grow mould over the batter. Read my full post & try it again.
Can You Refrigerate Idli Batter?
Yes. It can be refrigerated for 1 to 2 days. After grinding, it must be transferred to separate containers. Then fermented separately. Next refrigerated after fermentation without disturbing it.
I usually make the idli batter good enough for 2 days. Then transfer it to 2 different containers and ferment them separately.
Use up one the next morning and refrigerate the other as it is without stirring it. For the second day, I use a glass or ceramic bowl. Plastic or steel containers may make it sour. My idli turns out soft with no sour smell even on the subsequent days.
On the third day, I am left with some batter that is not enough for all of us. So I mix up ragi flour in luke warm water and add it to the left over batter. I allow it to rest for 30 mins out of the fridge. Even these turn out good.
How to Make Idli in Instant Pot
For fermentation, place a trivet inside the steel insert of your Instant pot. Then keep the idli batter bowl on the trivet and cover the IP with a plate and not with the lid. Ensure your pot is not too hot from your earlier cooking otherwise your batter will have the flavour of cooked urad dal.
Press the yogurt button (set to low) and the timer to 8 to 16 hours depending on your weather conditions.
To steam the idlis in your IP, pour 1.5 cups water to your steel insert and bring the water to a rolling boil on a saute mode. Meanwhile, fill the idli moulds. When the water begins to boil, place the stand in the IP. Cover it with the lid and position the steam vent to venting mode. Press the steam button and steam them for 10 mins.
Related Recipes

Recipe Card
Idli Recipe (Idli Batter Recipe with Pro Tips)
Ingredients
- ½ cup urad dal or skinned black gram
- 1 cup idli rice (or parboiled rice) or (1x- 1 cup + 2 tbsp idli rava)
- 2 tablespoon thick poha Or ½ tsp fenugreek seeds (methi seeds)
- ½ teaspoon Non-iodized salt (rock salt or pink salt)
- ½ cup chilled water (2 to 4 tbsps more if required, to grind dal)
- ½ cup water (to grind rice)
- ½ cup urad dal
- 1½ cups idli rice (or parboiled rice)
- ½ teaspoon fenugreek seeds (methi seeds)
- 2 tablespoons thick poha (flattened rice) (substitute with ¼ tsp methi)
- ½ cup chilled water (2 to 4 tbsps more if required, to grind dal)
- ¾ cup water (to grind rice)
Method
- Add urad dal & methi seeds to a bowl. Add rice or idli rava to another bowl.
- Wash them very well separately until water runs clear. Soak them separately in lot of water for at least 6 hrs.
- Rinse and soak poha with ¼ cup water for about 30 mins before blending.
- After 6 hours, drain the water from both the bowls.
- Add dal, methi, soaked poha, salt & water to a blender jar or a wet grinder.
- Blend to a thick, smooth, bubbly & frothy batter. The idli batter should not turn hot or even warm as it makes dense idli. If the batter is too thick you may add 2 to 4 tbsps more water while blending.
- If you live in a hot climate then skip adding salt now and add it just before making idli else the batter turns sour. You will have to experiment with salt to know what works well for you.
- Transfer urad dal batter to a large bowl.
- A. If using rice : Add rice to the blender with water (mentioned in the ingredients). Grind to a little coarse batter (semolina texture). Pour this to the dal batter. Mix both of them well with your clean hands. The batter must be thick yet of pouring consistency. B. If using idli rava : Drain off the water thoroughly from the rava. Squeeze excess water from the rava with the help of both your palms. Rava must not look soggy. It must absolutely have no water in it, else the batter will become runny.
- Transfer this to the urad dal batter and mix well.
- Now mix everything well. Use your hand to mix as it helps to ferment faster and better. If needed can add little water, if the batter is too thick.
- Set the batter aside in a warm place for at least 8 to 14 hrs. The batter ferments and rises well to double the quantity. Sometimes it may take up to 18 hours depending on the weather and temperature.
- If you live in a cold country, keep it in the oven with the light bulb ON. Or preheat the oven to 120 F or 50 C for 10 to 12 mins. Keep the loosely covered batter bowl inside & turn off. If you have a instant pot or microwave (with yogurt function), then you can also turn it ON with the yogurt setting (low) for 6 to 12 hours or until the batter doubles.
- A well fermented batter will yield good soft idli. The batter must rise and look fluffy but not turn sour. You will need to experiment to know the fermentation time.
- On a high flame, bring water to a boil in an idly steamer or a pressure cooker. If using instant pot, pour 1½ cups water to your inner pot. Press the saute button and bring the water to a rolling boil.
- Meanwhile grease your idly plates lightly. Mix the idli batter gently 1 to 2 times only. Do not over do as the aerated batter will turn flat. Fill the molds with batter.
- When the water begins to bubble and steam up, place the stand in the steamer. Cover and steam for exactly 10 mins on a high flame. If using Instant pot, when the water begins to boil, press CANCEL button. Keep the idli stand in the IP. Cover with the lid & position the steam release handle to venting . Then press STEAM button. Use an external timer to monitor & steam for 10 to 12 mins.
- Once done turn off and wait for 2 mins. Remove the idly stand. Set aside to cool down for 2 to 3 mins. When cooled, the idli must not be wet on top.
- With the help of a spoon remove the idlis to a plate. Serve idli with a chutney or sambar.
Notes
- Aged urad dal requires lesser water. Fresh dal takes needs more. So adjust the amount of water as required when you blend.
- Nutrition values are for recipe 1
- Do not use air tight jars for fermenting.
- Use stainless steel or ceramic containers for fermenting.
- Avoid plastic jars. Never let your batter warm up while grinding, as it will make the idly harder.
- If using wet grinder, you can use 1½ cups rice for recipe one.
- For Recipe two you can use 2 cups rice.
- Use more water proportionately.
Private Notes
Tried this recipe?
Mention @SwasthisRecipes or tag #swasthisrecipes!About Swasthi
I’m Swasthi Shreekanth, the recipe developer, food photographer & food writer behind Swasthi’s Recipes. My aim is to help you cook great Indian food with my time-tested recipes. After 2 decades of experience in practical Indian cooking I started this blog to help people cook better & more often at home. Whether you are a novice or an experienced cook I am sure Swasthi’s Recipes will assist you to enhance your cooking skills. More about me
Follow Swasthi’s Recipes
Comments
Please guide me how to freeze and reheat frozen idli. Thaw first or reheat from frozen.
Hi Rajni,
Idlis are best cooked and eaten fresh. But if you plan to freeze try using idli rava. They keep much better than those made with rice and poha. If possible avoid poha. Cool down completely and chill in the fridge for an hour before freezing them in a freezer safe container. This prevents them from turning mushy later. Reheat directly from frozen, don’t thaw. They are best steamed in a steamer or cooker, uncovered until very hot/steaming hot. Hope this helps
Tried this recipe and they came out super soft. Learnt so many things from your post which I didn’t know. Thank you
Glad your idlis turned out soft. Thanks for letting us know Sameera
Hi Swasthi, Many thanks for the recipe. Can the batter directly be fermented in the Instant pot steel pot?
Hi Neha,
Yes you can do it directly or do pot-in-pot fermentation
Thank you Swasthi.
Excellent idli recipe Swasthi. I jumped out of joy because they turned out really well.
Thank you Indra
If I’m freezing the batter, which is better? fermented vs unfermented. How would you thaw it.
Freezing idlis is better than freezing the batter because the results will be consistent. But if you don’t prefer that, fermenting the batter first and freezing gives better results than freezing the unfermented. Thaw the batter in the refrigerator and bring close to room temperature before steaming.
I followed your recipe for the first time using 1 cup dal for 2 cups idli rice and they turned out unbelievably good. Your recipes are so reliable and never fail. Thank you Swasthi
My pleasure Deepthi. I’m happy to read that.
I used idli rava instead of rice and my husband loved them. Very soft. But I’m wondering are there benefits to using idli rice or rava vs raw rice like basmati or sona
Thanks Gauri. Yes certainly idli rava is made from parboiled rice and idli rice itself is parboiled rice, which is lower in carbs compared to raw rice like sona or basmati (not sella). If you want to eat healthier idlis don’t use raw rice use parboiled like idli rice or rava. Also these have higher amount of other nutrients like fiber etc. When you use raw rice you may also see a thin dry layer on top of your idlis due to excess starch. Hope this helps
Following your recipe I made the softest and best tasting idlis. Everyone loved it. Alongside, sambar also turned out yummy with your recipe.
Thank you so much.
Welcome! So glad to know you got the softest idlis Shreya. Thanks for letting me know
Amazing details Swasthi! I finally nailed making cotton soft and spongy idlis using your recipe. Turns out perfect during all seasons. Too much poha never keeps my batter good for longer especially on warmer days. Using both methi and poha helps in a good rise and longer shelf life. Thank you
Happy to know the recipe works well for you Kiranmayee. Thank you for sharing back your experience. Yes too much poha can make the batter sour too soon. Glad you figured out what works for you.
Hi Swasthi,
When you talk pf using steaming mode on IP and venting, Im guessing you are using the original IP lid with the silicon gasket…did I understand correctly?
Hi Pat,
Yes you are correct.
Hi Swasthi, I didn’t follow one point. When you say, 1 cup+ 2 tbsp rava, what do you mean? 1 cup of rice + 2 tbsps of rava or 1 cup rava + additional 2 tbsps of rava? Thank you!
Hi Usha,
It is the total amount of rava (1 cup + 2 tbsps). While washing rava, some of it gets washed off and probably we may lose that amount. So I add that extra 2 tbsps.
Hi Swasthi
Followed your recipe to a T. The softest idlis ever. Best Idli recipe ever. Thanks so much.
So glad to know Lata. Thank you for letting me know how they turned out for you
I love idli, but never thought I would be able to make them. This recipe is so descriptive yet easy to follow. The first time I made them, I made perfect little idli. Thank you, Swasthi! I couldn’t have done it without you.
Welcome Allendria. Thank you so much for letting me know how it went for you.
Love your recipes and finally I started to make idli with 1:2 for lower carb and higher protein. Thanks for the fermentation tips and they really work.
Glad to know Janani.
Hi Swasti! Absolutely love each and every recipe of yours. I can’t even tell you how many compliments I’ve got till date.
But I keep facing problems with idly/dosa batter fermentation.
It just never ferments for me.
I live in Austin Texas, and currently outside temperature is between 20-23 Celsius. Inside the house it is always 20 Celsius.
I kept the batter in the oven with the light on from 12.30 pm, and now it’s almost 12 am.. it still haven’t risen.
Sometimes, I’ve left it over night too.. and next day it doesn’t rise but still has a weird smell to it..
What am I doing right.. or wrong.. please help me. I followed the recipe down to exact measurements too. But the fermentation never happens 🙁 please help.
Hi Sushma,
Thank you for the kind words. Here are some new troubleshooting tips:
1. Santising the kitchen too often with antibacterial sprays especially near the sinks or on the counters etc can delay or infact inhibit the fermentation process in your kitchen. People handling meat and raw eggs do this.
2. Avoid using chlorinated water – to soak as well to grind. Highly purified water (ex: boiled and cooled water) can also inhibit the fermentation.
3. Preheat the oven to 100 F /38 C and switch your oven to light mode for 4 to 5 hours. Place the batter in the center and let ferment overnight or 9 to 12 hrs. TThe light goes off after 5 hrs but it still ferments well by 10 hrs. If your oven can’t heat at such low temperatures 38c, then simply preheat at the lowest temp like 50 or 60 c and wait for 5 to 10 mins before placing the batter inside. This is a tried and tested method that has worked well even when the temperature falls to 14 C.
4. If the batter is too thick or too runny it won’t ferment. It should be thick, yet of pouring consistency.
5. You can also try soaking longer, for 6 to 8 hours.
Hope this helps
Dear Swasthi,
Your idli recipe is a staple in my home and everyone who tasted them love them for the fluffy texture. I’m looking for tried and tested a no rice idli recipe for my in-laws. Can you please help me?
Thank you so much for the kind words Pavithra. You can use the same recipes from this post and replace rice with millets or moong dal for a high-protein idli. Replace poha with fenugreek seeds. Hope you get to try
Excellent recipes. I made the 1:3 recipe and my idlis were very good. Going to try the other one too to see if it gives me different results. Thanks Swasthi
Glad to read that Poonam. Thank you so much for your time.
It was very good 👍 👍 explanation
My idlis never come rt..it’s either the weather or proportion. Tried your idli recipe and it was extremely soft.
Thanks so much
Glad to know the recipe worked for you. Thanks Sabitha
I’ve been researching on the nutritional values of idli. I love this recipe because it seems to be more nutrient packed with higher amount of protein and lower rice. But how can each idli be 13 g of carb when it is using lesser rice? Please advice
Thanks Malini. Actually the nutritional values can change depending on the size of your idlis. Mine are extra large so the calculation shows higher nutrition values. But you should be able to make 20 to 24 idlis if you are using medium size plates. In that case the carbs will cut down. The nutritional values are calculated by a plugin and can be a rough estimate only. Hope this helps.
Which brand of idli cooker did you use for steaming idlis
Hi Padma,
I use a heavy bottom stainless pot with a vent from WMF and also a large steel pressure cooker (without whistle). The plates were bought separately many years ago in India (may be Bangalore). I don’t know the brand. I don’t use a idli cooker that comes as a set with plates. Hope this helps