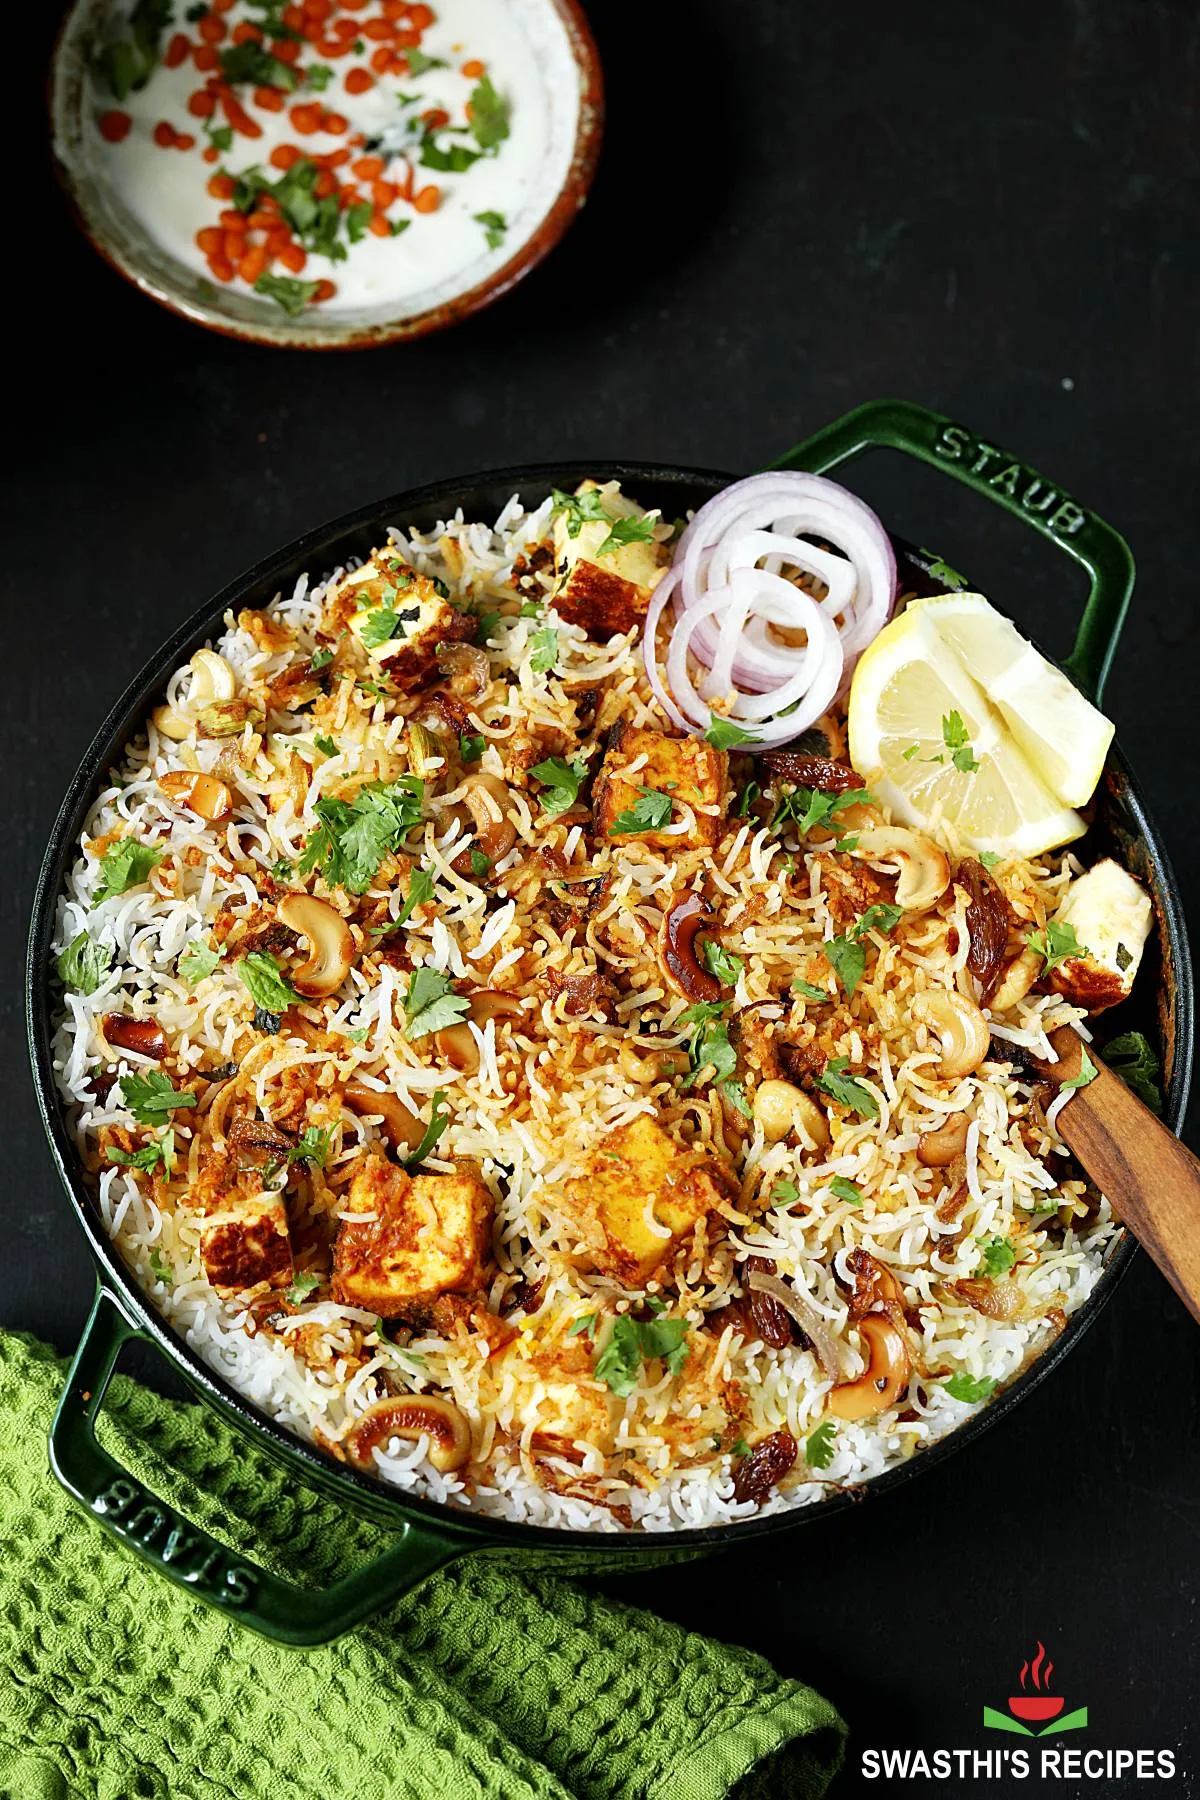
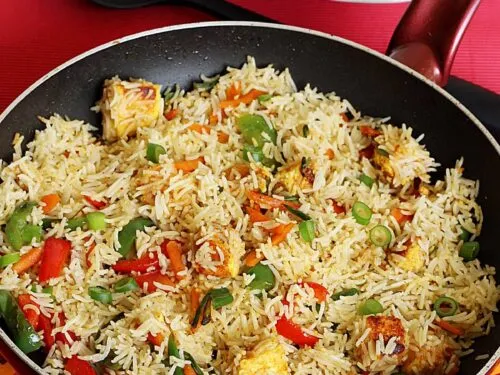
Paneer Biryani Recipe (Restaurant Style)
Updated: July 19, 2023, By Swasthi
Paneer Biryani is a delicious vegetarian layered dish of paneer, dum cooked with spices, herbs and basmati rice. Making this special dum Paneer Biryani is a labor of love and is great to make for special occasions or when the cravings kick-in for a real good vegetarian biryani. Serve this super flavorful Paneer Biryani with a Vegetable Salad or Kachumber, Raita or a biryani Salan.
Biryani needs no introduction and is the most popular dish enjoyed by Indians. Though it is a celebratory dish and is usually made for occasions, with the rise of Biryani corners in every nook & corner of India, it is eaten and enjoyed more often.
Traditionally a Biryani is made with meat and in the recent decades the Vegetable Biryani has been popular among the vegetarian Indians.
About Paneer Biryani
Paneer Biryani got its attention in the recent years and you get to taste the most amazing dish in some of the best biryani places in India. You will be amazed at how delicious a vegetarian Paneer Biryani can taste.
In this post I share the recipe to make a super flavourful and delicious Paneer Biryani. I am sure you will love it for the texture and aroma. You can make a fast paneer biryani in a pressure cooker too but the taste, flavour and texture is completely different.
Sometimes I make that as well by simply marinating and frying the paneer in a pan and then mixing it in the pressure cooked vegetable biryani.
But this layered dum biryani is special and in the true sense it is a celebratory dish. Paneer, cashews, raisins, saffron, yogurt, spices, herbs and basmati rice come together into a lovely classic dish.
It is not a quick recipe so I suggest reserving it for leisure times, weekends and special occasions. You can also prepare a bit the previous day so you can easily finish it the day you plan to serve.
This Paneer Biryani takes lesser time and effort than a vegetable dum biryani because you don’t need to chop, saute or cook the veggies before layering. To cut down the cook time I do not prefer to add any veggies in this recipe.
But if you prefer and like sweeter tones go for green peas. Frozen work well and if you want to use fresh peas, make sure you boil them first until tender and then add them along with the paneer.
If you are a beginner I highly recommend following the detailed step by step instructions instead of the recipe card.
Photo Guide
How to Make Paneer Biryani (Stepwise Photos)
Preparation
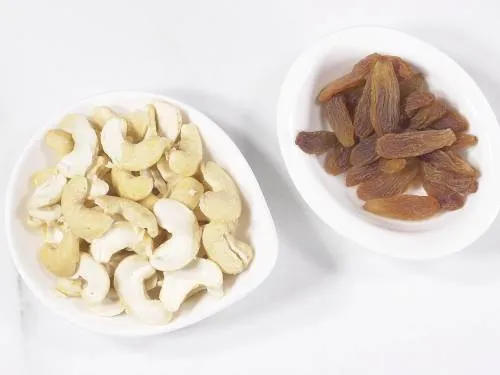
1. I prefer to use 20 to 25 whole cashews (split open later) and 2 to 3 tablespoons sweet raisins for garnish. You may skip them if you want.
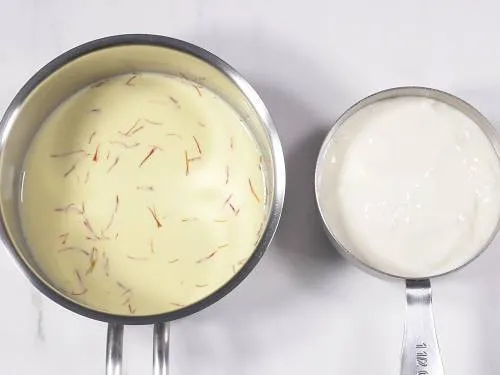
2. Heat ¼ cup milk in cup or sauce pan and add 2 to 3 large pinches of saffron strands. Optionally, also add ½ tbsp. of kewra or rose water to it and keep aside. Whisk 1¼ cup fresh yogurt (not sour) well with a whisk or fork and set aside. (To use Greek yogurt whisk 1 cup Greek yogurt with ¼ cup milk.)
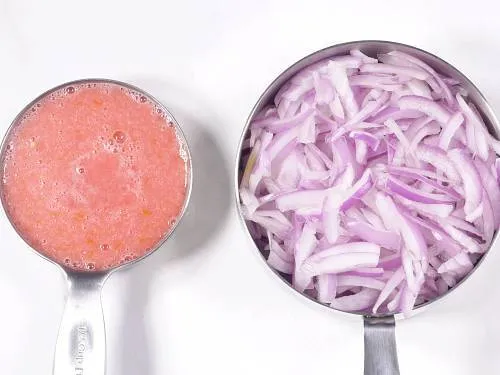
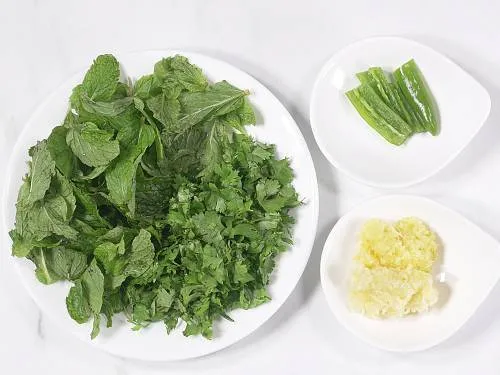
3. Puree ½ cup tomatoes (sweet tomatoes) in a small grinder. Slice 2 cup onions thin and evenly so they fry evenly. I use 1 large onion, slice and then halve the slices so they fry faster. You will slice and then squeeze them gently to separate the layers completely, then measure.
4. Rinse & drain ¾ to 1 cup each of mint leaves and coriander leaves. Chop them later. Slice 1 green chili (optional, deseed if needed) & set aside 1½ tablespoons ginger garlic paste (or gratings).
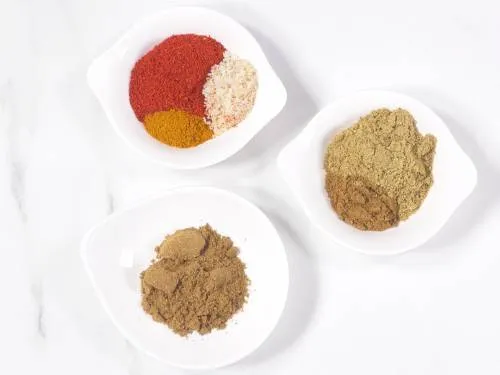
5. You will need the following ground spices:
- 1½ to 2 teaspoon Kashmiri chilli powder (adjust to taste)
- ¼ teaspoon turmeric
- 1 ½ to 2 teaspoons biryani masala or garam masala (adjust to taste)
- 1 tablespoon coriander powder
- 1 teaspoon roasted cumin powder
- ¾ to 1 teaspoon salt (adjust to taste)
6. Rinse 2 cups aged basmati rice well and soak it in water for at least 30 minutes. You can soak up to 50 minutes but not more as the rice can easily break and turn mushy.
Other Preparations
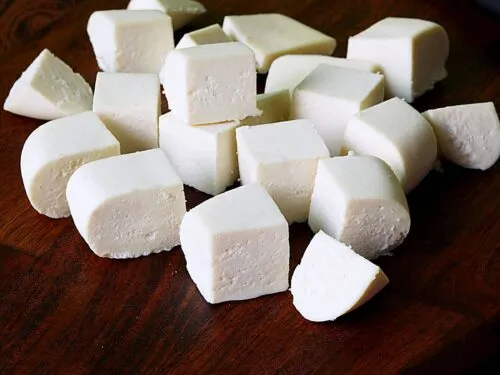
7. Heat 1 tablespoon ghee in a heavy bottom pan. When it is hot enough, place the paneer block/s (250 to 400 grams) gently and fry it on a medium high heat until golden on both the sides, turn it when one side is done. (If you put the paneer in cold ghee or cold pan, it will get stuck, so wait until hot)
If you don’t want to garnish the biryani with fried paneer, you can cut down to 300 grams.

8. Remove to a plate and cool down. Later dice to desired sizes. I dice each block to 10 portions. To garnish I dice to smaller pieces.
9. To the same pan, add cashews and fry until light golden. Stir in the raisins. If you want you may add a tsp of ghee while frying.
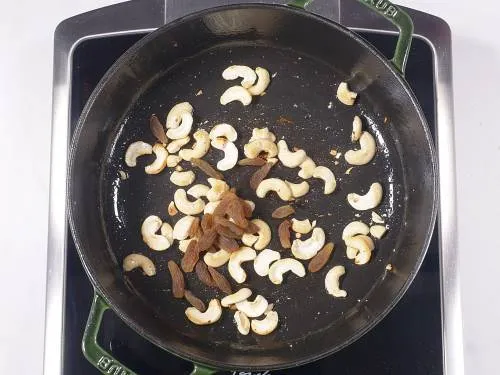
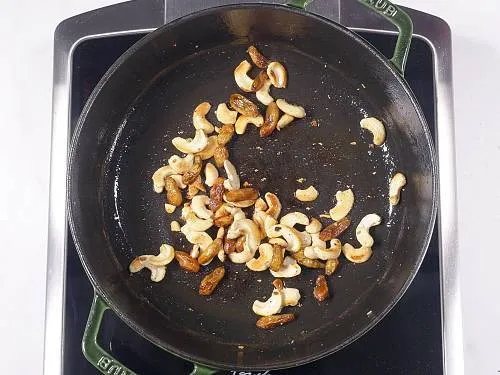
10. Let fry until they turn plump. Remove to a plate and keep aside. I prefer to wipe the pan with some kitchen tissues to prevent burnt bits of nuts or paneer.
11. Pour 4 tablespoons ghee and add the sliced onions. Begin to fry on a medium high heat. Keep stirring often & spread them in the pan. Continue to fry for a few minutes, then reduce the flame as needed to medium or low.
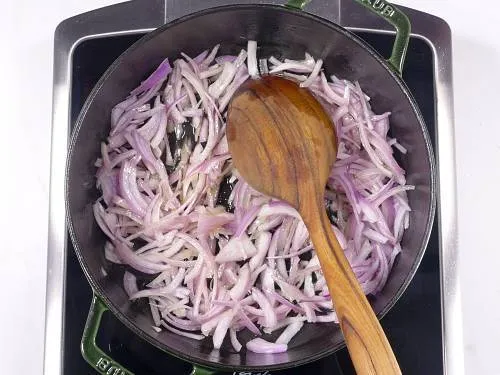
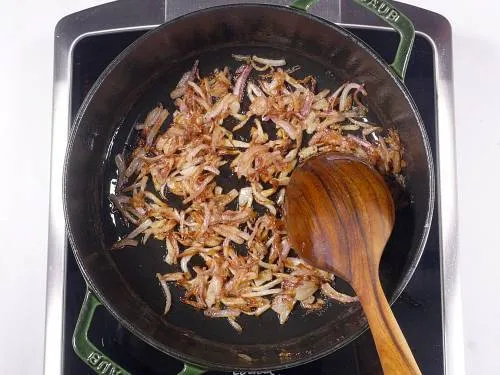
12. After about 8 to 9 minutes, onions begin to caramelize. At this stage turn down the heat to lowest so they don’t burn. If using dutch oven, turn off the heat. Saute until the onions caramelize and turn evenly deep golden. Be very attentive at this stage as they can burn in few seconds. Burnt onions taste bitter. It took me 12 minutes for this entire task, at varying heat levels. Turn the heat to low. Remove 2 tbsps of these fried onions to a plate and set aside.
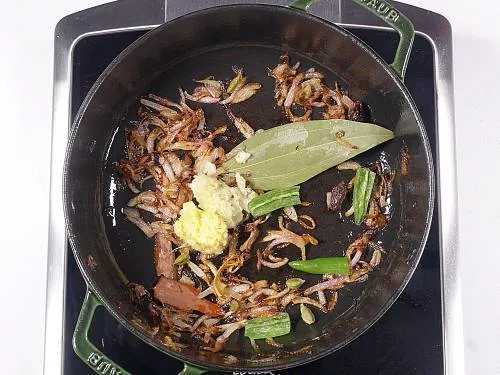
13. Add the following spices
- 1 bay leaf
- 2 star anise
- 6 green cardamoms
- 2 inch cinnamon
- 2 Black cardamoms
- 1 large strand of mace / javitri
14. Quickly sauté 1½ ginger garlic paste & slit green chilli until slightly aromatic. Be cautious as this can burn in a flash.
15. Stir in salt, Biryani/ garam masala, Coriander powder, Cumin powder, Kashmiri red chilli powder & turmeric.
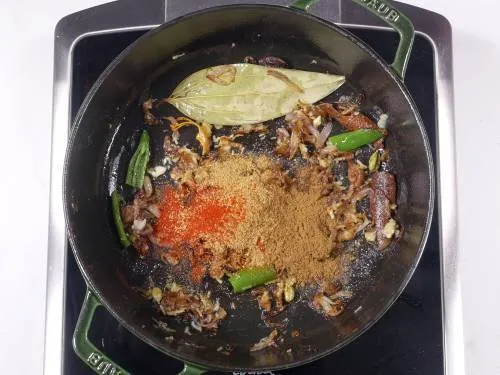
16. Pour the half cup tomato puree.
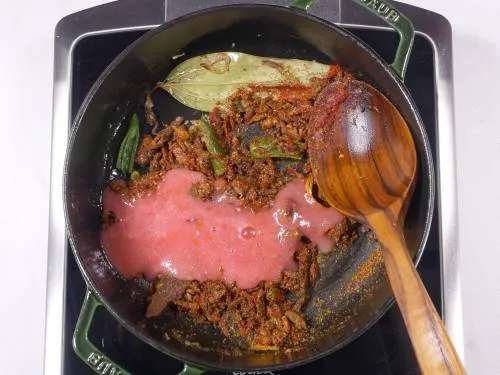
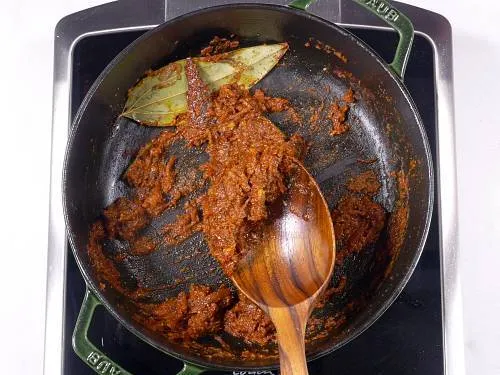
17. Cook until it turns thick & aromatic.
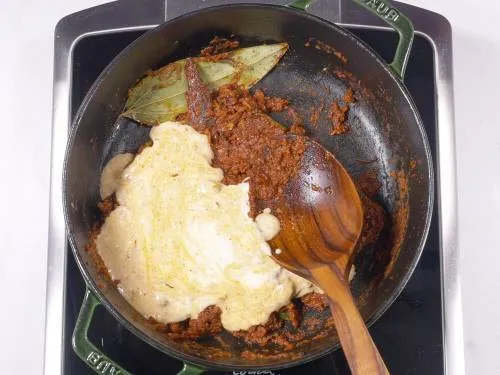
18. Make sure your yogurt is smooth and whisked well. To the yogurt bowl, stir in 2 tbsps of the prepared masala.

19. Turn the heat to low and add the spiced yogurt to the pot.
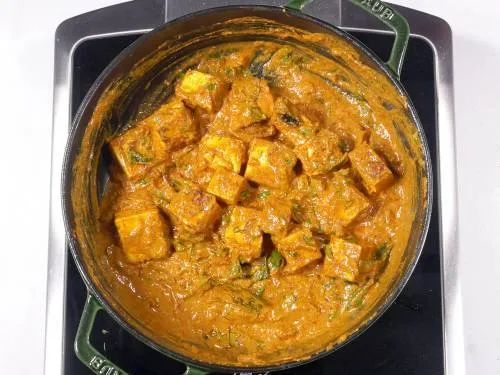
20. Stir well and cook on a low heat until the mixture turns thick and fats begin to separate.
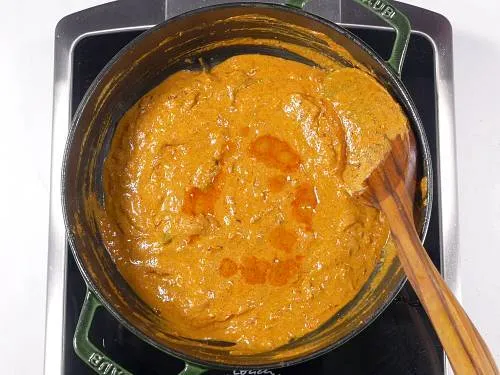
21. Turn off the heat. Pour 3 to 4 tablespoons hot water and stir well. Taste test this and add more salt or garam masala if you want. Add ¾ of the mint leaves, ¾ of the coriander leaves you prepared and ¾ of the fried paneer (save some for kids or garnish if you want). Do not add all 400 grams here. You can add max 300 grams.
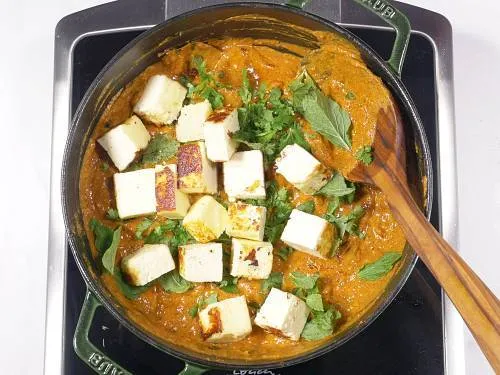
22. Cover and keep aside until the rice is prepared.
Cook Basmati Rice
23. On a high heat, bring 6 cups of water to a rapid boil along with 1 teaspoon salt, 1 teaspoon oil & 1 tablespoon lemon juice. If you want you can add any whole spices like shahi jeera, star anise, bay leaf, etc. But I didn’t add any here.
24. When the water comes to a rapid boil, drain the water from the rice and add it to the pot of boiling water. Cook on a high heat ensuring the water does not over flow. Cook until the rice is just 95% cooked, meaning al dente. Rice should have a bite to it.
When it is done drain it to a colander & shake off the excess water.
Dum cook Paneer Biryani
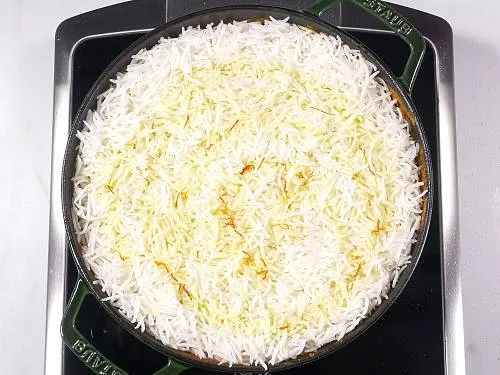
25. Before you layer the rice over the paneer masala, make sure your gravy and the rice both are hot and not warm or cold. If the gravy is cold, heat it until hot and turn off. Also make sure the gravy is slightly runny else it will burn. (read my pro tips section below)
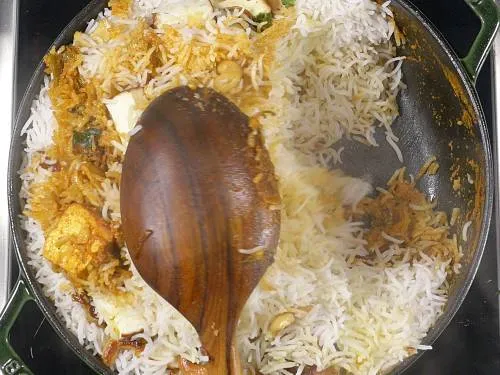
26. Layer the rice over the gravy & pour saffron milk all over evenly.
27. Sprinkle rest of the mint leaves, coriander leaves, ¼ teaspoon biryani masala (optional), 1 tablespoon ghee, fried cashews and raisins.
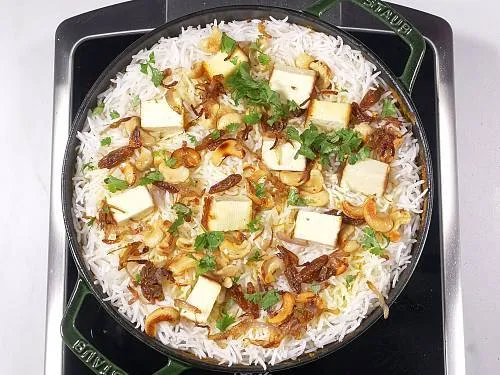
28. Seal the pot with a foil or moist cloth so the steam does not escape. Cover with a heavy lid. Cook this for 2 to 3 mins on a medium heat until the pot is hot, while you heat a griddle or tawa on another burner on a high heat.
29. After 2 to 3 mins, place your pot over the griddle and reduce the heat to low. Dum cook this way for 15 mins. Turn off and rest for another 20 mins. If you put it on direct flame biryani can easily burn.
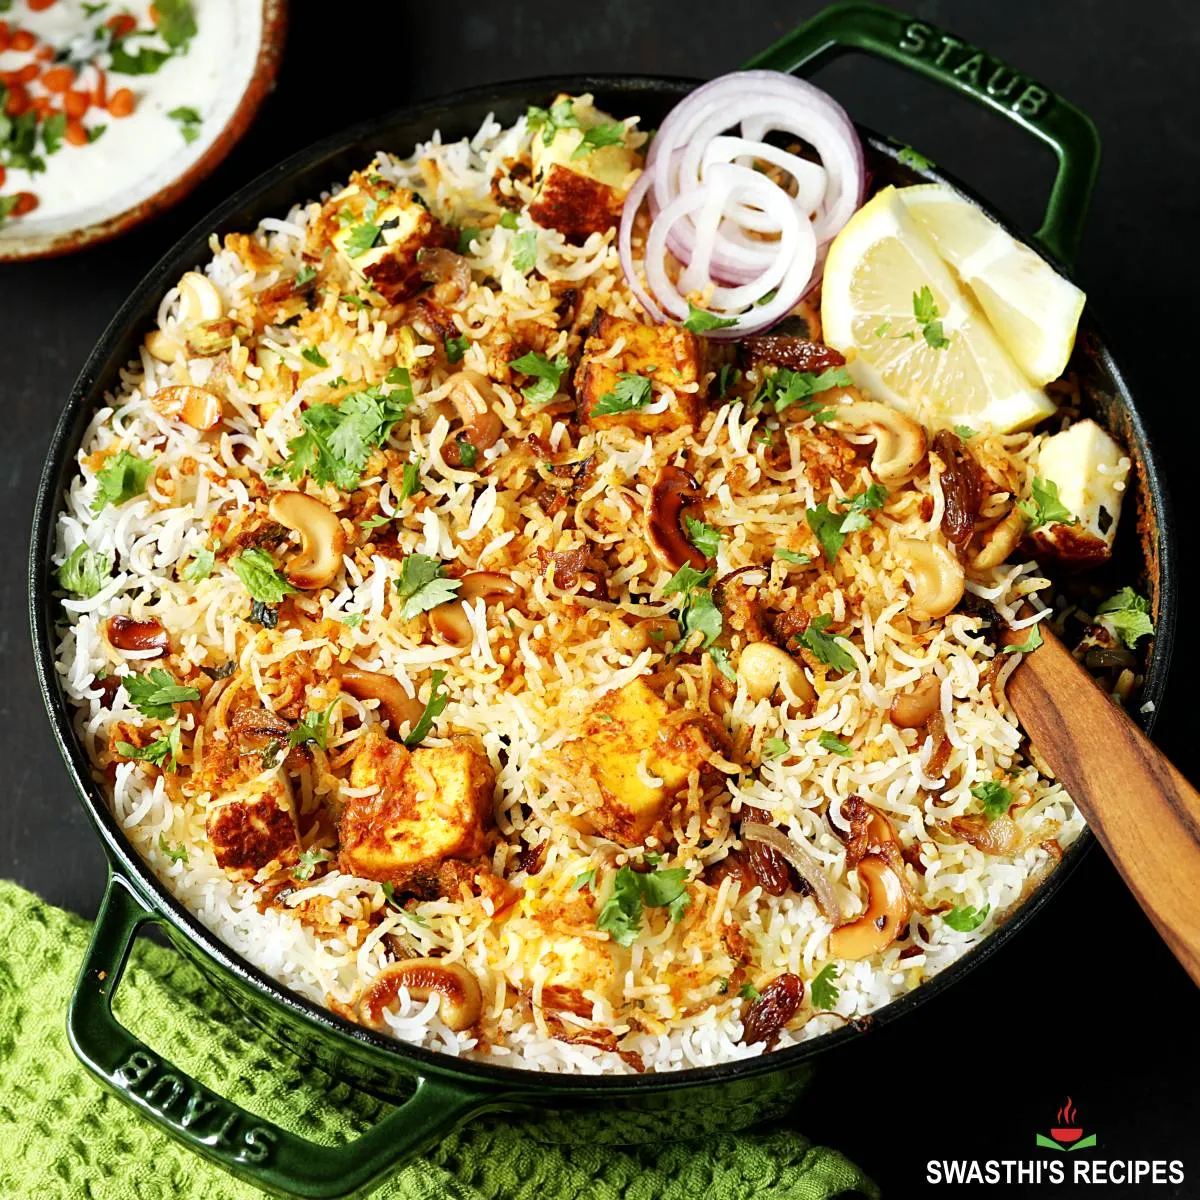
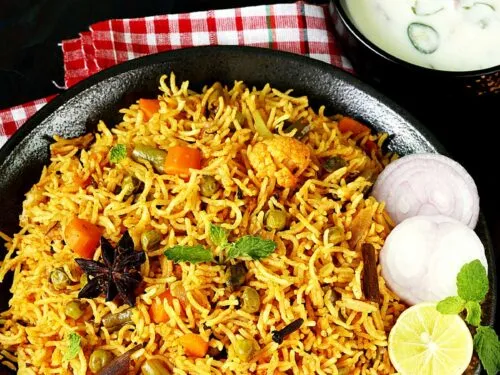
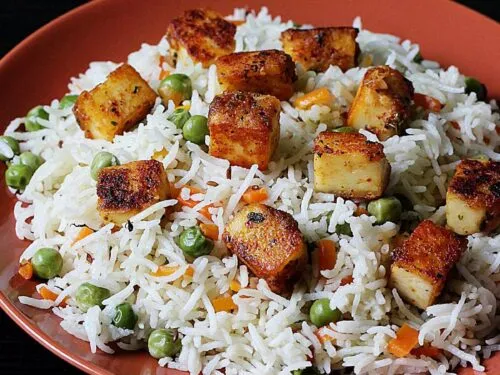
30. Serve Paneer Biryani in layers such that every serving gets a part of the bottom layer paneer masala, the middle layer basmati rice and top the layer garnishes.
Papads, raita, veggie salad or salan goes well with this. Even plain yogurt will do.
Related Recipes


Recipe Card

Paneer Biryani Recipe (Restaurant Style)
For best results follow the step-by-step photos above the recipe card
Ingredients (US cup = 240ml )
To cook rice
- 2 cups (400 Grams) aged basmati rice
- 1½ to 2 teaspoons salt (for cooking rice)
- 1 tablespoon oil (for cooking rice)
- 1 tablespoon lemon juice
Whole Spices (substitute with ⅓ teaspoon garam masala)
- 1 to 2 bay leaf
- 2 star anise
- 6 green cardamoms
- 2 inch cinnamon piece
- 2 black cardamoms
- 1 strand mace
To make gravy
- 250 to 400 grams (0.5 to 0.8 pounds) paneer block/s (divided, read notes)
- 6 tablespoons ghee (or oil, divided)
- 2 cup onions sliced thinly (180 grams, 2 medium)
- 1 to 2 green chilli slit (optional, deseeded if needed)
- 1½ tablespoon ginger garlic paste or grated
- ½ cup pureed tomatoes (¾ cup chopped, 1 medium tomato)
- 1½ to 2 teaspoon Kashmiri chilli powder (adjust to taste)
- 1 ½ to 2 teaspoons biryani masala or garam masala
- 1 tablespoon coriander powder
- 1 teaspoon roasted cumin powder
- ¼ teaspoon turmeric
- ¾ teaspoon salt (more to adjust to taste)
- ¾ cup mint leaves (pudina, chopped, divided equally)
- ¾ cup coriander leaves (chopped, divided equally)
- 1¼ cup yogurt (fresh curd, not sour)
- 3 to 4 tablespoons hot water
To garnish
- 20 cashews
- 3 to 4 tablespoons raisins
For saffron milk
- ¼ cup whole milk (full fat)
- 2 to 3 pinches saffron
- 1 teaspoon kewra water or rose water (optional, mixed with saffron milk)
Instructions
Preparation
- Heat milk & soak saffron strands. Stir in the rose water or kewra water.
- Slice onions thin and even. Squeeze them gently to separate the layers completely & measure. Slice green chili & deseed if needed.
- Rinse & drain mint leaves and coriander leaves. Chop and set aside.
- Rinse basmati rice well and soak it in water for at least 30 minutes.
Make Biryani Gravy
- Heat a tablespoon ghee in a heavy bottom pan. When it is hot enough, place the paneer block/s gently and fry it on a medium high heat until golden on both the sides.
- Remove to a plate and cool down completely. Later dice each block to 10 to 12 portions. Keep aside.
- To the same pan, add a tsp of ghee, cashews and fry until light golden. Stir in the raisins & fry until they turn plump. Remove to a plate and keep aside.
- Wipe the pan with some kitchen tissues to remove burnt bits of nuts or paneer.
- Pour the rest of the ghee (reserve a tablespoon for later) and add the sliced onions. Fry on a medium high heat, stirring often & spread them in the pan.
- Continue to fry for a few minutes, regulating the flame from high to medium and then to low, until the onions turn golden brown but not burnt. (Check images in the post)
- Remove 2 tbsps of these fried onions to a plate and set aside.
- Reduce the heat & stir in the whole spices. Saute ginger garlic & green chilli until aromatic.
- Add salt & spices – biryani/ garam masala, Coriander powder, Cumin powder, Kashmiri red chilli powder & turmeric.
- Pour the tomato puree and cook until it turns thick & aromatic.
- Stir in 2 tbsps of the prepared masala with the whisked yogurt.
- Turn the heat to low and pour the spiced yogurt to the pot.
- Stir well and cook on a low heat until the mixture turns thick and traces of oil are seen on top.
- Turn off the heat & stir in hot water.
- Taste test and adjust salt or garam masala if you want. Add ¾ of the prepared mint leaves, ¾ of the coriander leaves and ¾ of the fried paneer (save some for kids or to garnish). Cover and keep aside until the rice is ready.
Cook basmati rice
- On a high heat, bring water to a rapid boil along with salt, oil & lemon juice.
- Drain the water from the soaked rice and add it to the pot of boiling water. Cook on a high heat ensuring the water does not over flow.
- Cook until the rice is just 95% cooked, meaning al dente. Drain it to a colander & shake off gently to get rid of the excess water.
How to Make Paneer Biryani
- Make sure the paneer gravy and the rice both are hot and not warm or cold before you layer the biryani. If the gravy is cold, heat it until hot and turn off. Also make sure the gravy is slightly runny else it will burn.
- Layer the rice over the gravy & pour saffron milk all over evenly.
- Sprinkle rest of the mint leaves, coriander leaves, ghee, fried paneer, cashews and raisins.
- Seal the pot with a foil or moist cloth so the steam does not escape. Cover with a heavy lid. Cook this for 2 to 3 mins on a medium heat until the pot is hot, while you heat a griddle or tawa on another burner on a high heat.
- After 2 to 3 mins, place your pot over the griddle and reduce the heat to low. Dum/steam cook this way for 15 to 18 mins. Turn off and rest for another 20mins.
- Serve Paneer Biryani in layers such that each serving gets a portion of the bottom layer paneer masala, the middle layer basmati rice and top the layer garnishes. Papads, raita, veggie salad or salan goes well with this. Even plain yogurt will do.
Notes
- If you wish not to garnish with paneer, cut down to 300 grams paneer in the recipe. Avoid adding the entire 400 grams into the gravy. Note that the garnished paneer is going to be plain/bland and has no biryani flavor.
- To use Greek yogurt, whisk 1 cup yogurt with ¼ cup milk and use.
Video
Watch Paneer Biryani Video
NUTRITION INFO (estimation only)
© Swasthi’s Recipes
About Swasthi
I’m Swasthi Shreekanth, the recipe developer, food photographer & food writer behind Swasthi’s Recipes. My aim is to help you cook great Indian food with my time-tested recipes. After 2 decades of experience in practical Indian cooking I started this blog to help people cook better & more often at home. Whether you are a novice or an experienced cook I am sure Swasthi’s Recipes will assist you to enhance your cooking skills. More about me
Follow Swasthi’s Recipes
Comments
This is the first recipe I made from this wonderful site and it won’t be the last. Your instructions are so clear and easy to follow and the result is the most delicious dish. 🤤
Hi Swathi – love all of your recipes that I’ve tried so far. I’m planning to try this paneer biryani recipe today or tomorrow. However I want to add some veggies (probs frozen corn carrots and peas). At what point would I add to this recipe and would I need to adjust other ingredients accordingly? Thanks!
Hi Reema,
Thank you! Saute them separately until tender and add along with the paneer. Cut down the amount of paneer slightly else your biryani may turn out dry. You don’t need to adjust any ingredients. If you add a lot of veggies, it can burn at the bottom, so use moderately. Hope you enjoy!
Lovely paneer biryani! I first made this for our wedding anniversary last month and my husband loved it so much that he wants me to make it every week. Thank you Swasthi. Your recipes are such a joy to try and the results are outstanding. Good and keep it up!
Hi,
We made the paneer biriyani. It was easy to make and very delicious. Thank you so much for sharing the recipe.
Any substitute for tomato? Yogurt for instance?
It’s alright to omit tomatoes. But if you want, you may use 1½ cup yogurt instead of 1¼. Make sure your yogurt is not too sour
Superb recipe! My daughters just loved it! Amazing taste!! Thanks Swasthi! 👍
Really easy to make recipe and it turned out to be so tasty that my husband liked it very much
Hi Swasthi.
This really looks like a great recipe – in fact, all of the recipes I’ve tried of yours are wonderful.
I want to make a mixed paneer and veg biryani and I know you have separate recipes for both types but wondered which would be the best recipe to adapt for a paneer and veg mixed biryani? Would this recipe work if I followed it exactly but added some carrots, cauliflower, peas and potatoes to the paneer gravy?
Thanking you in advance
I made this recipe and it’s amazing. Thankyou so much ??
Glad you like it Sakshi. Thank you
Hi Swasthi, I am new to cooking Indian food and I (and my wife) are enjoying your recipes very much! When using green and black cardamon, do you use just the seeds, or use the whole pods and then take them out before serving?
Thanks, Dave
Hi Dave,
Thank you. So glad you are enjoying them. I use the whole pods because it is easy to remove them while serving. If you want you can use ¼ teaspoon ground cardamom along with the other ground spices and leave out the whole green cardamoms. But I don’t suggest that for black. It is best used whole. Hope you both enjoy the dish.
Hello Swasthi,
I tried this paneer biryani and it was fantastic. However I have 2 queries about the process. What kind of tawa do you use for dum? I used my cast iron dosa tawa. Just wondering if this is going to harm my tawa due to dry heat. Can I finish the dish in the oven? If so how long do I bake it? Please advice. TIA
Hello Amrit,
Thanks for trying and glad you like it. I use a lodge cast iron pan. It is a pan I use for roti & parathas too. As you said if you dry heat the pan I think it won’t work for dosas until you season it back. Sometimes I also use a steel pressure pan, that works just as good. I haven’t tested this recipe in the oven but yes it should work.
Hi,
I tried this recipe. It came out yumm.. but i have few queries..
I used homemade paneer so after completion my paneer got burnt from down and got hard. Apart from this, some of the rice grains were literally very hard. Could you please tell me how to improve these to make flawless biryani like yours.
Hi Bharti,
Glad to know!
I think your biryani got burnt. Tawa is used at the bottom to prevent the burn. Next time use a non-stick pan/pot for the biryani and then a heavy bottom tawa. Too much of heat hardens the paneer here. Did the rice cook properly? Did the grains harden after the dum process. If yes it means high heat again. Dum cook it on a low flame and reduce the timing if needed. Hope this helps
Your recipe style is very nice.
Thank you!
Hi Swati…wanted to ask while cooking rice should v add salt…n hw do v knw dat salt is perfect before doing d dum….coz when v put in pressure cooker with water v check water n make it salty right ..so in dis case he it’s done
Hi Rashmi,
Yes you have to add salt to the water in which you cook the rice. I listed it in the ingredients but forgot to mention in the instructions. I will update it.
Thank you swasthi for posting easy and delicious recepies. I make hydrabadi chicken dum biryani using your recipe. And am known for my Biryani. All credit to you. Will surely try this paneer biryani. Thanks a lot.
Hi Shaila,
You are welcome. Glad your biryani turns out good. Thank you so much for the comment!
🙂
Really appreciate the perfect instructions and recipes that turn out so great!
Thank you
Welcome Nisha
Thank you
Dear Ma’am,
Have been following your recipes for quite some time now. First started with the Chicken Biryani recipe, and when that became an instant success, became ambitious and started trying the other Biryani varieties like Veg Biryani, Chicken Hyderabadi Dum Biryani, Awadhhi Biryani and Paneer Biryani respectively. And I must admit each one of them had been a great learning curve and fully successful. For instance, I was pretty tensed while trying the Hyderabadi Dum Biryani because I had no prior dum cooking experience. But I knew you can’t be wrong and hence went ahead with it. On the table when it was first tasted my uncle had his eyes closed and I was eagerly waiting for the first response. And then he opened his eyes and said ‘Super’. My sisters too, who are big cooks in their own way, nodded saying, “Bhai, you have become such a nice cook!” I then heaved a sigh of relief and thanked you wholeheartedly.. For the Awadhhi Biryani recipe, I fell in love with the prep style and later on felt why it is considered as one of the best ever Biryani dishes among all. And all credit to you, ma’am, for that incredibly beautiful recipe. Coming to the Paneer Biryani, recipe let me admit that I got attracted to it by seeing the snaps. It looked so visually enticing that I finally tried it last week. And the result was just out of the world as far as the taste was concerned. Among other dishes I also tried your beautiful recipes for Paneer Butter Masala, Chicken Butter Masala, Chicken Fried Rice and Lemon Chicken respectively. Before I conclude please allow me to share a few delightful incidents regarding my experiments with Chicken Fried Rice, Lemon Chicken and Awadhhi Biryani. As for the first one, I got so accustomed with the recipe that I made a new dish based on it and named it Chicken Egg Prawn Fried Rice! Apart from the eulogies during dinner for Lemon Chicken my sister liked it so very much that she took it as lunch for the next day too! And Awadhhi has become a first choice for us whenever Biryani is made nowadays. Isn’t that fantastic? Don’t have words to thank you. May God bless you, ma’am.
Gonna try your recipe for Chicken Rezala/Korma next week. Please wish me luck.
Regards,
Anindya Basu
Hi Anindya Basu
You are welcome.Very glad to know you. Thanks a lot for trusting my recipes and trying them. Your comment made me very very happy. Thanks again for those wonderful words and wishes. Go ahead and try the chicken korma i am sure you will make it very good. Good luck!!
🙂
Thank you, ma’am. Happy belated Teachers’ Day.
Hi Swasthi, made this recipe for dinner today, Tasty and easy to make recipe. Flavoured paneer cubes tastes great.
Thanks Shaila
Want to try this recipe but have a doubt. In marination ingredients you have mentioned whole spices like green chillies, cardamom, bay leaves, cumin , cinnamon, all these are to be tempered or to be added to marination directly ??
Hi Shaila
They are to be added directly to the marinade so the flavors are absorbed by paneer during marination,.
Thanks much.
Nice dishes
Thank you
Great recipe. Surely i will try this.
Thanks Ayesha
Great recipe, fantastic taste, thank you.
I was able to make as per instructions, except for the “put it on a tawa, and dum it…” part. Please advise.
Many thanks. ?
Hi Manj , You are welcome
You will have to heat a old tawa or a griddle on the stove, when it is hot place the biryani pot on it and cook for 5 mins on a high flame and then for 10 mins on a medium flame. I have updated the recipe card with more details. Thank you